
Last updated: June 2026
Overview
Kepler is GitKraken’s Agentic Development Environment (ADE), a delivery surface that adds task management and Git worktrees around the coding agent you already use. You do not switch agents to use Kepler; you connect the one you already have.
Each connected agent runs as an agent session inside a Task. A Task is the core unit of work in Kepler: it holds work across one or more repos, manages a worktree (a Git worktree per Task per repo), and tracks all changes produced by the session.
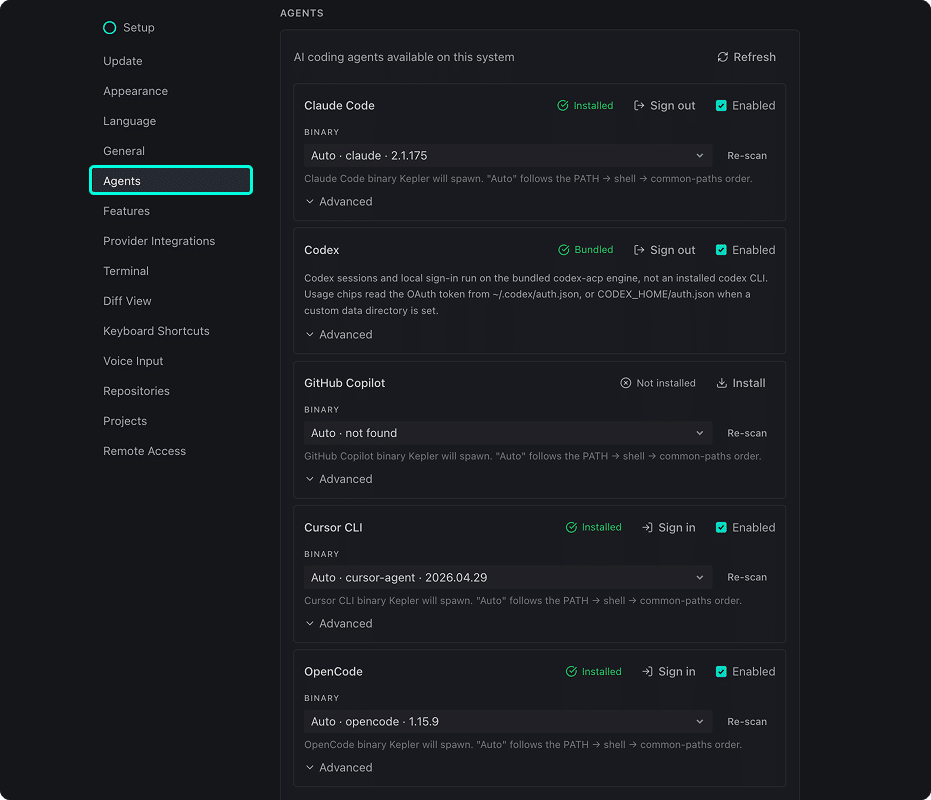
Supported agents
| Agent | Description | Prerequisites | Status |
|---|---|---|---|
| Claude Code | Anthropic’s coding agent | Claude Code installed and configured locally | Supported |
| Codex CLI | OpenAI’s coding agent | Codex CLI installed and configured locally | Supported |
| Copilot CLI | GitHub’s coding agent | Copilot CLI installed and authorized with a GitHub account | Supported |
| Cursor | AI code editor with built-in agent | Cursor installed | Supported |
| OpenCode | Open-source, model-agnostic coding agent | OpenCode installed; API key for your chosen model | Supported |
Claude Code
Claude Code is Anthropic’s coding agent. Kepler launches it as an agent session inside a Task and passes Task context and repo state automatically at session start.
Prerequisites
- Claude Code must be installed on your local machine.
- Claude Code must be authenticated with a valid Anthropic API key or Claude.ai account before connecting to Kepler.
Connect Claude Code to Kepler
- Open Kepler and navigate to Settings.
- Select Agents from the sidebar.
- Under Claude Code, click Connect.
- Kepler detects the Claude Code installation path automatically. If detection fails, enter the path manually.
- Click Save.
How Kepler passes context
When you start a Claude Code agent session inside a Task, Kepler automatically provides:
- The Task description and any attached instructions.
- The repo path and the Task’s dedicated worktree.
- Branch context so the agent commits to the correct branch.
Kepler passes the context automatically — no manual re-description needed.
Verification and troubleshooting
If Claude Code is not connecting as expected, use the following troubleshooting steps.
Claude Code not detected
Verify that the claude binary is on your PATH by running claude --version in a terminal. If it is not found, reinstall Claude Code or enter the binary path manually in Kepler settings.
Authentication errors
Run claude auth in a terminal to confirm your session is active. Re-authenticate if the token has expired, then return to Kepler and reconnect.
Permission errors
Ensure the user running Kepler has read and execute access to the Claude Code binary and to the repo directory.
Codex CLI
Codex CLI is OpenAI’s coding agent. Kepler connects to it as an agent session inside a Task and passes Task context and repo access automatically.
Prerequisites
- Codex CLI must be installed on your local machine.
- Codex CLI must be configured with a valid OpenAI API key.
Connect Codex CLI to Kepler
- Open Kepler and navigate to Settings.
- Select Agents from the sidebar.
- Under Codex CLI, click Connect.
- Kepler detects the Codex CLI installation path automatically. If detection fails, enter the path manually.
- Click Save.
How Kepler passes context
When you start a Codex CLI agent session inside a Task, Kepler passes:
- The Task description and instructions.
- The repo path and the Task’s dedicated worktree.
- Branch context for the session.
Verification and troubleshooting
If Codex CLI is not connecting as expected, use the following troubleshooting steps.
Codex CLI not detected
Run codex --version in a terminal to confirm the binary is on your PATH. If not found, reinstall Codex CLI or enter the binary path manually in Kepler settings.
Authentication errors
Confirm your OPENAI_API_KEY environment variable is set and valid. Re-export the key if it has changed, then reconnect Codex CLI in Kepler settings.
Permission errors
Ensure the user running Kepler has read and execute access to the Codex binary and to the repo directory.
Copilot CLI
Copilot CLI is GitHub’s coding agent. Kepler connects to it as an agent session and passes Task context and repo access at session start.
Prerequisites
- Copilot CLI must be installed on your local machine.
- Copilot CLI must be authorized with a GitHub account that has an active Copilot subscription.
Connect Copilot CLI to Kepler
- Open Kepler and navigate to Settings.
- Select Agents from the sidebar.
- Under Copilot CLI, click Connect.
- Kepler detects the Copilot CLI installation path automatically. If detection fails, enter the path manually.
- Click Save.
Verification and troubleshooting
Copilot CLI not detected
Run gh copilot --version in a terminal to confirm the extension is installed. If not found, install it with gh extension install github/gh-copilot.
Authorization errors
Run gh auth status to confirm your GitHub session is active. Re-authenticate with gh auth login if needed, then reconnect in Kepler settings.
Permission errors
Ensure the user running Kepler has read and execute access to the gh binary and to the repo directory.
Cursor
Cursor is an AI code editor with a built-in coding agent. Kepler connects to Cursor’s agent and runs it as an agent session inside a Task.
Prerequisites
- Cursor must be installed on your local machine.
Connect Cursor to Kepler
- Open Kepler and navigate to Settings.
- Select Agents from the sidebar.
- Under Cursor, click Connect.
- Click Save.
Verification and troubleshooting
If Cursor is not connecting as expected, use the following troubleshooting steps.
Cursor not detected
Confirm Cursor is installed and that the cursor binary is accessible. Enter the binary path manually in Kepler settings if auto-detection fails.
OpenCode
OpenCode is an open-source, model-agnostic coding agent. It runs any model through a unified interface. Use OpenCode when you need a model that Claude Code, Codex CLI, or Copilot CLI do not offer.
Prerequisites
- OpenCode must be installed on your local machine.
- You must have a valid API key for the model you intend to use (for example, Anthropic, OpenAI, or another supported provider).
When to use OpenCode vs. a proprietary agent
Use OpenCode when:
- You want to switch between models without switching agents.
- You are using a model not offered by Claude Code, Codex CLI, or Copilot CLI.
- You want to run a self-hosted or open-weight model.
Use a proprietary agent (Claude Code, Codex CLI, Copilot CLI) when the agent’s fixed model meets your needs and you want first-party support.
Connect OpenCode to Kepler
- Open Kepler and navigate to Settings.
- Select Agents from the sidebar.
- Under OpenCode, click Connect.
- Kepler detects the OpenCode installation path automatically. If detection fails, enter the path manually.
- Select or enter the model you want OpenCode to use.
- Click Save.
Verification and troubleshooting
If OpenCode is not connecting as expected, use the following troubleshooting steps.
OpenCode not detected
Run opencode --version in a terminal to confirm the binary is on your PATH. If not found, reinstall OpenCode or enter the binary path manually in Kepler settings.
API key errors
Confirm the API key for your chosen model is set correctly. OpenCode reads API keys from environment variables. Verify that the relevant variable (for example, ANTHROPIC_API_KEY or OPENAI_API_KEY) is exported in your shell environment, then reconnect in Kepler settings.
Permission errors
Ensure the user running Kepler has read and execute access to the OpenCode binary and to the repo directory.
