
Last updated: June 2026
This page is a reference for every setting in Kepler, organized by section. It also includes a complete keyboard shortcut reference.
Update
The Update section shows the currently installed version of Kepler and lets you check for newer releases.
- Current version — displays the installed version number (for example, v0.6.2).
- Check for updates — checks for and downloads any available release.
Appearance
The Appearance section controls the visual theme and color mode.
| Setting | What it controls | Default | Options |
|---|---|---|---|
| Theme | The overall UI design language | Base | Base, Observatory |
| Mode | Light or dark color rendering | System | Dark, Light, System |
Terminal
The Terminal section controls the font and spacing used in Kepler’s integrated terminal.
| Setting | What it controls | Default |
|---|---|---|
| Font Family | Comma-separated list of font families; Kepler uses the first one available on your system | Fira Code, JetBrains Mono, Menlo |
| Font Size | Terminal font size in pixels | 13 |
| Line Height | Vertical spacing between lines | 1.2 |
Diff View
The Diff View section sets the default layout for the diff panel.
| Setting | What it controls | Default | Options |
|---|---|---|---|
| Default diff layout | How diffs are displayed when you open the diff panel | Stacked | Stacked, Split |
You can override this per-session using the toggle in the diff panel itself.
Language
The Language section sets the display language for Kepler’s UI.
| Setting | What it controls | Default |
|---|---|---|
| Language | UI display language | English |
Keyboard Shortcuts
Kepler supports the following keyboard shortcuts. Shortcuts shown are for macOS. The Windows/Linux equivalents substitute Ctrl for ⌘ and Alt for ⌥ unless noted.
| Action | Mac | Windows / Linux |
|---|---|---|
| Toggle left sidebar | ⌘ B | Ctrl B |
| Toggle right sidebar | ⌘ ⌥ B | Ctrl Alt B |
| Open settings | ⌘ . | Ctrl . |
| New task | ⌘ ⇧ N | Ctrl Shift N |
| Switch to List view | ⌘ 1 | Ctrl 1 |
| Switch to Kanban view | ⌘ 2 | Ctrl 2 |
| Switch to Console view | ⌘ 3 | Ctrl 3 |
| Switch to tab 1–9 | ⌥ 1–9 | Alt 1–9 |
| Previous tab | ⌘ ⇧ [ | Ctrl Shift [ |
| Next tab | ⌘ ⇧ ] | Ctrl Shift ] |
| Open quick launcher | ⇧ ⌥ T (Global) | Shift Alt T (Global) |
| New window | ⌘ N | Ctrl N |
| Zoom in | ⌘ = | Ctrl = |
| Zoom out | ⌘ – | Ctrl – |
| Reset zoom | ⌘ 0 | Ctrl 0 |
| Close tab | ⌘ W | Ctrl W |
| Toggle terminal | ⌘ J | Ctrl J |
| New tab | ⌘ T | Ctrl T |
| Dismiss / Cancel | Escape | Escape |
General
The General section has settings for default file system locations, the folder picker, and diagnostic logs.
Default Repositories Folder
Sets the default directory where Kepler clones new repositories. Click Browse to pick a different location. The default is your ~/kepler/repositories directory.
Default Worktrees Folder
Sets the default directory for new worktrees. Click Browse to pick a location. The path supports the following placeholders:
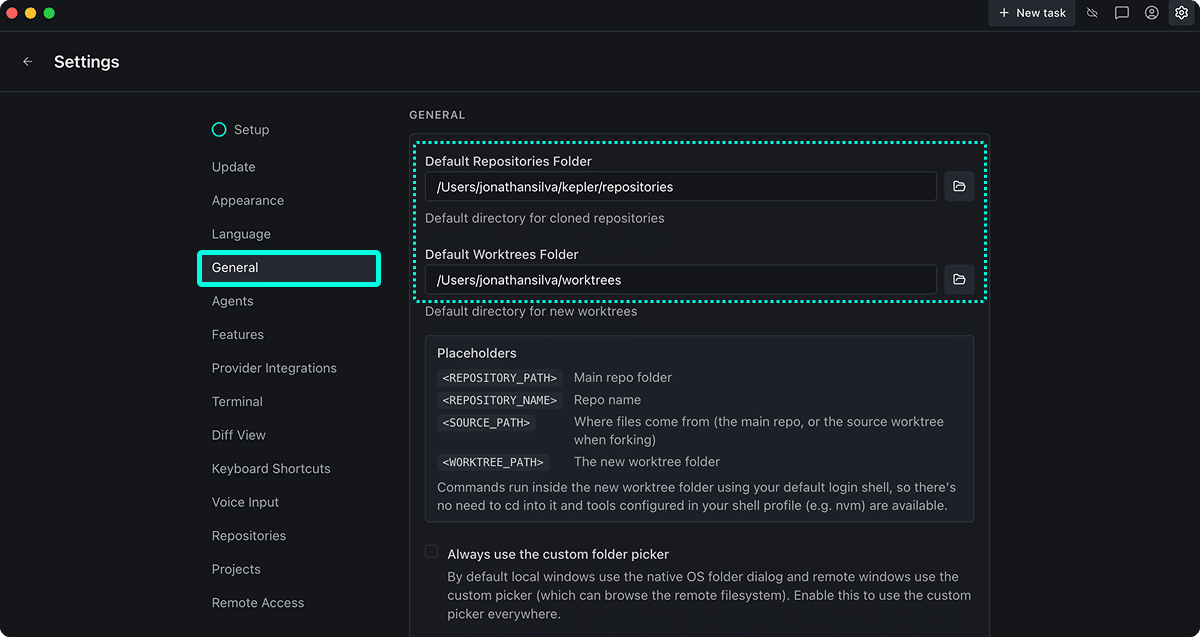
| Placeholder | Meaning |
|---|---|
<REPOSITORY_PATH> |
The main repository folder |
<REPOSITORY_NAME> |
The repository name |
<SOURCE_PATH> |
Where files come from: the main repo, or the source worktree when forking |
<WORKTREE_PATH> |
The new worktree folder |
For example, <REPOSITORY_PATH>/.worktrees/<REPOSITORY_NAME> places each worktree inside the repo it belongs to.
Always use the custom folder picker
By default, local windows use the native OS folder dialog and remote windows use Kepler’s built-in picker. Enable this setting to use Kepler’s custom picker in all windows.
Diagnostics
The Diagnostics section shows the log file path and controls for managing it.
- Log file path — shows the full path to the current log file (for example,
.../Application Support/Kepler/logs/kepler.log). - Reveal — opens the log file location in Finder / Explorer.
- Copy path — copies the log path to your clipboard.
- Clear log — deletes the current log contents.
The log file can grow up to approximately 20 MB. Attach it when filing a bug report.
Voice Input
The Voice Input section controls Kepler’s on-device speech-to-text feature. Kepler transcribes audio locally on your device and never uploads it.
| Setting | What it controls | Default |
|---|---|---|
| Enable voice input | Shows a push-to-talk microphone button in the agent chat prompt | Off |
| Submit after speaking | Automatically sends the prompt when you stop recording instead of inserting the text for review | Off |
| Continuous dictation | Keeps the mic open and transcribes each phrase as you pause, rather than requiring press-and-hold | Off |
Model
Kepler downloads a local speech recognition model to your device.
| Setting | What it controls |
|---|---|
| GPU model variant | Auto-selected based on your GPU (for example, webgpu or q4/q4f16). Click Re-analyze GPU to re-detect. |
| Model size | Controls the accuracy-vs-speed tradeoff. Options: Tiny, Base, Small, Large. Tiny is the fastest and smallest (~100 MB) and is recommended for most setups. |
The Downloaded model row shows the model name, revision, download date, and disk usage. Use Re-download to refresh the model or Delete model to remove it from disk.
Agents
The Agents section lists every AI coding agent Kepler can detect on your system and lets you configure how each one runs. Click Refresh to re-scan for newly installed agents.
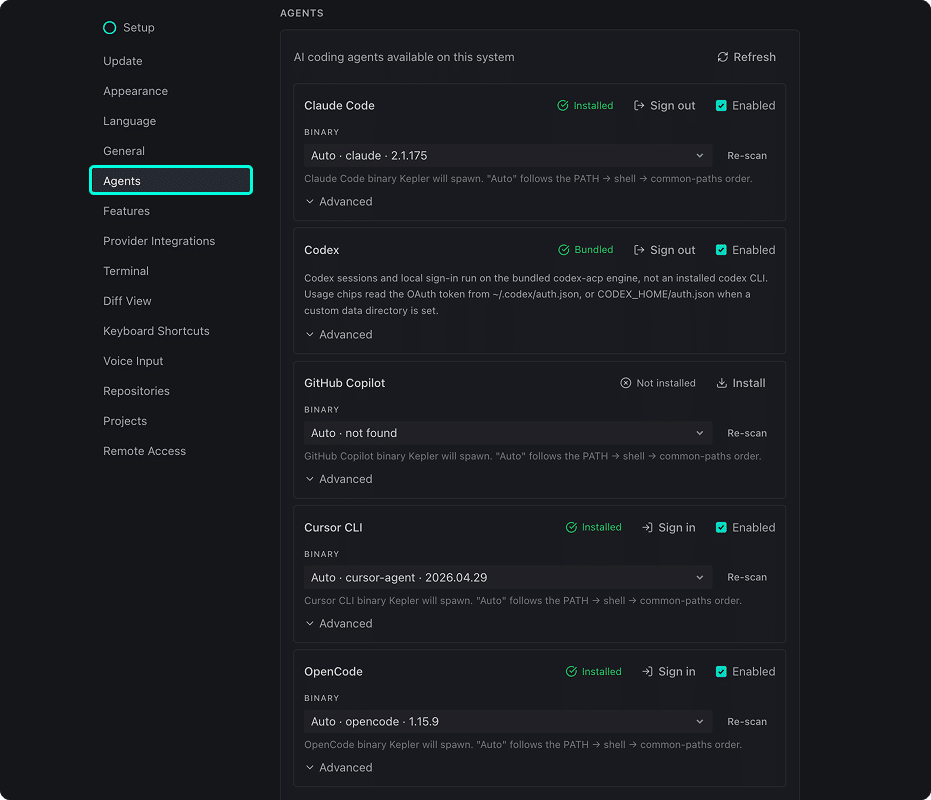
Agent list
Each agent entry shows:
- Name — the agent’s display name.
- Status badge —
Installed,Bundled, orNot installed. - Sign in / Sign out — authenticates the agent with its provider.
- Enabled toggle — activates or deactivates the agent in Kepler.
Binary detection
The BINARY field shows the resolved binary path. The dropdown displays Auto · [version] by default. Click Re-scan to force Kepler to search again.
Auto follows this resolution order: PATH → shell → common install paths.
Advanced
Each agent has an expandable Advanced section with additional configuration options.
Supported agents
| Agent | Default status | Notes |
|---|---|---|
| Claude Code | Installed | Binary auto-detected. Supports the ACP bridge option (see below). |
| Codex | Bundled | Uses Kepler’s bundled codex-acp engine, not an installed CLI. Reads the OAuth token from ~/.codex/auth.json or $CODEX_HOME/auth.json. |
| GitHub Copilot | Not installed | An Install button is shown. |
| Cursor CLI | Installed | Requires sign-in to activate. |
| OpenCode | Installed | Requires sign-in to activate. |
Claude Code options
| Setting | What it controls | Default |
|---|---|---|
| Use ACP bridge for Claude Code | Runs Claude Code through the Agent Client Protocol bridge so Kepler drives sessions directly. Turn off to launch Claude Code in a terminal instead. | On |
| Detect external Claude Code sessions | Adds hooks to ~/.claude/settings.json so Kepler can surface Claude Code sessions started outside the app. |
Off |
GitKraken MCP server
| Setting | What it controls | Default |
|---|---|---|
| Install GitKraken MCP for detected clients | Adds the GitKraken MCP server to every detected MCP client so agents can call provider APIs directly. Reinstalls on app startup; uninstalling is not supported. | On |
Default agent
The Default agent dropdown sets which agent is pre-selected in the Task Launcher. Kepler applies this agent’s default model, mode, and effort when you start a new session.
Show token usage
| Setting | What it controls | Default |
|---|---|---|
| Show token usage | Reads Claude Code and Codex access tokens from disk to call providers’ usage APIs. Provider endpoints are unofficial and may change. Tokens are sent only to their respective provider. | Off |
Features
The Features section has two opt-in experimental capabilities, both off by default.
AI Sync
AI Sync gives agents tools to rebase or merge branches with automatic conflict resolution. Operations are safe and can be rolled back.
To enable AI Sync, toggle it on in the Features section. After you enable AI Sync, agents can rebase or merge the current branch as part of a task without manual intervention.
Compose
Compose gives agents tools to reorganize messy changes into clean, atomic commits. Operations are safe and can be undone.
To enable Compose, toggle it on in the Features section. After you enable Compose, agents can restructure in-progress work into well-scoped commits before pushing.
Projects
A Project groups multiple repositories together so they appear as a unit in Kepler. Use Projects when your work spans several repos, for example a frontend and backend repo you develop in parallel.
Each project in the list shows:
- Name — the project’s display name.
- Repo count — the number of repositories in the project.
- Edit button (pencil icon) — opens the project editor to rename it or add/remove repos.
Click + New project to create a project and add repositories to it.
Repositories
The Repositories section lists every repository Kepler knows about. Each entry shows the repository’s local path and a No commands > row you can click to add custom startup commands that run when you open the repo.
Click + Add repository to register an existing local repository with Kepler.
To remove a repository, open its entry and click Remove.
For details on startup commands and environment setup, see environment-and-setup.md.
Provider Integrations
The Provider Integrations section connects Kepler to your issue trackers and pull-request providers so they appear in the Task Launcher. Click Refresh to re-check connection status.
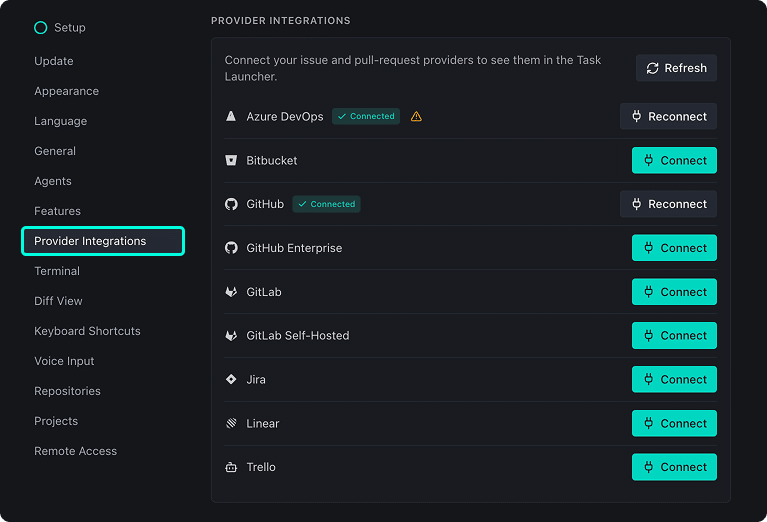
Supported providers:
| Provider |
|---|
| Azure DevOps |
| Bitbucket |
| GitHub |
| GitHub Enterprise |
| GitLab |
| GitLab Self-Managed |
| Jira |
| Linear |
| Trello |
Each provider shows either a Connect button (not yet connected) or a Reconnect button (previously connected).
For per-provider setup instructions, see pull-request-integrations.md and issue-tracker-integrations.md.
Remote Access
The Remote Access section starts a local server that lets you open Kepler from another device on the same network, such as a second computer or phone. This is not SSH or WSL remote development; for those, see remote-environments.md.
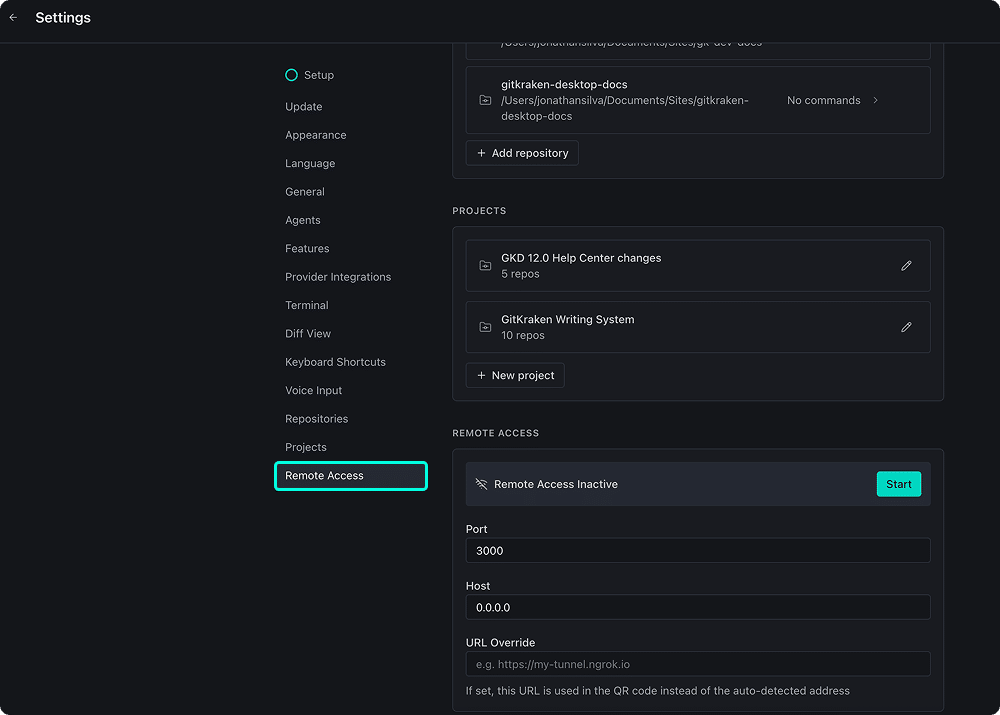
Status and controls
- Status indicator — shows Remote Access Inactive or Remote Access Active.
- Start — activates the local server.
Network settings
| Setting | What it controls | Default |
|---|---|---|
| Port | The port Kepler’s server listens on | 3000 |
| Host | The host address Kepler binds to | 0.0.0.0 |
| URL Override | If set, this URL is used in the QR code instead of the auto-detected local address. Use this when you expose Kepler through a tunnel service (for example, https://my-tunnel.ngrok.io). |
— |
Accessing Kepler remotely
- Start Remote Access from the Settings panel.
- Scan the QR code shown, or copy the URL, and open it on the remote device.
- If the device is on a different network, set a URL Override to a public tunnel address (for example, from ngrok) before starting the server.
