
Last updated: June 2026
Kepler covers two remote scenarios:
- Run Tasks on a remote machine or WSL environment when you need more compute or a Linux runtime.
- Expose Kepler over the network to access it from another device.
SSH: Run Tasks on a Remote Machine
Use SSH when your local machine doesn’t have enough compute for the work, or when builds are too slow. When a Task runs via SSH, Kepler runs the worktrees and agent sessions on the remote machine. Kepler’s UI remains local.
Prerequisites
- SSH access to the remote machine (key-based or password authentication).
- Kepler installed locally.
Connect a Remote Machine
- Open Kepler and navigate to Settings.
- Click Add Remote Machine.
- Enter the SSH connection details:
- Host: hostname or IP address of the remote machine.
- Port: SSH port. Default:
22. - Username: the SSH user on the remote machine.
- Authentication: select key-based or password authentication.
- Click Test Connection to verify Kepler can reach the machine.
- Click Save.
After you save, the remote machine is available as a target when you create or configure a Task.
What Runs Remotely vs. Locally
| Component | Runs on |
|---|---|
| Tasks | Remote machine |
| Worktrees | Remote machine |
| Agent sessions | Remote machine |
| Kepler UI | Local machine |
Troubleshooting SSH Connections
Connection refused — Confirm the SSH daemon is running on the remote machine and the port is open in the firewall.
Authentication failed — Verify the username and credentials. For key-based auth, confirm the public key is in ~/.ssh/authorized_keys on the remote machine.
Timeout — Check that the remote machine is reachable from your network. If connecting over a VPN, confirm the VPN is active.
For Kepler-specific logs, see the log file path in Settings → General → Diagnostics.
WSL: Run Tasks in Windows Subsystem for Linux
Use WSL when you are on Windows and need a Linux environment for agent sessions or builds. Kepler connects to a WSL environment the same way it connects to a remote machine via SSH.
Prerequisites
- WSL installed on the local Windows machine.
- WSL version 2 recommended.
Connect a WSL Environment
- Open Kepler and navigate to Settings.
- Click Add Remote Machine.
- For Host, enter
localhost(or the WSL instance address). - Configure SSH credentials for the WSL environment as you would for any remote machine.
- Click Test Connection, then Save.
The WSL environment is available as a Task target alongside any other remote machines.
Troubleshooting WSL Connections
WSL not detected — Confirm WSL is installed and at least one distribution is running. Run wsl --list --running in PowerShell to check.
Version conflict — If you experience unexpected behavior, run wsl --set-default-version 2 in PowerShell to ensure WSL 2 is the default.
SSH connection refused in WSL — The SSH daemon may not be running inside WSL. Start it with sudo service ssh start inside the WSL terminal.
Remote Access: Access Kepler from Another Device
Remote Access is a separate feature from SSH and WSL. Remote Access starts a local server inside Kepler so you can reach the Kepler UI from another device on your network, or from outside your network via a tunnel.
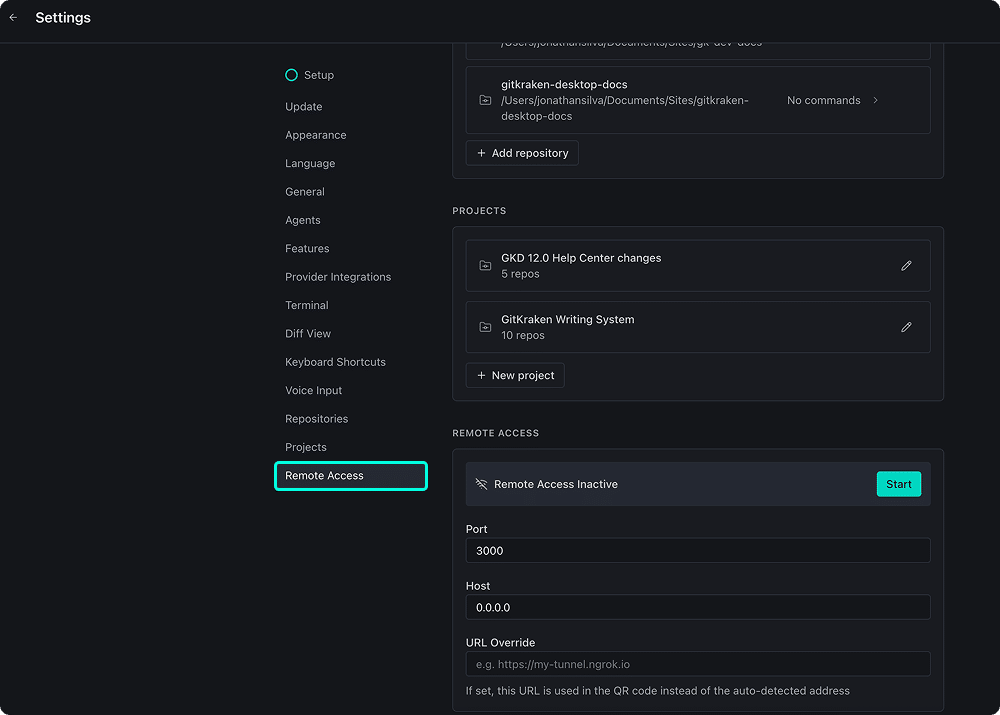
Configure Remote Access
Navigate to Settings → Remote Access to configure the server before starting it.
| Setting | What it controls | Default | Notes |
|---|---|---|---|
| Port | The port Kepler’s server listens on | 3000 |
Change if port 3000 is in use |
| Host | The address the server binds to | 0.0.0.0 |
0.0.0.0 listens on all network interfaces |
| URL Override | The URL used in the QR code instead of the auto-detected address | (none) | Use this when connecting through a tunnel, e.g., https://my-tunnel.ngrok.io |
Start Remote Access
- Open Settings → Remote Access.
- Review the port, host, and URL Override settings.
- Click Start.
Kepler shows Remote Access Active and generates an Access URL with a QR code. The URL includes a bootstrap token (e.g. ?bootstrap=…) that scopes access to this session. Scan the QR code with your phone camera or copy the URL to open Kepler in a browser on another device.
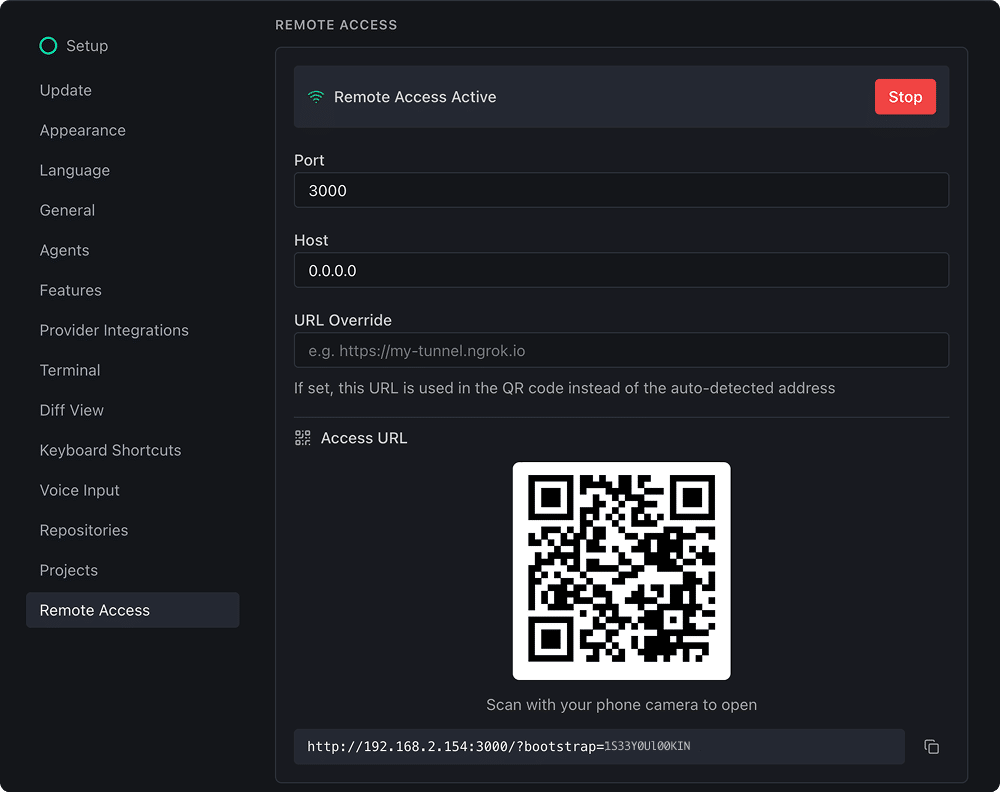
Connect via QR Code
The QR code encodes the access URL based on the auto-detected address, or the URL Override if one is set. Scan the code from any device on the same network to open Kepler in a browser — including your phone. This lets you check Task progress, read agent output, and give direction from wherever you are without sitting at your desk.
Expose Kepler Outside the Local Network with ngrok
To access Kepler from outside your local network — for example, to monitor running Tasks from your phone while away from the office — use a tunneling tool such as ngrok.
- Install ngrok and authenticate it with your ngrok account.
- Start Kepler’s Remote Access server (see above).
- In a terminal, run:
ngrok http 3000Replace
3000with your configured port if you changed the default. - Copy the public URL ngrok generates (for example,
https://abc123.ngrok.io). - In Settings → Remote Access, paste the ngrok URL into the URL Override field.
- Click Start (or Restart if the server is already running).
The QR code now encodes the ngrok URL, and Kepler is accessible from any device with internet access.
Security Considerations
Kepler’s access URL includes a session-scoped bootstrap token, so anyone who connects must use the full URL — guessing the address alone is not enough. That said, anyone with the URL can access your Kepler instance, so treat it like a credential.
To limit who can connect:
- Use Remote Access only on trusted networks, or behind a tunnel that enforces authentication (such as ngrok’s OAuth/IP restriction options).
- Stop the Remote Access server when you are not using it by clicking Stop in Settings → Remote Access.
- If using ngrok or a similar tunnel, use the URL Override field so the QR code reflects the secured tunnel URL rather than the local address.
