
Last updated: June 2025
Features marked with PRO require a trial or paid plan for use on privately hosted repositories.
Features marked with PREVIEW require a GitKraken Account, with access based on your plan level (Community, Pro, etc).
Revision Navigation
Revision Navigation allows you to quickly compare different versions of a file or specific lines.
Available commands:
-
Open Changes with Previous Revision (
gitlens.diffWithPrevious)
Compare the current file or revision with the previous commit. -
Open Changes with Next Revision (
gitlens.diffWithNext)
Compare the current file or revision with the next commit. -
Open Line Changes with Previous Revision (
gitlens.diffLineWithPrevious)
View how a specific line changed compared to the previous commit. -
Open Changes with Working File (
gitlens.diffWithWorking)
Compare the committed version of the file with your working directory. -
Open Line Changes with Working File (
gitlens.diffLineWithWorking)
See the difference between the last committed line and its current version. -
Open Changes with Branch or Tag… (
gitlens.diffWithRevisionFrom)
Compare the file against another revision from a selected reference. -
Open Changes with Revision… (
gitlens.diffWithRevision)
Compare the current file with any revision of the same file.
Current Line Blame
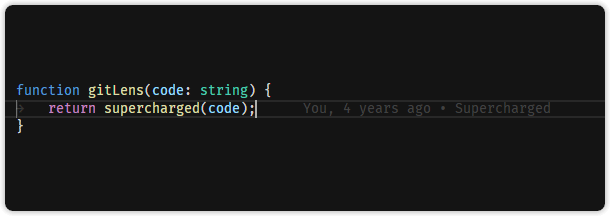
Current Line Blame adds a subtle, customizable, and themable annotation at the end of the active line.
By default, the annotation displays:
- The author of the most recent commit
- The commit date
- The commit message
You can control visibility with the command:
- Toggle Line Blame Annotations (
gitlens.toggleLineBlame)
Git CodeLens
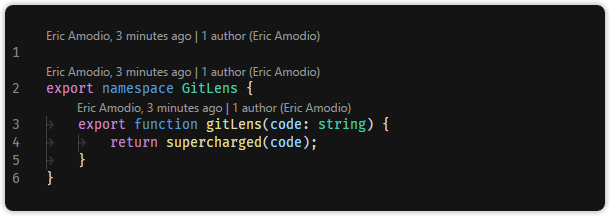
Git CodeLens displays inline Git insights at the top of each file and above code blocks (enabled by default, and customizable).
CodeLens Types
-
Recent Change
Shows the author and date of the most recent commit for the file or block.- Click to open a quick pick menu with commit details and actions (e.g., compare, explore history).
-
Authors
Displays the number of contributors and the most prominent author.- Click to toggle Git blame annotations across the file.
- Automatically hides if there’s only one author (to reduce visual noise).
CodeLens Behavior
Click behavior for each CodeLens is fully customizable. You can choose from:
- Toggle file blame annotations
- Compare the current commit to the previous one
- Show file or commit detail menus
- View commit history for the file or branch
Related Command
- Toggle Git CodeLens (
gitlens.toggleCodeLens)
Shortcut:Shift+Alt+B
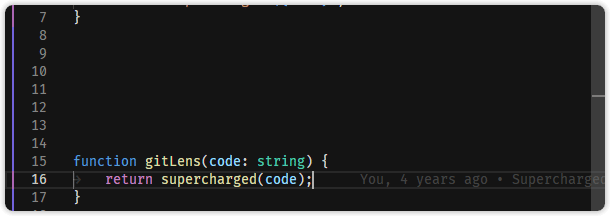
Status Bar Blame
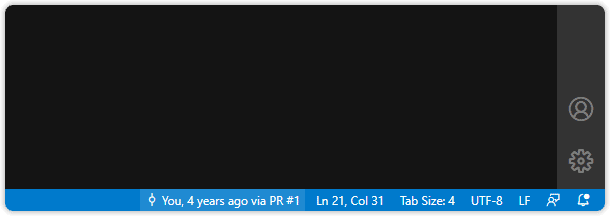
The Status Bar Blame displays Git blame details for the current line directly in the VS Code status bar. This feature is enabled by default and fully customizable.
Default Behavior
- Displays the author and date of the last commit affecting the current line.
- Clicking the status bar opens a quick pick menu with commit actions (compare, explore history, etc.).
Customizable Click Behavior
You can configure what happens when the status bar item is clicked:
- Toggle file blame annotations
- Toggle Git CodeLens on and off
- Compare the line’s commit to the previous one
- Compare the line’s commit to the working tree
- Show a quick pick menu with:
- Commit details and actions (default)
- File-level commit details
- Commit history of the current file
- Commit history of the current branch
Hovers
GitLens provides rich, customizable hover annotations to surface Git information directly in your editor. These hovers are enabled by default and support both blame and diff insights.
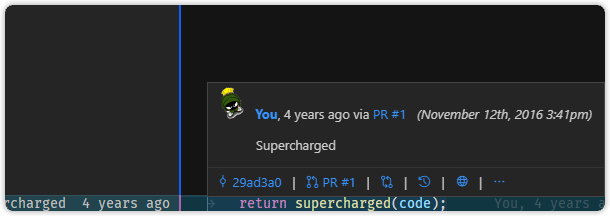
Current Line Hovers
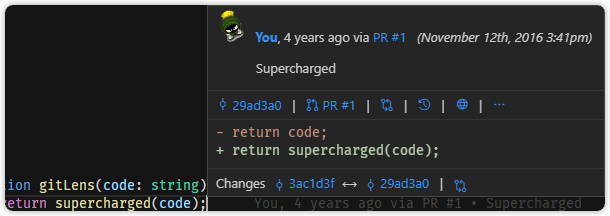
Details Hover
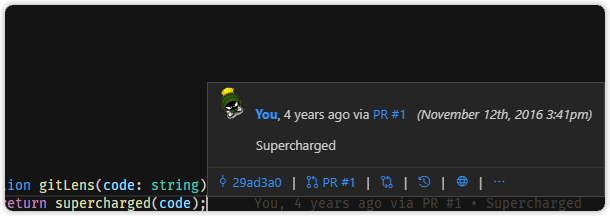
Displays detailed commit information for the current line.
Features:
- Automatic issue linking for Bitbucket, Gerrit, Gitea, GitHub, GitLab, and Azure DevOps.
- Quick-action bar with commands:
Open Changes, Blame Previous Revision, Open on Remote, Invite to Live Share, Show More Actions. - Click the commit SHA to trigger the Show Commit command.
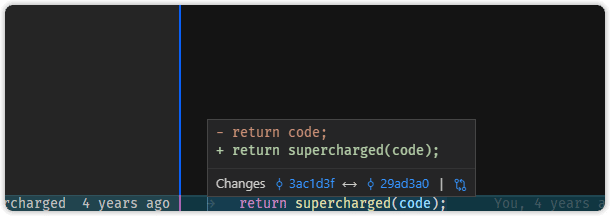
Changes (Diff) Hover
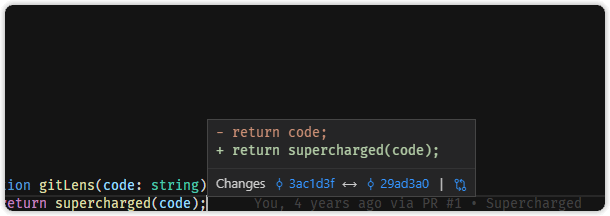
Displays the previous version of the current line.
- Click Changes to run the Open Changes command.
- Click commit SHAs to open Show Commit views.
Annotation Hovers
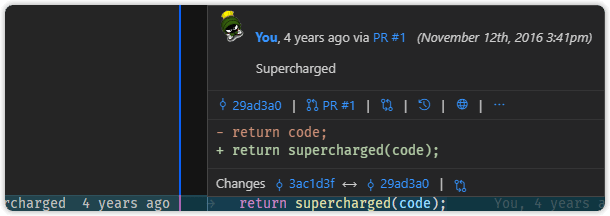
Accessible when blame annotations are active, these hovers provide the same detail and diff options.
Details Hover
Shows rich commit details per line with:
- Automatic issue linking
- Quick-action command bar
- Clickable commit SHA to open commit details
Changes (Diff) Hover
Reveals the previous version of each annotated line.
- Click Changes to run Open Changes.
- Click SHAs to open the Show Commit view.
File Blame
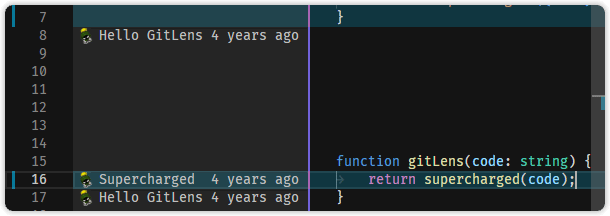
File Blame adds customizable, themable inline annotations that show the commit and author responsible for each line in a file.
Features
- Displays commit message and commit date per line (enabled by default).
- Adds a heatmap (age) indicator along the right edge to show how recently each line was changed.
(See File Heatmap for more info.) -
Easily toggle annotations with:
- Command:
gitlens.toggleFileBlame - Shortcut: Alt+B
- Dismiss: Escape
- Command:
File Changes
The File Changes annotation highlights lines that have been changed either locally (unpublished) or by the most recent commit.
This feature is customizable and themable, and is designed for quick visual inspection of file updates.
Features
- Highlights local changes and recent commit modifications.
- Toggle with the command:
gitlens.toggleFileChanges - Press Escape to disable the annotations
File Heatmap
The File Heatmap adds a color-coded bar to the edge of your file, helping you quickly spot older versus more recent changes.
Features
- Heatmap colors are customizable and reflect line age:
- Hot (bright) for recent changes
- Cold (dim) for older changes
(Lines default to “cold” after 90 days.)
- Brightness adjusts dynamically based on the median age of all changes in the file.
- Toggle with the command:
gitlens.toggleFileHeatmap - Press Escape to hide the heatmap annotations
Code Suggest PREVIEW
GitKraken Code Suggest simplifies code review by enabling you to propose edits across an entire project—not just the lines changed—in GitLens, GitKraken Desktop, or gitkraken.dev.
When a pull request is open, you can make suggestions that collaborators can review and apply directly to the PR.
Note: Code Suggest is currently supported only for repositories hosted on github.com.
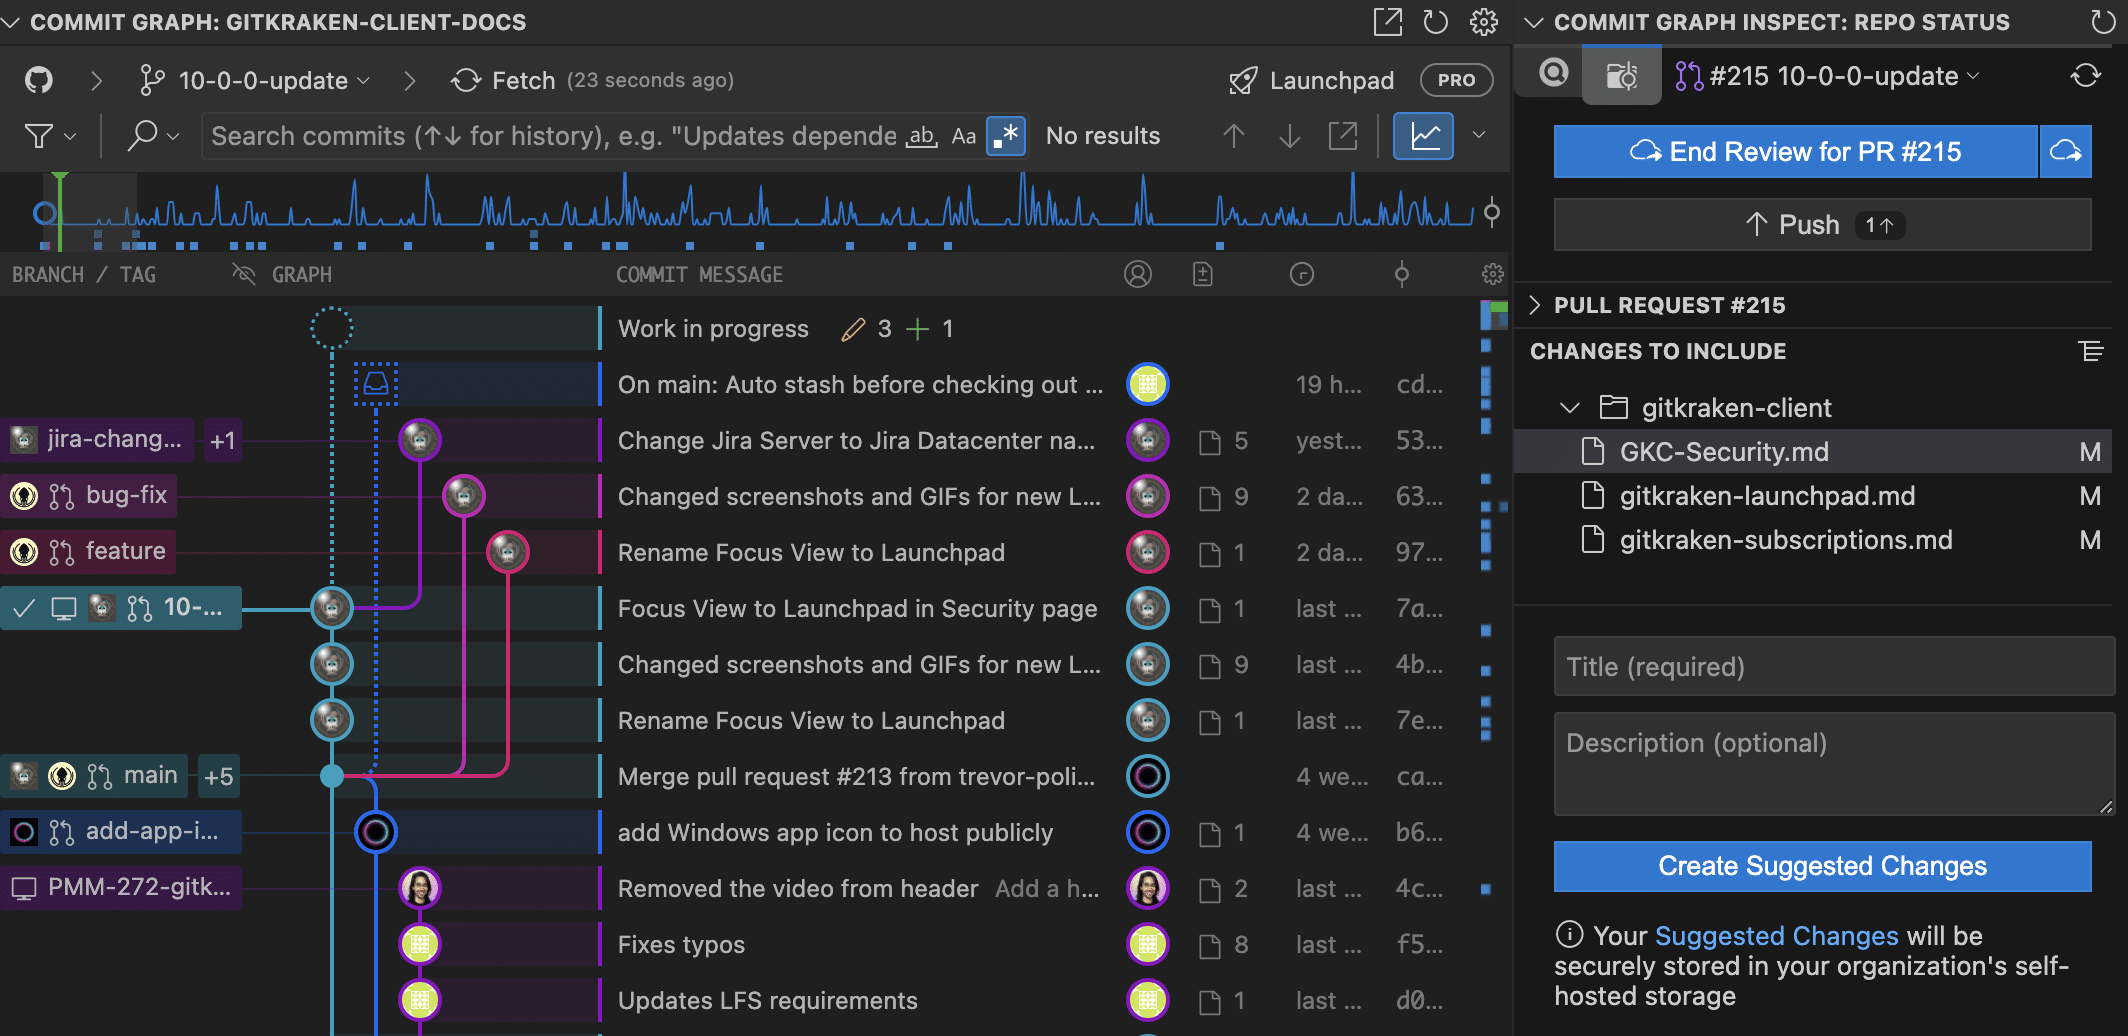
How to Create a Code Suggestion
- Open the GitLens Inspect Overview for the repository.
- Check out a branch that has an open pull request.
- Click Start Review for PR #PR.
- Modify and save any files to include in the suggestion.
- When ready, select Suggest Changes for PR, add a title, and click Create Code Suggestion.
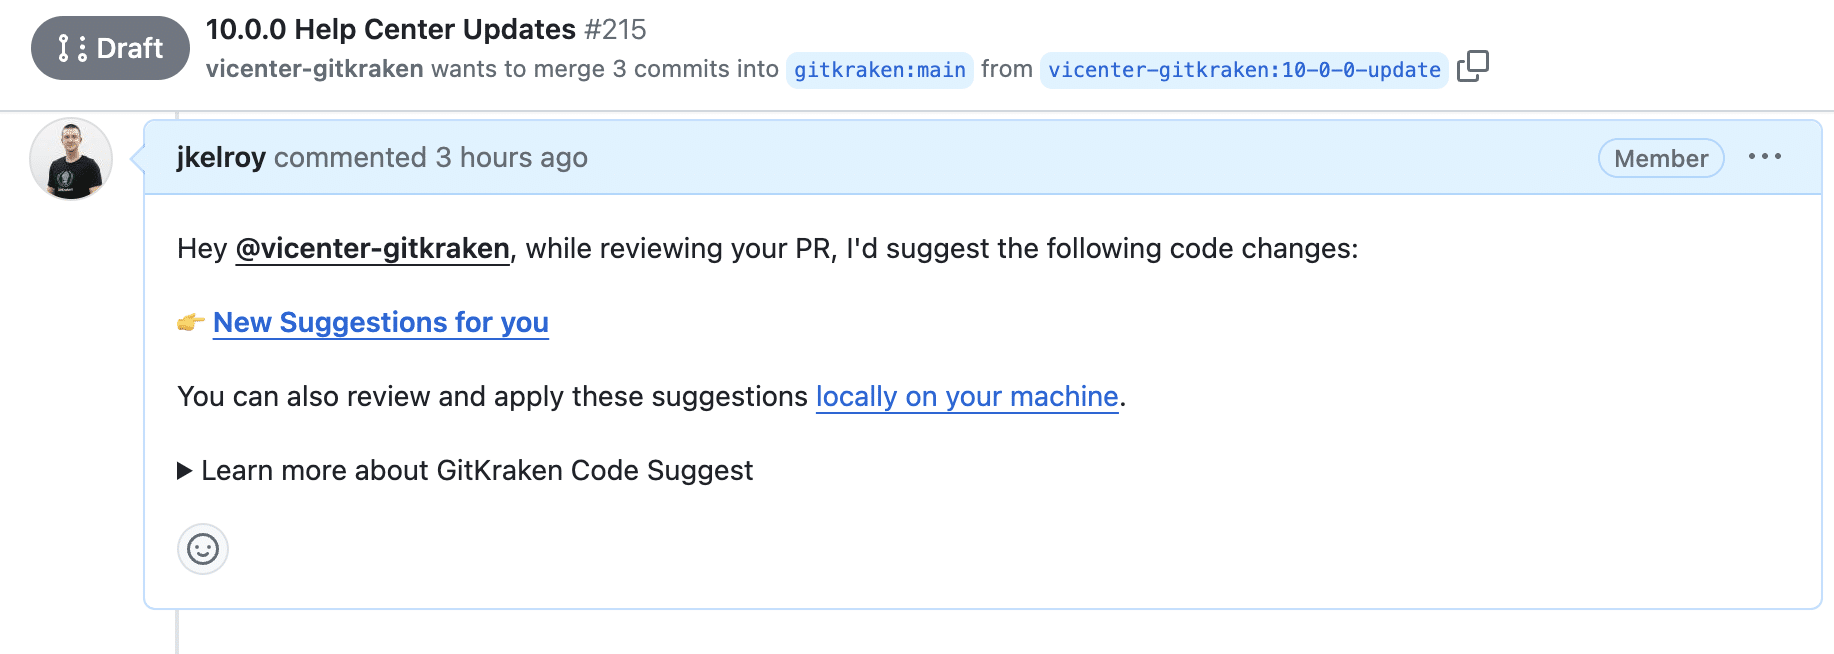
Once submitted, the pull request will receive a comment with two options:
- Code Suggestion for #PR — opens in gitkraken.dev
- Locally on your machine — opens in GitLens or GitKraken Desktop
Accepting a Suggestion Locally
- Open the suggestion in GitLens or GitKraken Desktop.
- Review each modified file.
- Select Apply to apply the patch to your current branch.
Or use the dropdown to Apply to a Branch.
Accepting a Suggestion on gitkraken.dev
- Select Code Suggestion for #PR in the PR comment.
- Review the changes on gitkraken.dev.
- Click Commit Suggestions to commit the patch directly to the PR’s branch.
Cloud Patches PREVIEW
What Are Cloud Patches and Why Use Them?
Cloud Patches are Git patches that GitKraken securely stores for easy sharing across GitLens, GitKraken Desktop, and the GitKraken CLI. The patch is uploaded directly from your machine into secure cloud storage.
This feature enables early collaboration—before a pull request is created—by letting you share in-progress work with your team. It helps streamline feedback cycles and reduce delays in PR reviews.
How to Set Up Cloud Patches
Cloud Patches are enabled by default, but you can manage this per client.
-
Open the Command Palette:
Ctrl/Command+Shift+P→ Preferences: Open User Settings (JSON) -
Add the following line to your settings:
“gitlens.cloudPatches.enabled”: true
To disable Cloud Patches, change the value to false.
How to Work with Cloud Patches
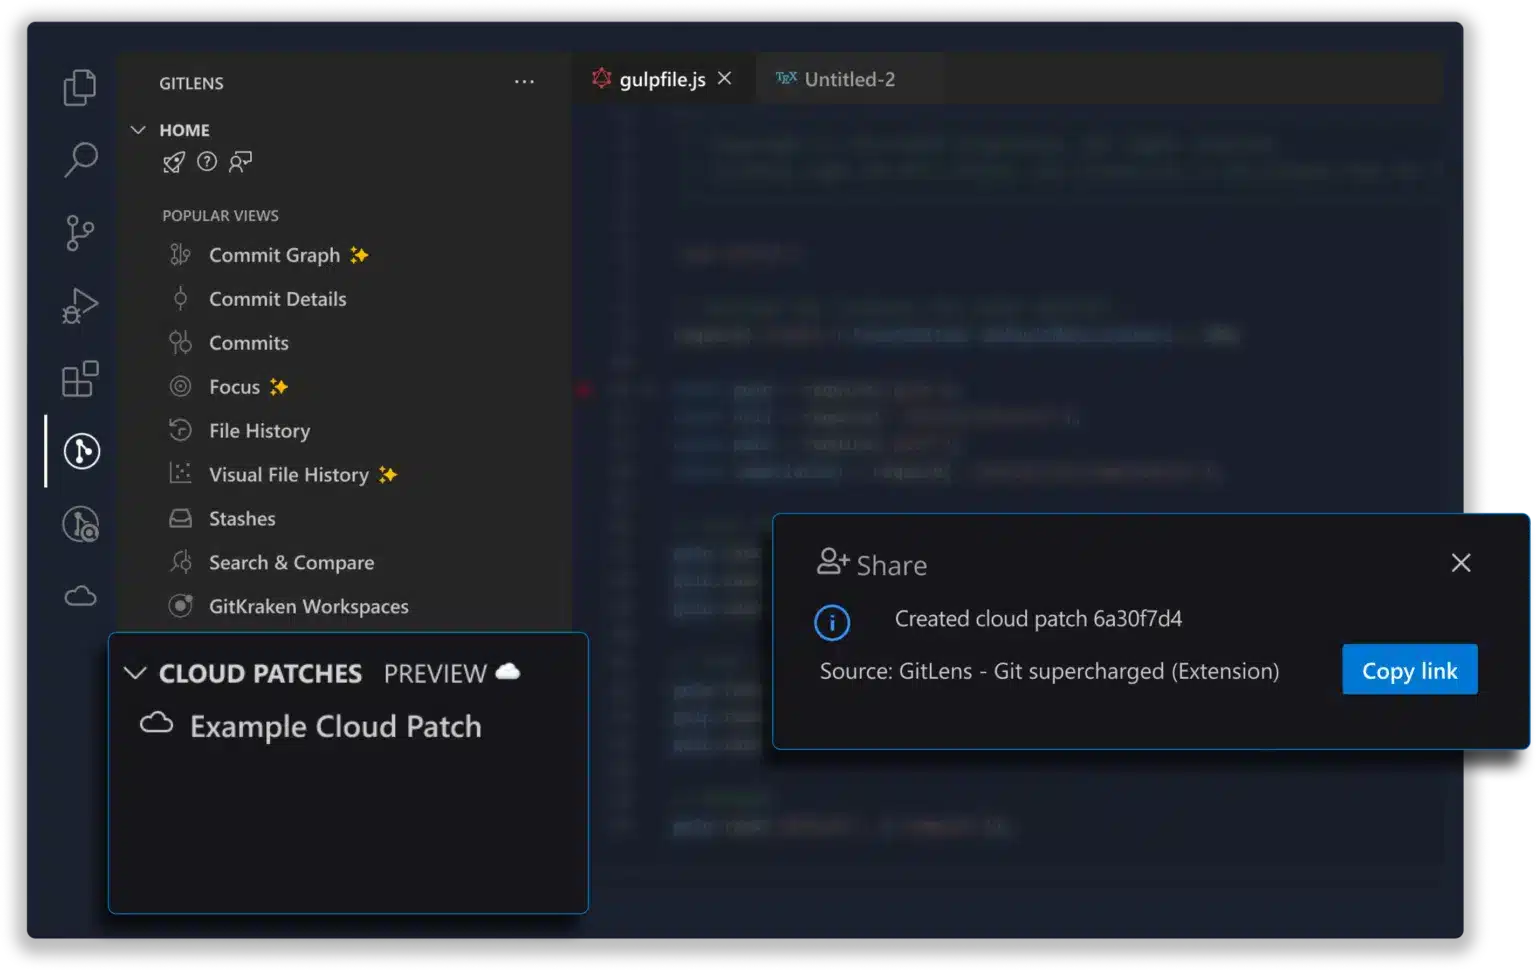
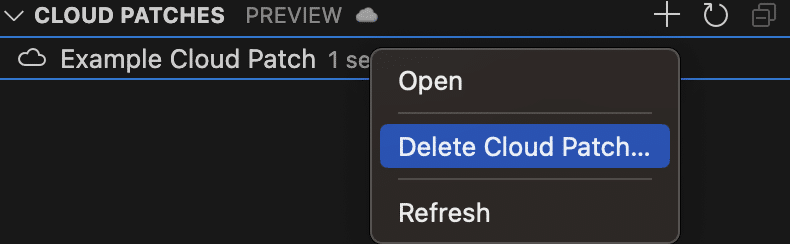
Cloud Patches are accessible from the Cloud Patches view in the GitLens sidebar.
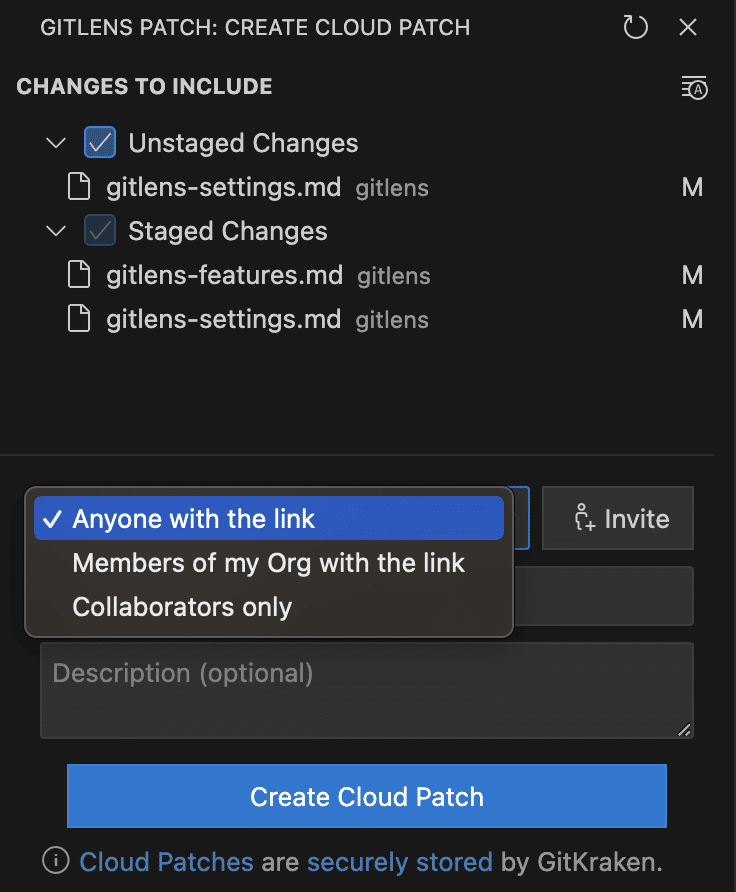
You can create a Cloud Patch from:
- Working Changes
- Commits
- Stashes
- Comparisons
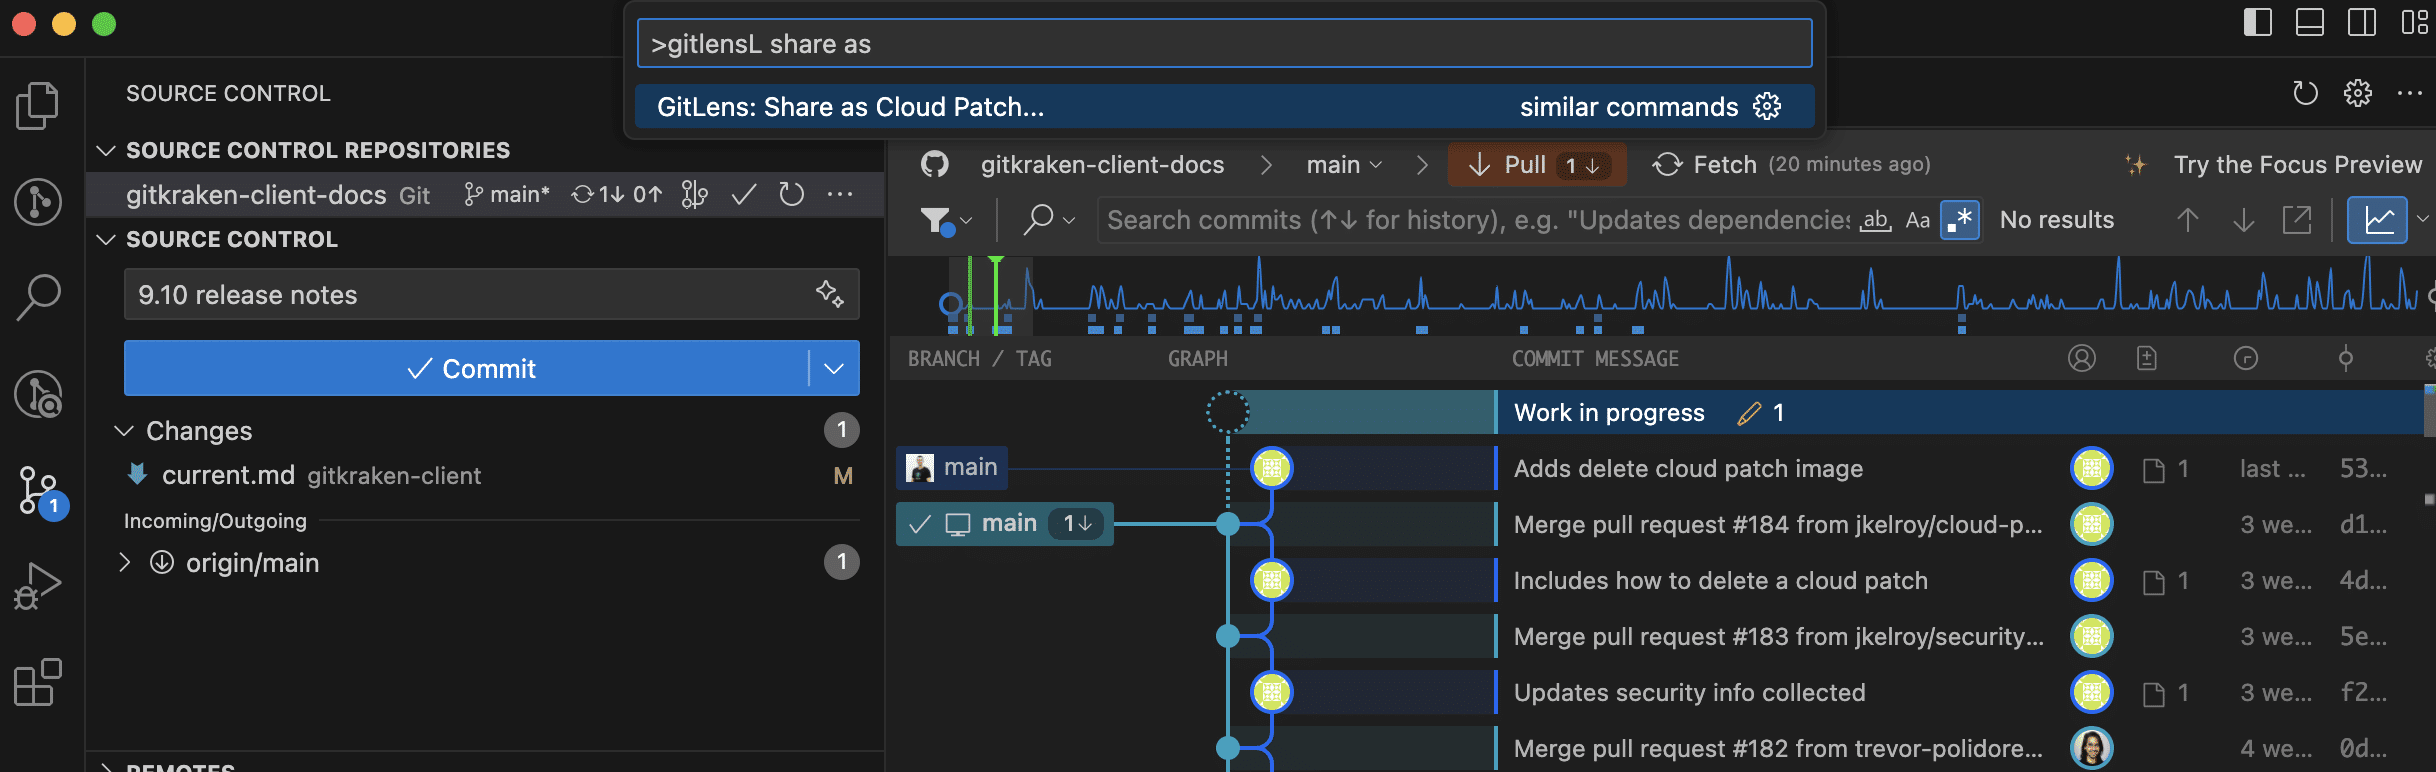
To create one, use Share as Cloud Patch from the command palette or the Share submenu in applicable GitLens views.
Sharing Options
Choose how your patch can be accessed:
- Anyone with the link – Public access without login.
- Anyone in my org – Restricted to users in your GitKraken organization (GitKraken login required).
- Only collaborators – Restricted to selected organization members. Use Invite to choose recipients.
Cloud Patches shared with you appear under the Shared with Me section.
Note: If you’re a member of multiple organizations, you can switch organizations from the GitKraken Account view.
You can also apply Cloud Patches directly from a shared URL. Simply click or paste the link, then follow GitLens prompts to apply it to your working directory or to a new/existing branch.
To delete a Cloud Patch, right-click it and choose Delete Cloud Patch….
Self-Hosting Cloud Patch Data
If you prefer not to store Cloud Patch data on GitKraken servers, you can configure GitLens to use your own AWS S3 storage.
Learn how to configure this in our Self-Hosting Guide.
Commit Graph PRO
The Commit Graph helps visualize your repository’s commit history by displaying branches, commits, and contributors in a unified view. This makes it easier to understand project activity and make informed decisions quickly.

How to Open the Commit Graph
To open the Commit Graph:
-
Open the Command Palette:
Cmd/Ctrl + Shift + P -
Type:
Show Commit Graph
A new tab will open, displaying your current repository’s commit history. You can scroll through the graph and resize column widths for easier viewing.
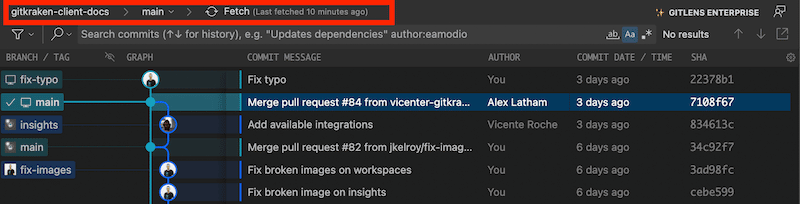
Commit Graph Header
At the top of the graph, you’ll see:
- Repository name
- Checked-out branch
- Last fetched timestamp
From here, you can:
- Click the branch name to switch branches
- Click Fetch to update commit data
Note: The Commit Graph is available to all users on public or local repositories without needing an account.
Private repository access requires a GitLens Pro subscription or trial.
We welcome your input—join the discussion on GitHub.
Configuration and Layout
The Commit Graph offers extensive layout and configuration options so you can tailor the view to fit your workflow.
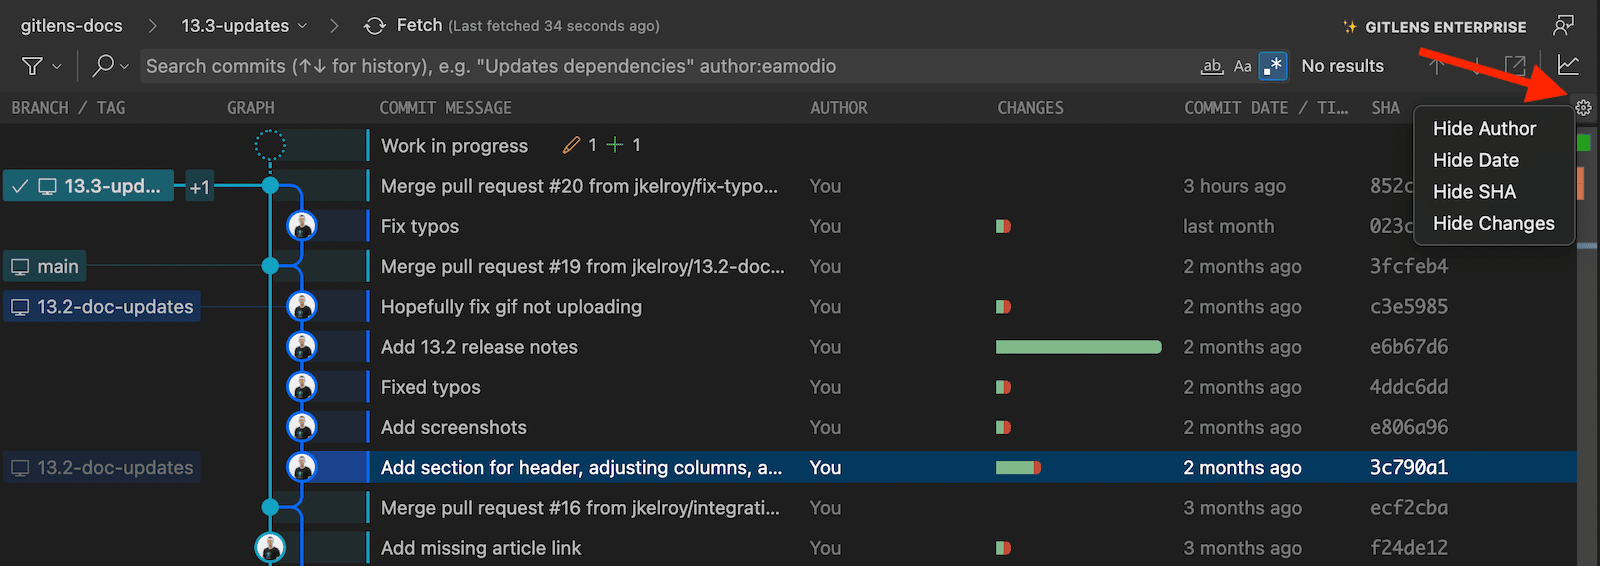
Column Customization
All columns in the Commit Graph are fully customizable:
- Drag and drop column headers to rearrange the layout.
- Right-click a column header to toggle columns on or off.
- The Changes column displays visual indicators for added (green) and deleted (red) lines in each commit.
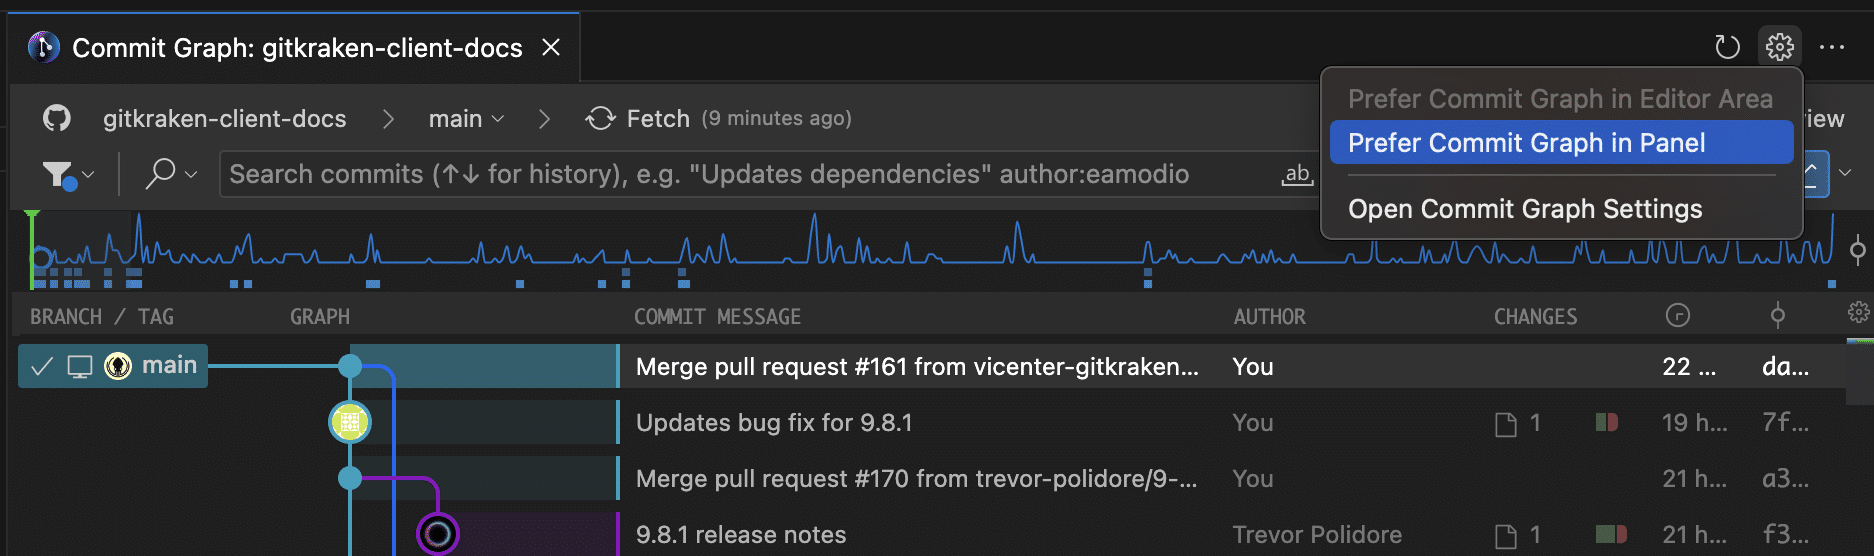
Panel vs. Editor Layout
You can choose where the Commit Graph appears:
- Panel Layout — displays the graph in the bottom panel (next to Terminal) with a dedicated Commit Graph Details view.
- Editor Area Layout — shows the graph in a standard VS Code editor tab.
To switch layouts:
- Click the gear icon in the top-right of the Commit Graph.
- Select Prefer Commit Graph in Panel Layout or Prefer Commit Graph in Editor Area.
You can even open both layouts simultaneously.
Compact Layout
For smaller screens or simplified views:
- Compact Graph Column Layout reduces the visual size of the graph.
- The Author column shows avatars when minimized.
- Columns display icons instead of truncated text when resized to narrow widths.
To enable the compact graph layout, right-click the Graph column header and select Compact Graph Column Layout.
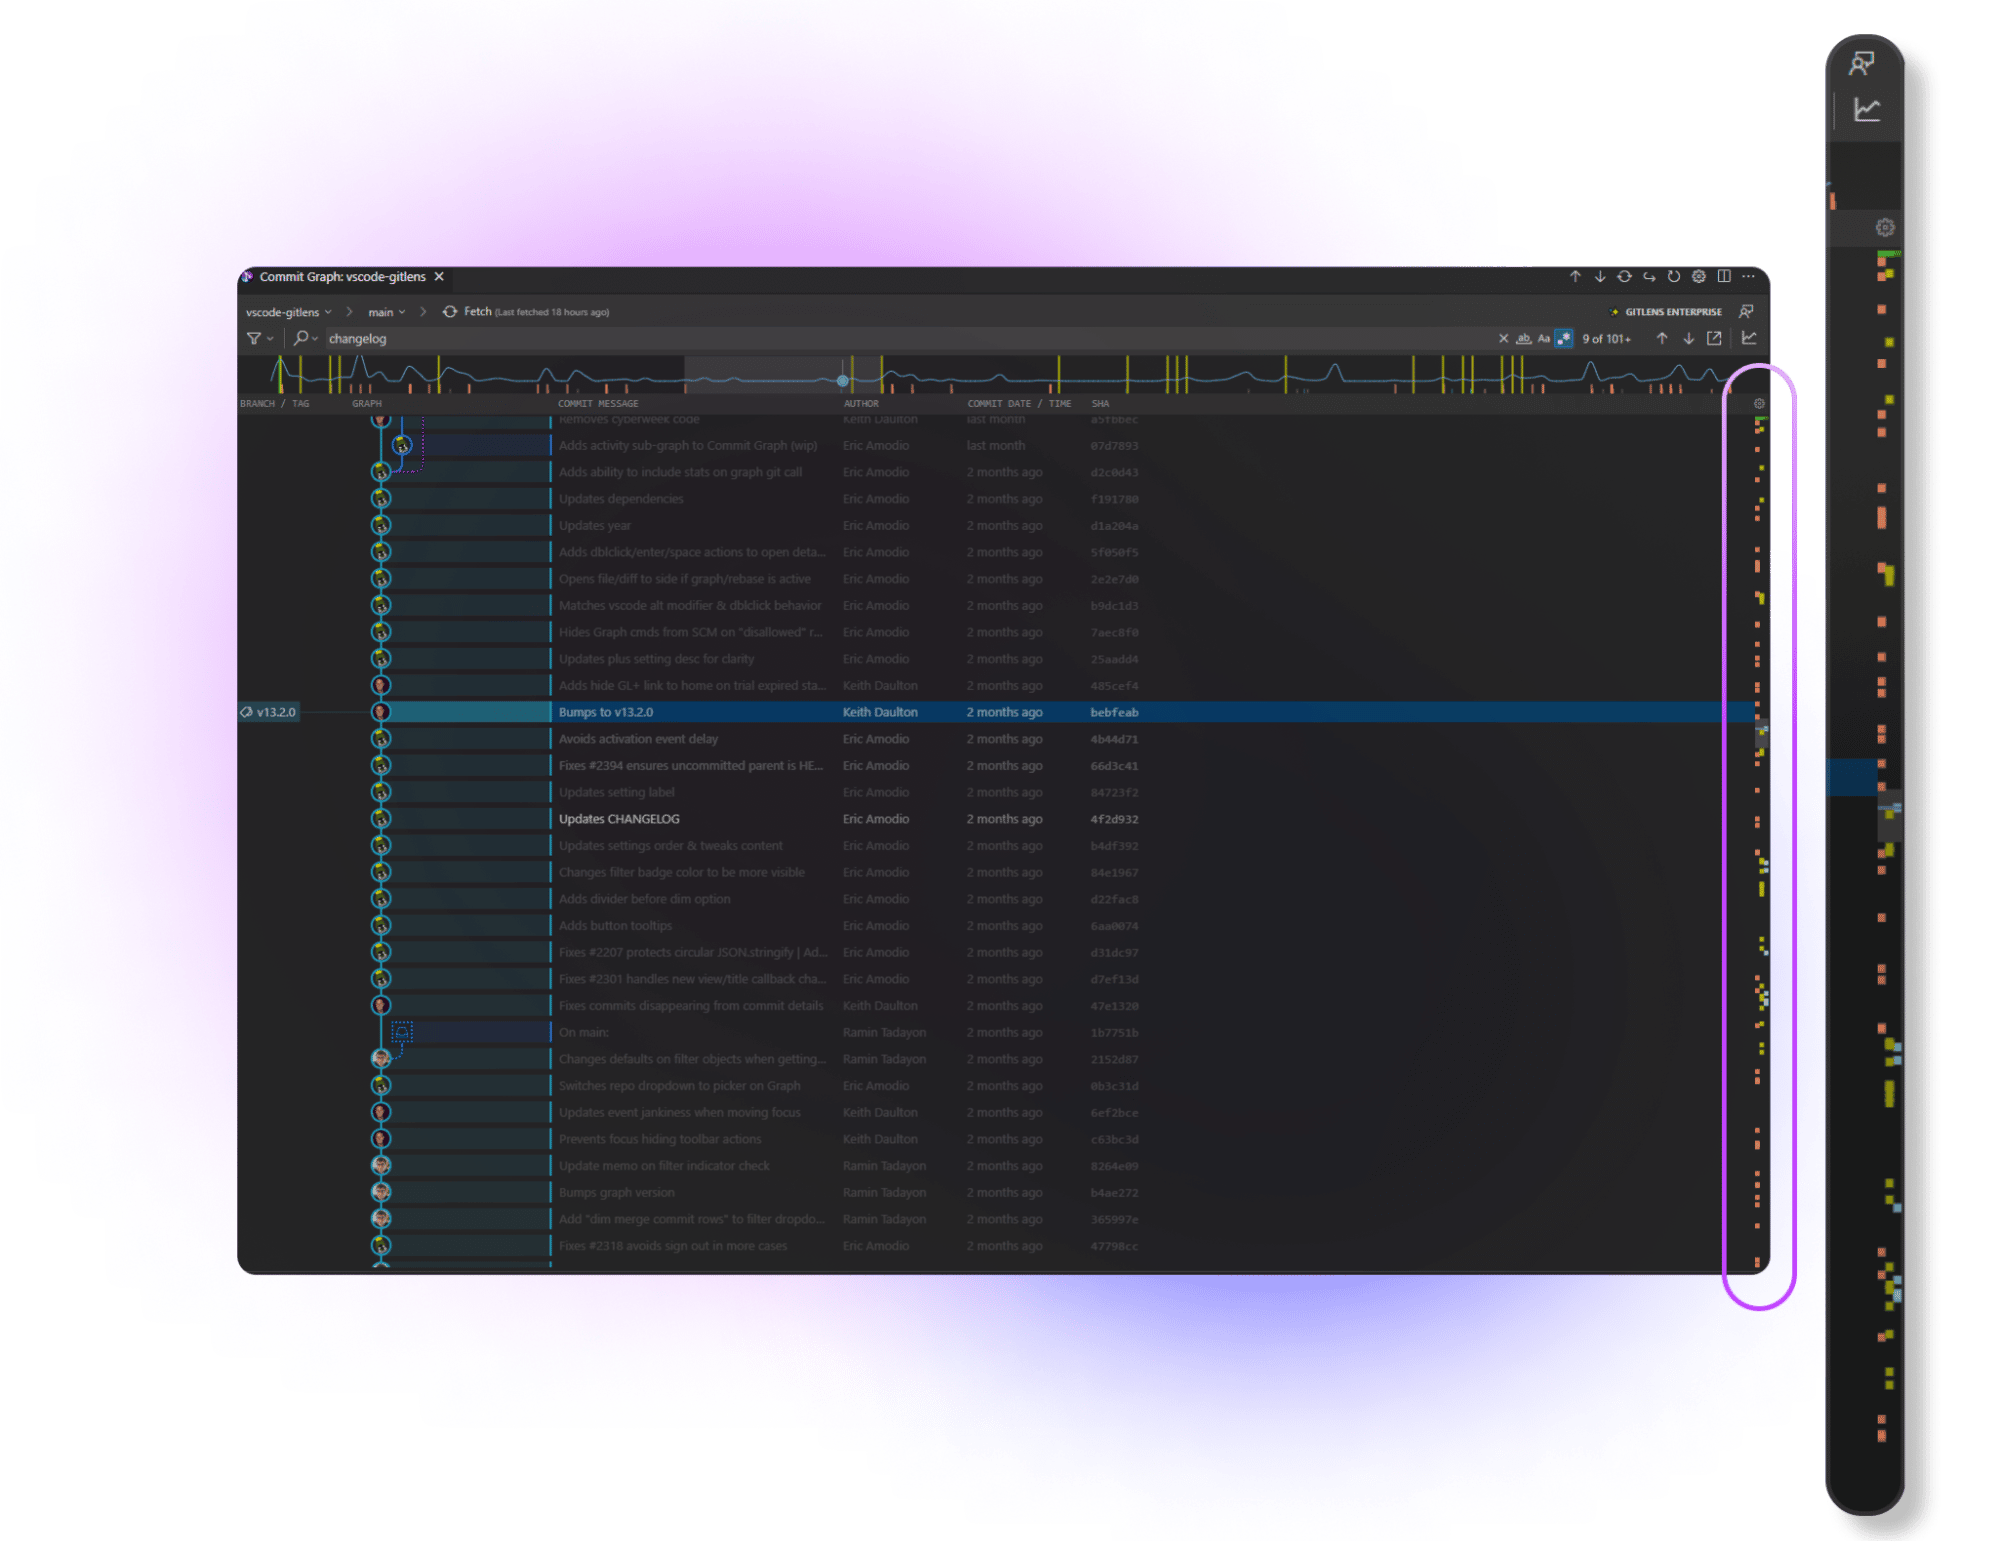
Scroll Markers
Scroll markers appear alongside the Commit Graph scrollbar to highlight:
- Checked-out branches
- Selected rows
- Search matches
They provide quick navigation to key locations like HEAD or specific refs.
You can toggle scroll markers in Commit Graph settings.
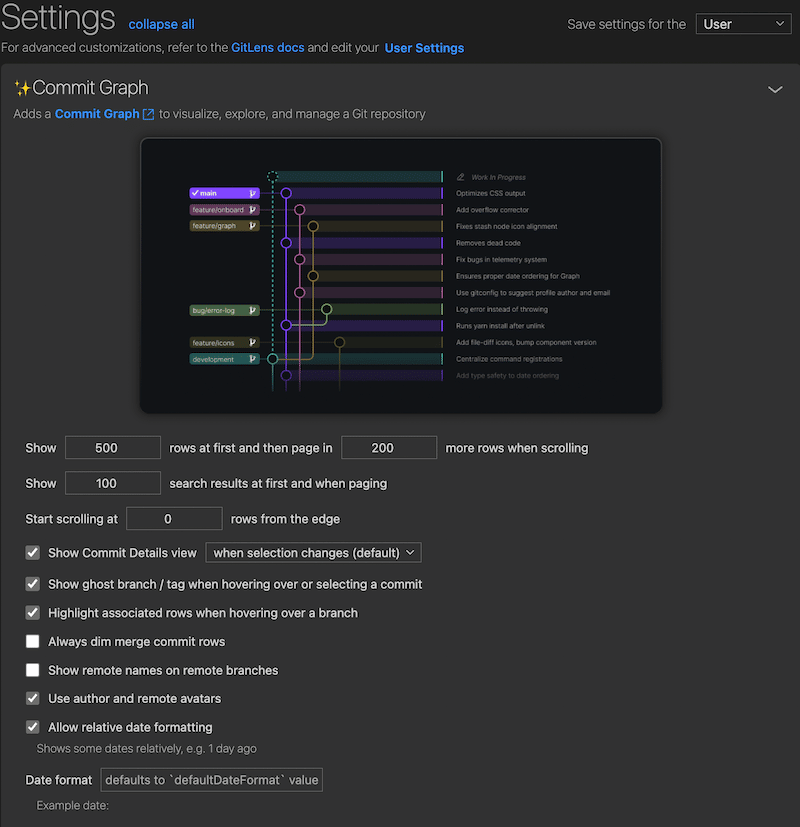
Settings
You can adjust Commit Graph preferences through the GitLens Settings panel.
-
Open the Command Palette:
Cmd/Ctrl + Shift + P -
Search for:
GitLens: Open Settings
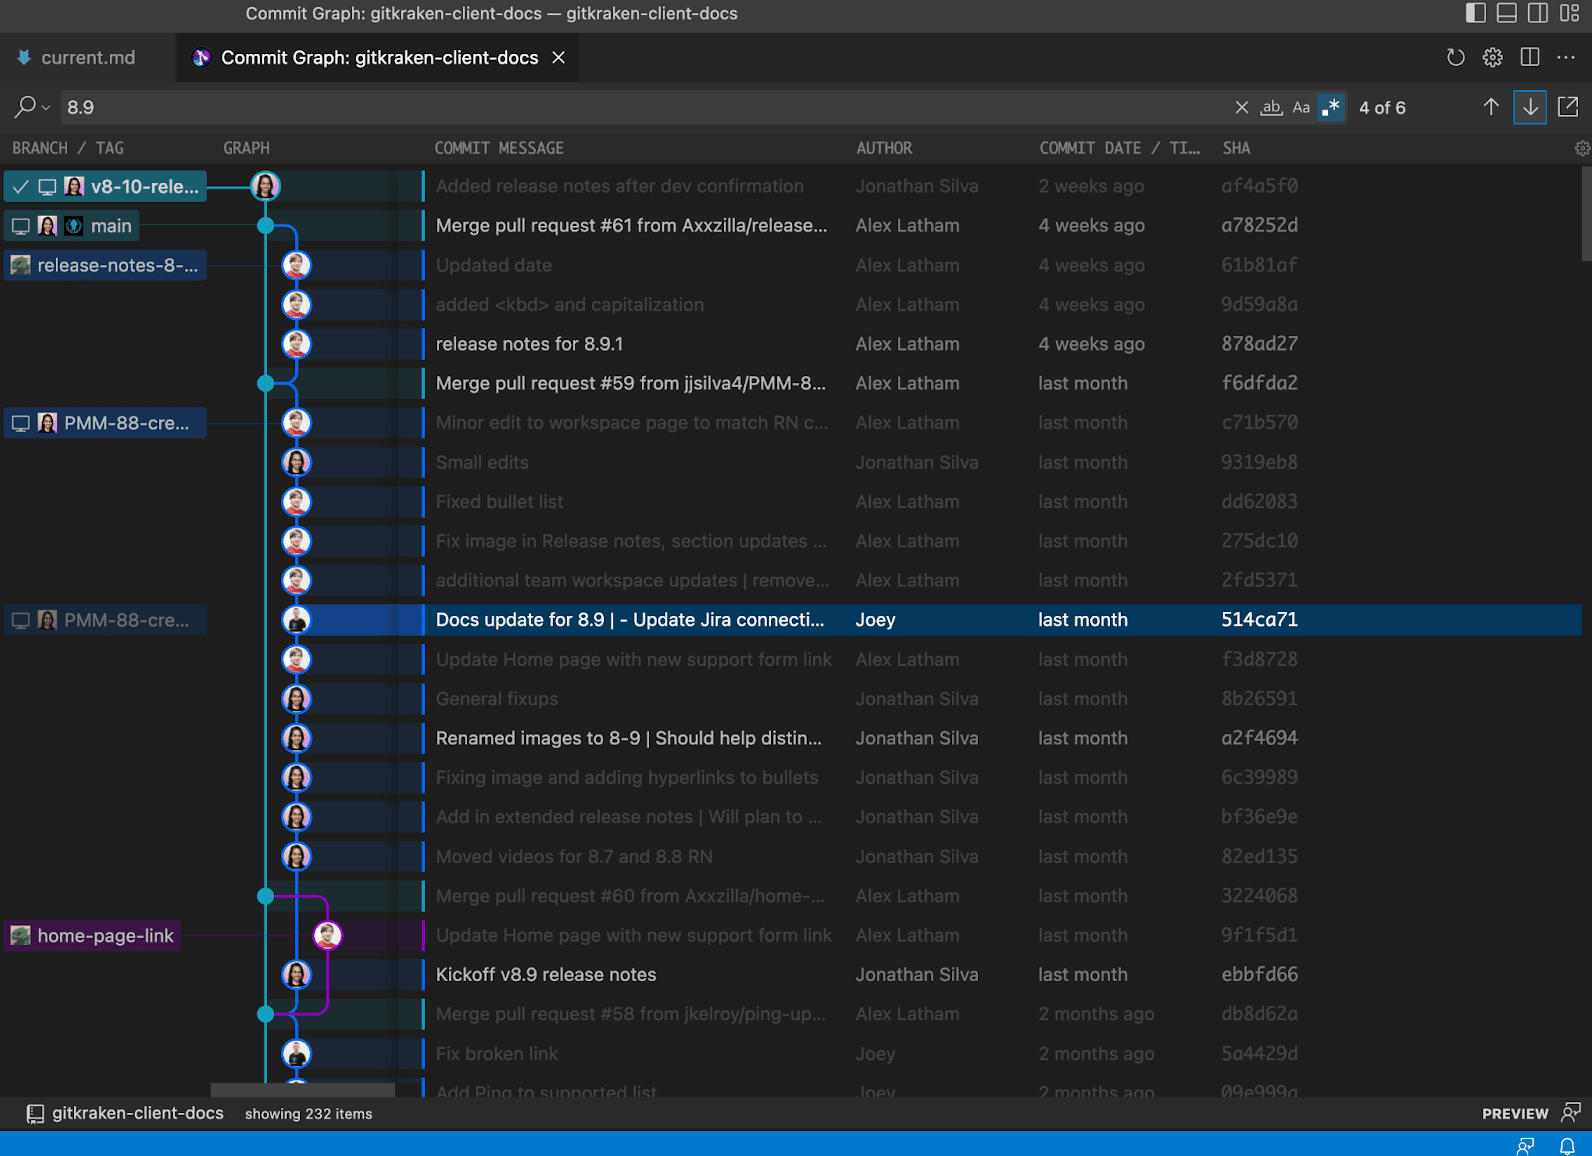
Rich Commit Search
The Commit Graph includes a powerful search bar to locate commits by message, author, file, or even specific code changes.
Use the following search prefixes:
Commit:Message:Author:File:Change:@me(to filter commits made by your user)
Use keyboard shortcuts to navigate results:
- F3 / Cmd+G — next result
- Shift+F3 / Shift+Cmd+G — previous result
- Hold Shift and click arrows to jump to first or last match
You can also refine results with:
- Match all
- Match case
- Regular expression
Full Context Menu Support
The Commit Graph supports right-click actions on branches, commits, tags, authors, and column headers.

Popular options include:
- Compare with Common Base — View changes between the current and selected branches based on their shared ancestor.
- Open All Changes with Common Base — Launch a multi-diff view showing all changes that would be merged.
Pull Request Indicators
For GitHub and GitLab, GitLens displays a Pull Request icon on branches with active pull requests. To enable this:
- Connect your account using rich integration settings.
- The icon will appear next to branches in the graph once linked.
Hiding Remotes, Branches, or Tags
You can hide individual remotes, branches, or tags from the Commit Graph to reduce clutter and focus your view.
- To hide: Hover over any ref and click Hide.
- To show again: Use the Hide panel at the top of the graph and reselect the ref.
Filtering Options
You can further control what is shown using the filter dropdown:
- Show Current Branch Only — Display the current branch and its upstream (minimal view)
- Show All Local Branches — Default view showing all local refs
- Toggle visibility of:
- Remote-only branches
- Tags
- Stashes
- Option to dim merge commits

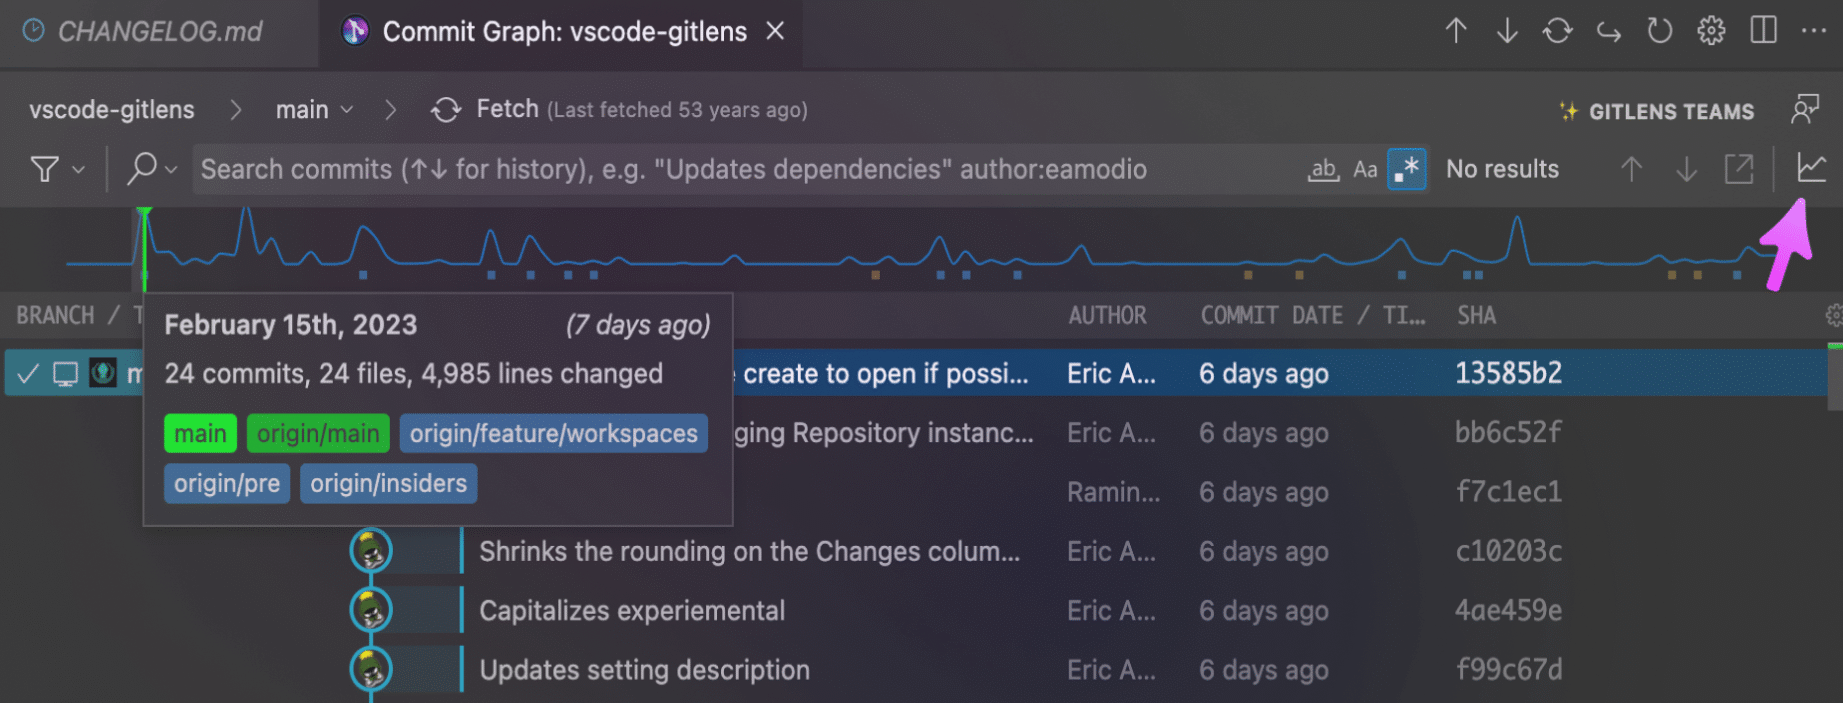
Minimap (Experimental)
The Minimap gives you a visual summary of repository activity at a glance:
- Quickly locate
HEAD, remotes, tags, and stashes - Jump to any region in the graph using visual cues
- Toggle it via the Minimap icon in the top right
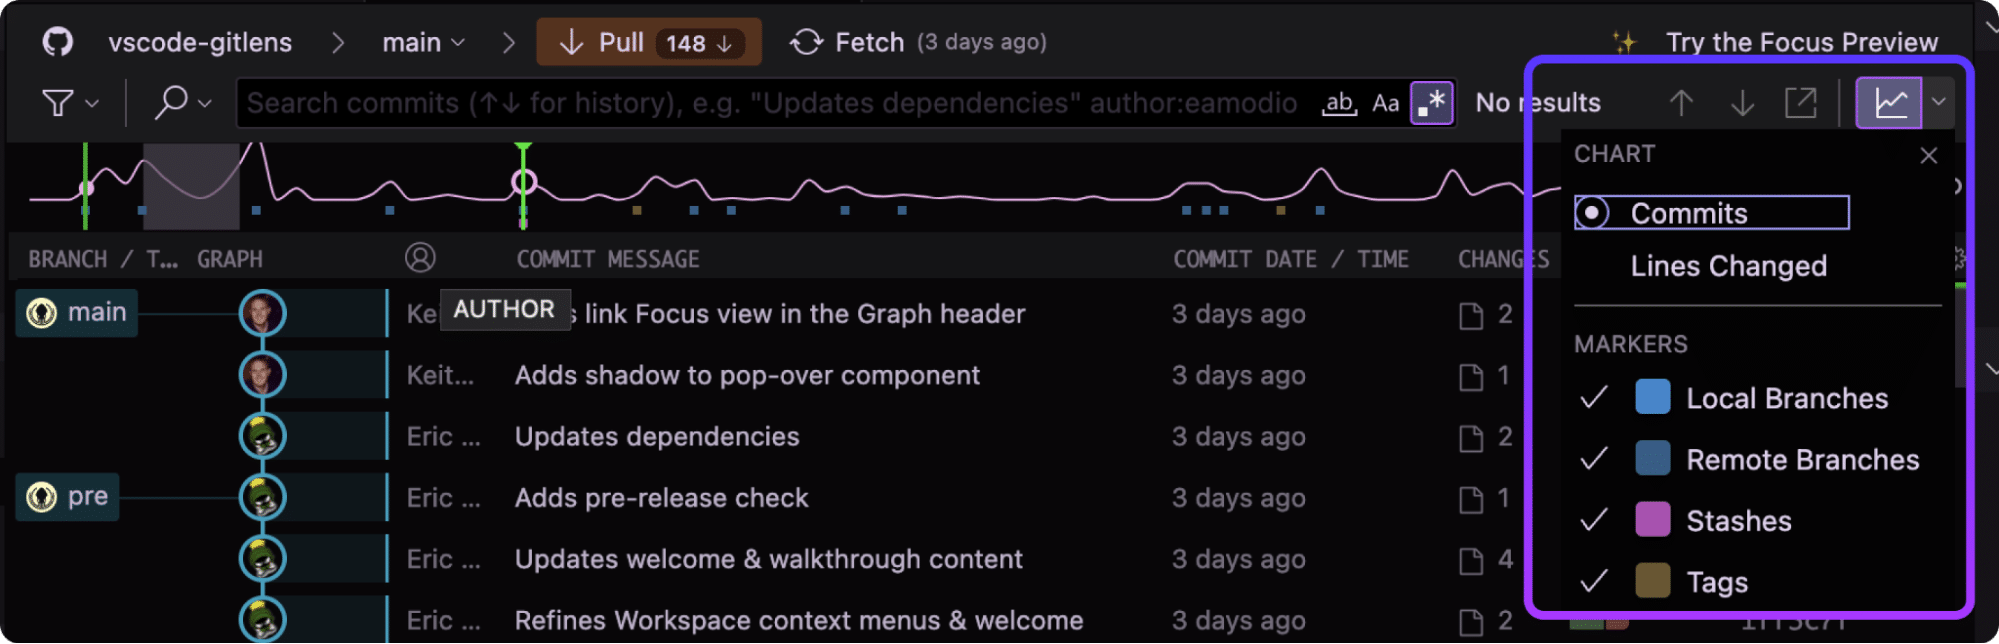
Minimap Settings
Customize the Minimap via the graph icon dropdown:
- Toggle between:
- Commits view
- Lines changed view
- Show or hide:
- Markers for branches, tags, stashes, search results
Minimap Legend
| Element | Description |
|---|---|
| Green lines | HEAD |
| Yellow lines | Search results |
| Blue blocks (top) | Remote branches |
| Brown blocks (top) | Tags |
| Pink blocks (bottom) | Stashes |
| Blue blocks (bottom) | Local branches |
| Highlighted area | Current view region |
Note: We welcome your feedback on the Minimap. Share your thoughts on the GitLens GitHub Discussions.
Launchpad PRO
Launchpad organizes pull requests (PRs) by status to help you identify bottlenecks and take prioritized actions. This streamlined view allows you to manage PRs quickly, directly within VS Code.
Launchpad currently supports GitHub.com and GitLab.com repositories. To use it, connect your Git provider using the GitHub or GitLab Integration.
Accessing Launchpad
- From the Command Palette:
Command/Ctrl + Shift + P→GitLens: Open Launchpad - Or select the Pull Request status bar item in VS Code
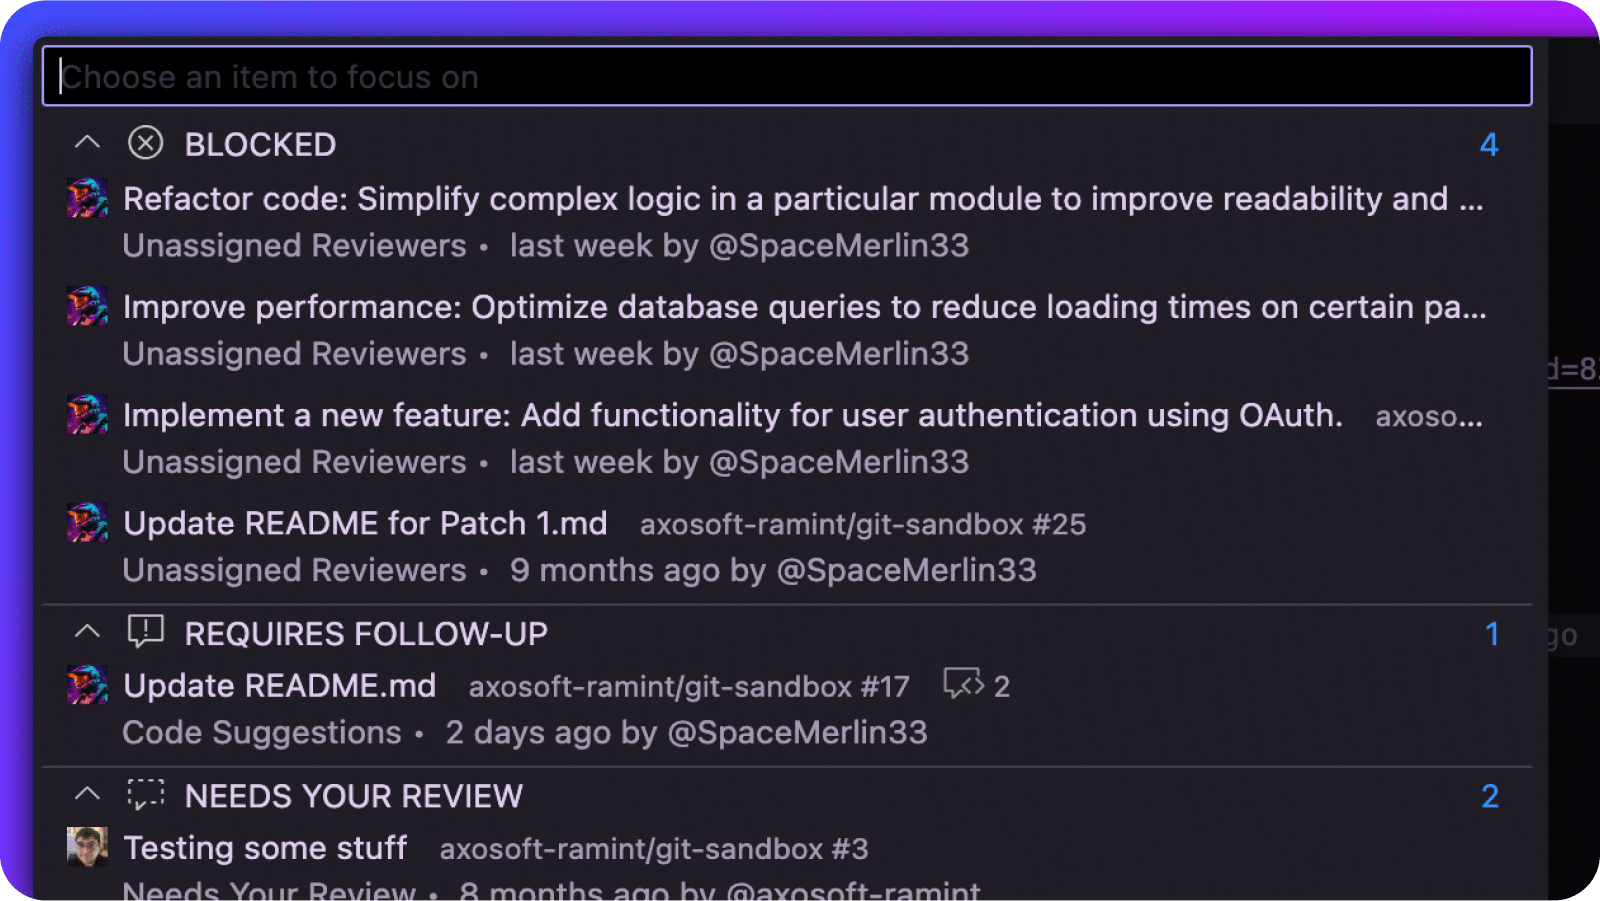
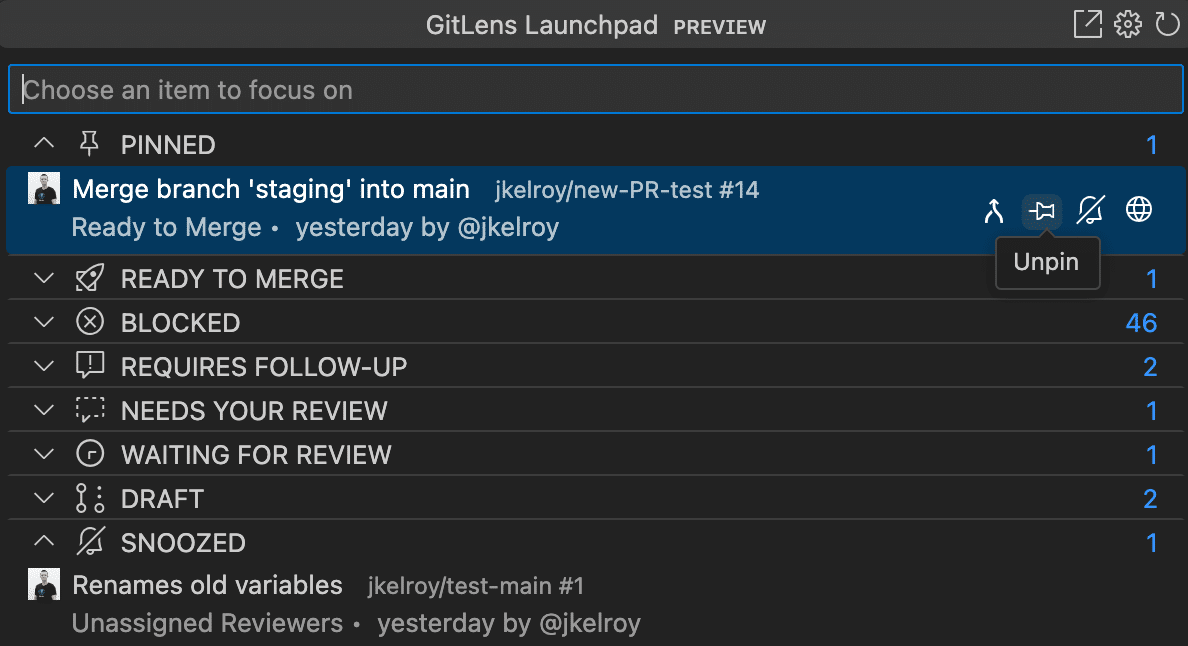
Using Launchpad
View PRs by grouped statuses:
- Ready to merge
- Blocked
- Requires follow-up
- Needs your review
- Waiting for review
- Draft
- Snoozed
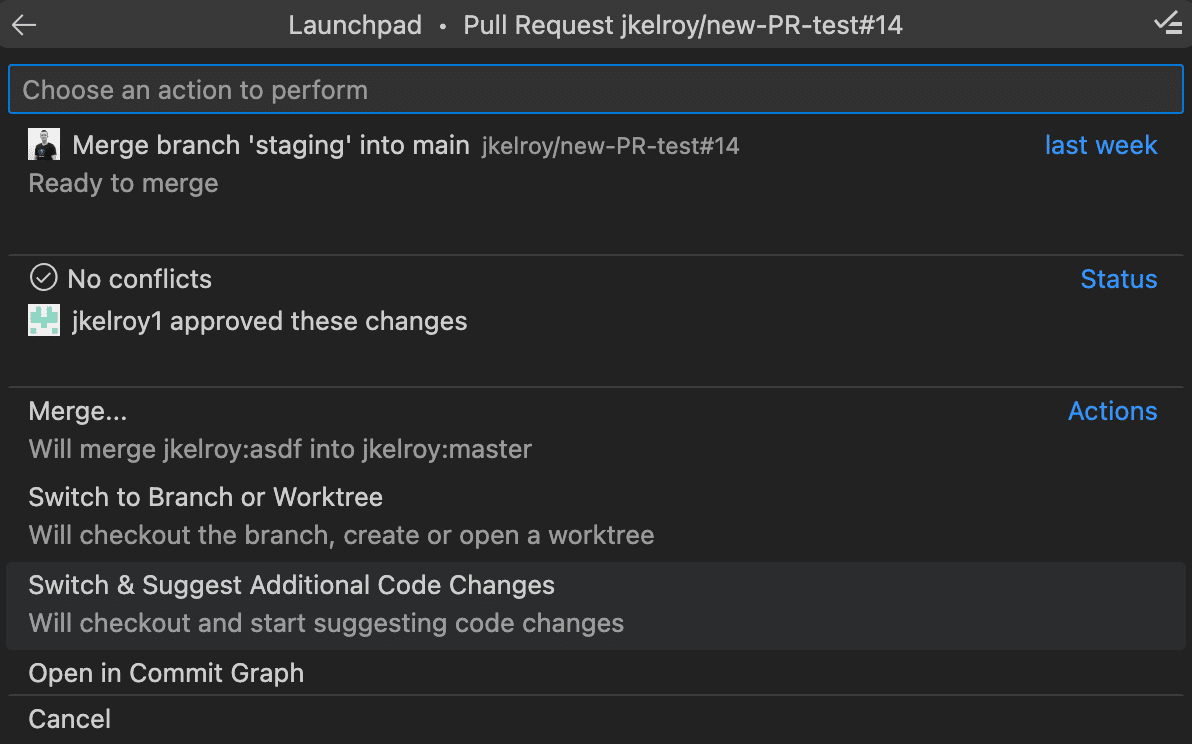
Click a PR to:
- View full details
- Open in your browser
- Merge (if eligible)
- Switch to the branch or open in a worktree
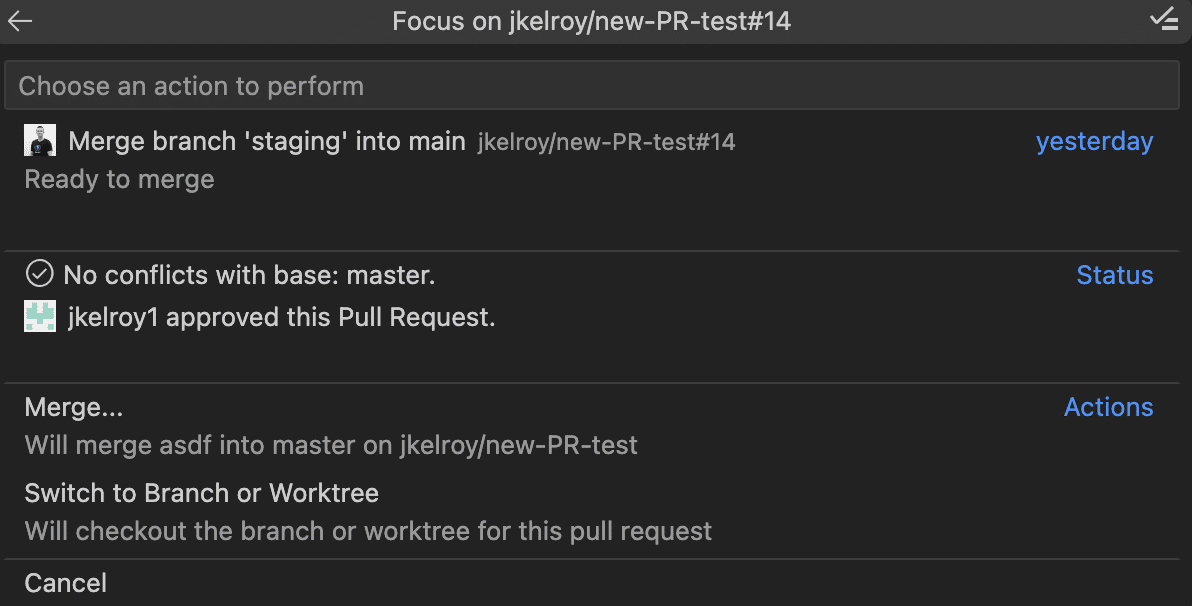
You can also start or review Code Suggestions directly from the PR action menu.
This feature is available through the Gitkraken MCP
Pin or Snooze PRs
Use the pin icon to keep important PRs in the Pinned group.
Use the snooze icon to move less urgent PRs into the Snoozed group.
Click the icon again to unpin or unsnooze as needed.
Note: Launchpad prioritizes items requiring action by elevating them to the top of the list. This behavior may change in future updates.
This feature is only available on GitLens Pro subscription tiers or higher.
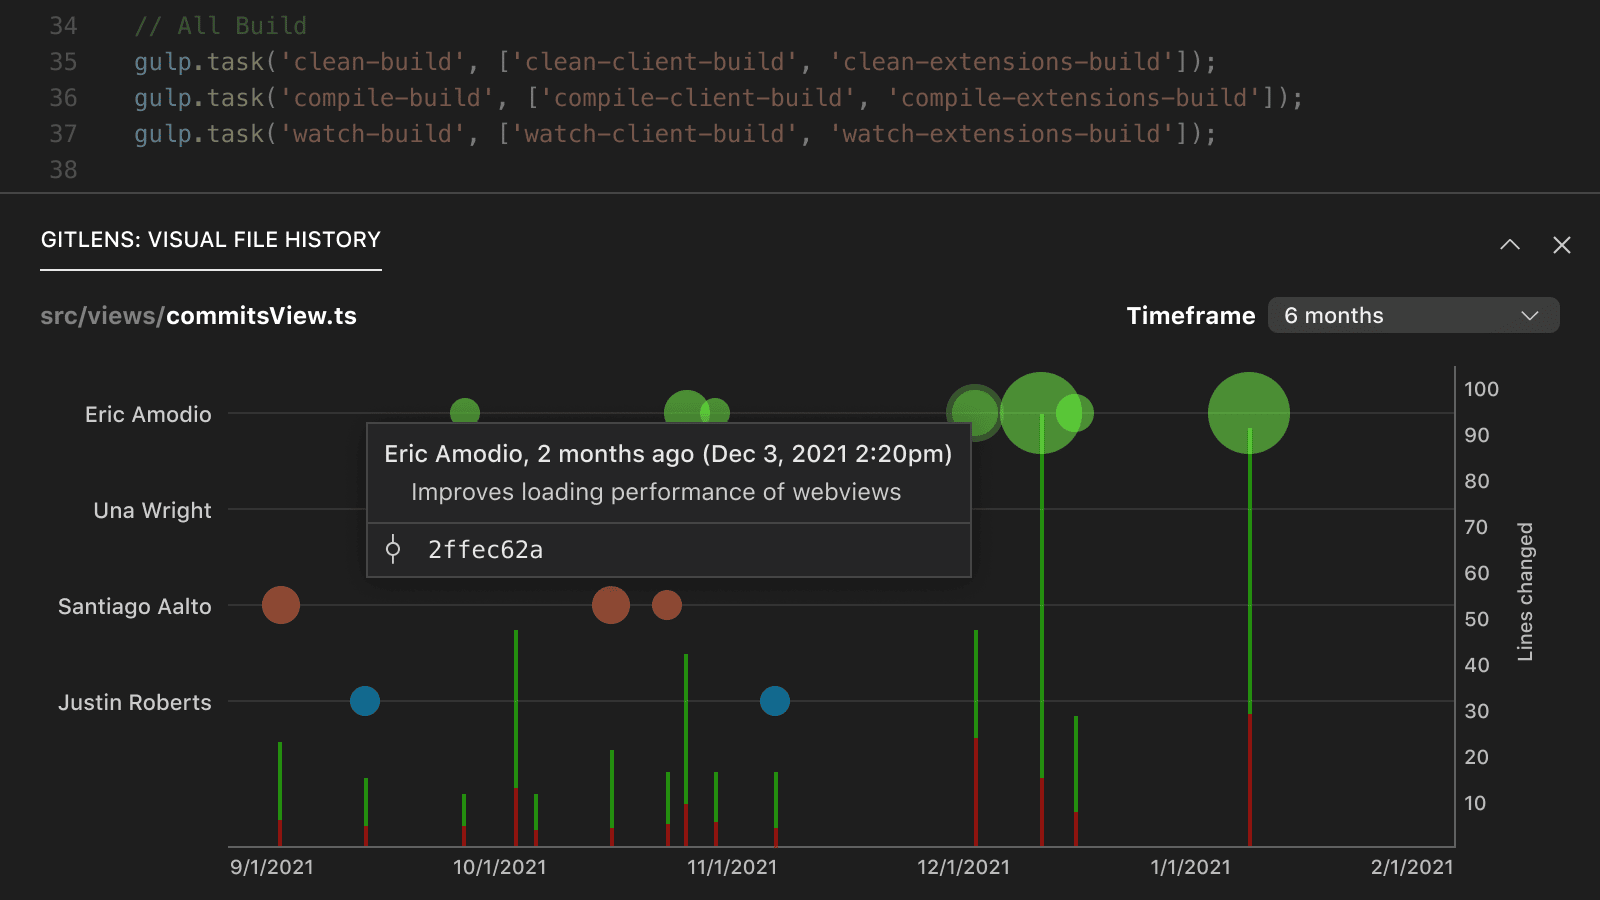
Visual File History
Visual File History provides a clear timeline of a file’s changes—showing when, what, and who modified it—helping you quickly understand how a file evolved.
To open Visual File History:
- Use the GitLens Inspect Sidebar, or
- From the Command Palette:
Cmd/Ctrl + Shift + P→GitLens: Show Visual File History View
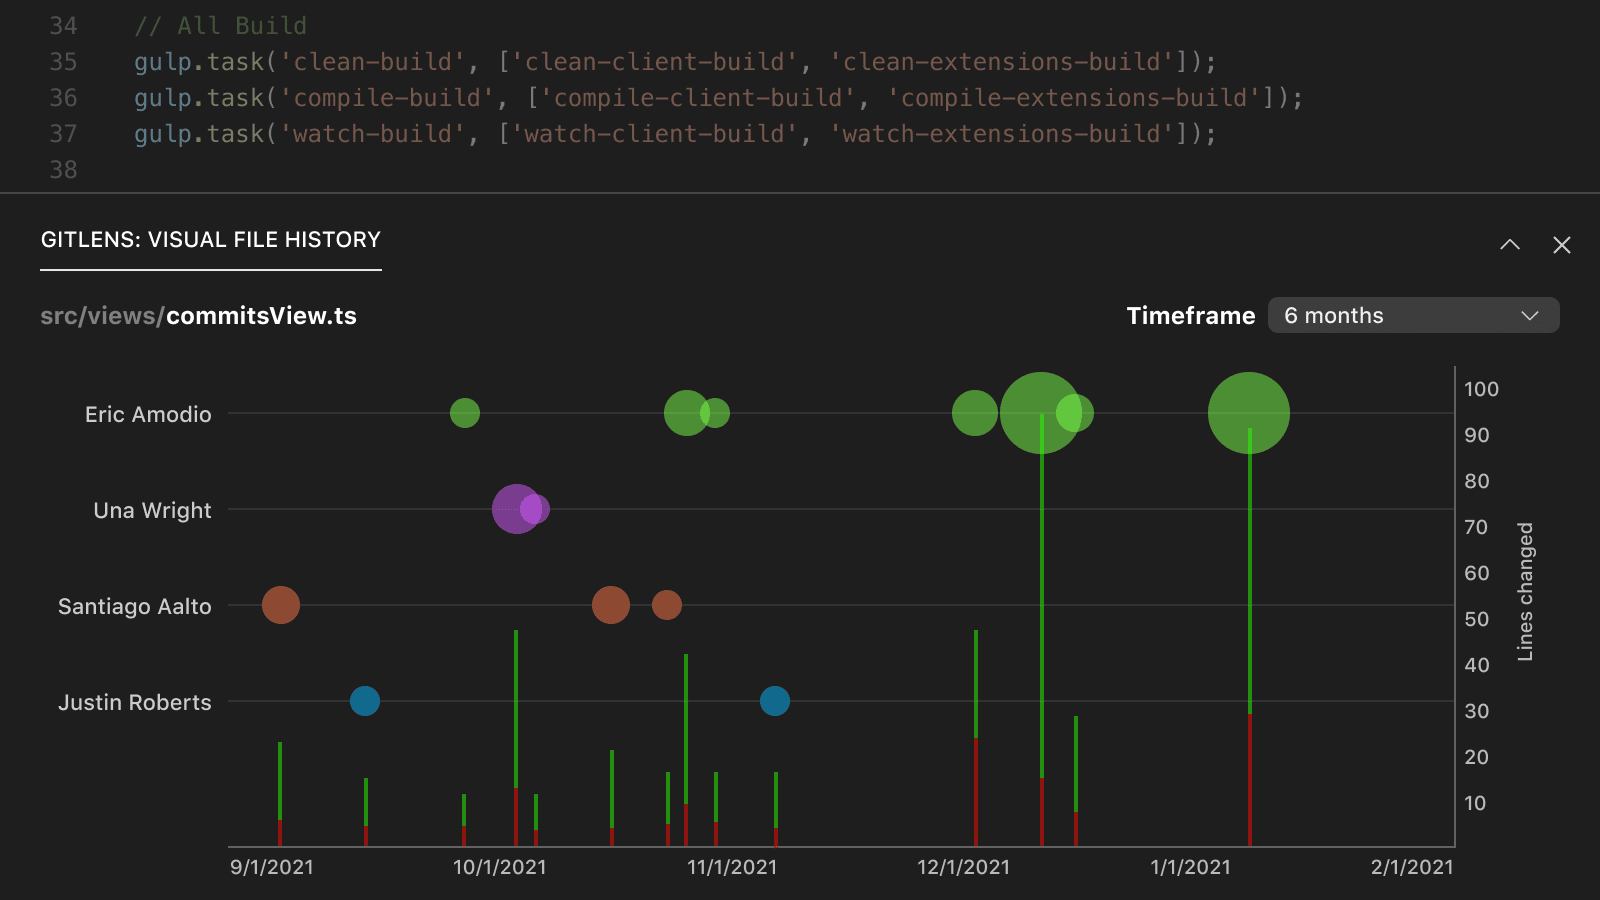
How to Read the Graph
- Y-axis (left): Contributors, shown in individual swim lanes
- X-axis: Timeline of commits
- Bubbles: Color-coded per author; bubble size reflects the magnitude of changes
- Bars (right y-axis): Line additions (green) and deletions (red)
Hover over a bubble or bar for detailed insights.
The Community plan supports Visual File History only on public and local repositories.
GitKraken AI
GitKraken AI enhances your development workflow with automated commit messages, intelligent stash descriptions, and code change explanations.
AI-Generated Commit Messages
Automatically generate descriptive commit messages based on staged changes.
To use:
- Stage your changes.
- Open the Home View and click Generate Commit Message, or
- Use the Command Palette:
GitLens: Generate Commit Message (Experimental)
GitKraken AI will analyze the diff of staged changes to generate a message. You may provide additional context in the commit box to improve results.
You can customize behavior using:
gitlens.experimental.generateCommitMessagePromptfor message formatting- Additional
gitlens.aisettings for provider and model preferences
Pro users and above can optionally use a custom API key to connect to a different AI provider. GitKraken AI currently uses the Google Gemini model.
AI Stash Messages PRO
Available in Pro, Advanced, and Business plans.
Automatically generate meaningful stash descriptions to make your stashes easier to identify later.
How to access:
- From the Command Palette:
GitLens: Generate Stash Message with AI - During stash creation: Use the AI option in the stash interface
- In the Stash view: Generate AI-powered descriptions for existing stashes
AI Explanations PREVIEW
Let GitKraken AI help explain complex changes across your repo with natural language summaries.
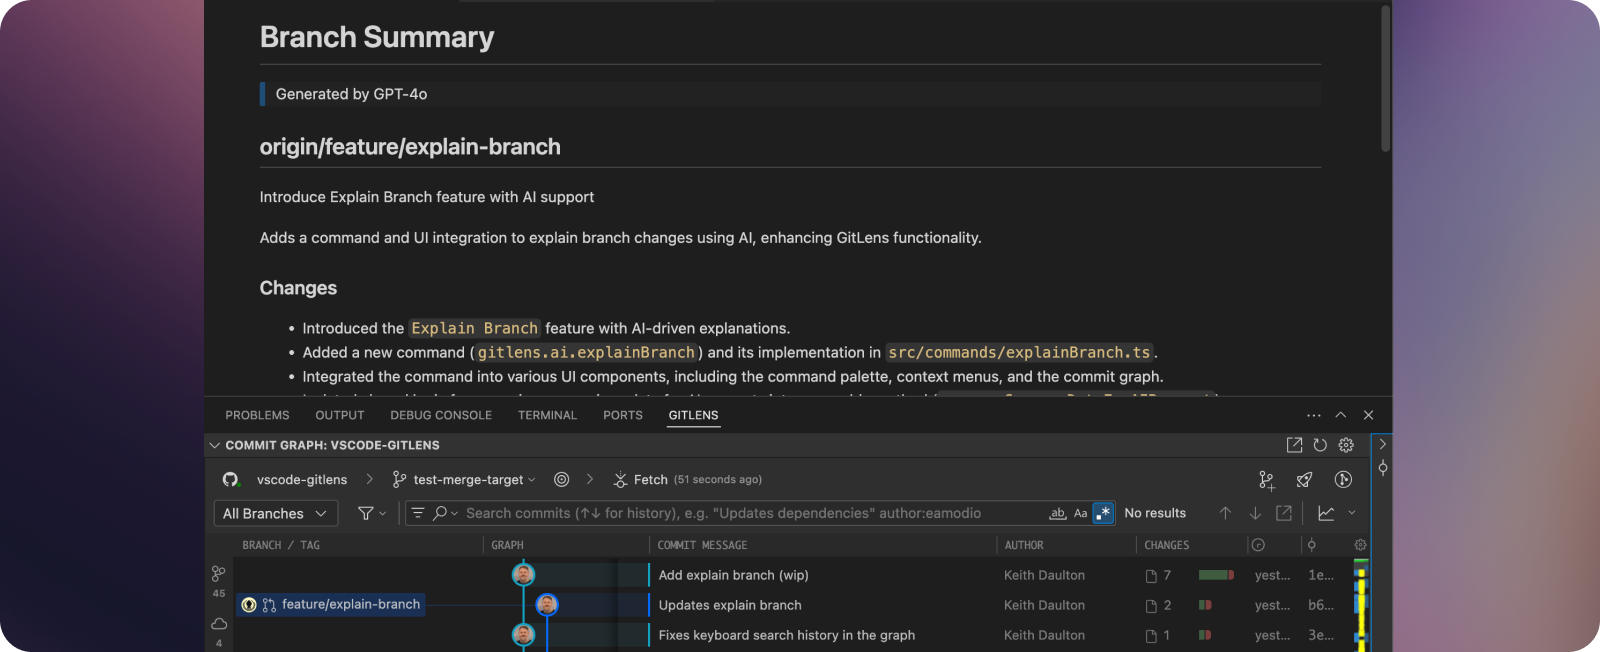
✨Explain functionality provides markdown summaries for:
- Branches — ✨Explain Branch
- Working changes — ✨Explain Working Changes
- Stashes — ✨Explain Stash
Where to find it:
- Commit Graph
- Command Palette
- GitLens views: Commits, Branches, Stashes, Search & Compare
- Branch cards in the Home view
With GitKraken AI explanations, you can quickly understand:
- What changed across all commits in a branch
- What you’ve modified in your working directory
- What your previous stashes contain
AI Commit Explanations
PRO
Available in: Pro, Advanced, and Business plans
Understand the purpose and context of commits with AI-generated summaries. These explanations help you grasp the intent behind complex commits without manually reviewing all changes.
How to access:
- Commit Details view: See the AI explanation panel
- Cloud Patch Details view: View AI insights alongside commit data
- Commit Review: Generate explanations for any selected commit
AI Changelog Creation ADVANCED
Available in: Advanced and Business plans only
Automatically generate detailed and structured changelogs from a set of selected commits—ideal for maintaining release documentation.
How to access:
- Search/Compare view: Click the inline button on the commits line
- Commit Graph: Select multiple commits, right-click, then choose Generate Changelog
- Command Palette:
GitLens: Generate Changelog from Commits
More questions about GitKraken AI? See the GitKraken AI FAQ for additional details.
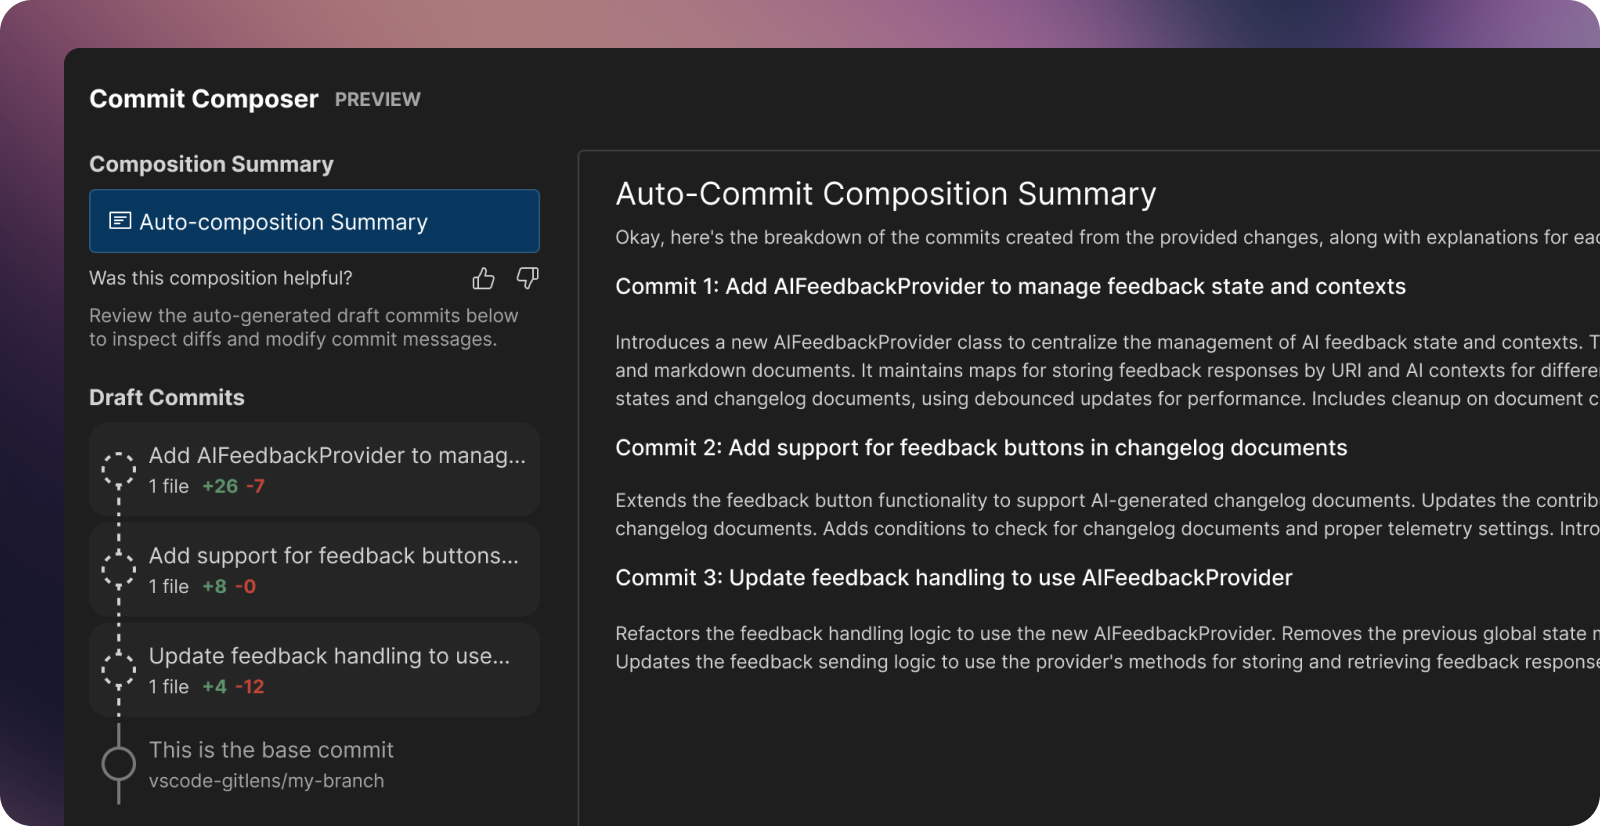
Commit Composer View Pro
The Commit Composer has evolved from a simple one-step process into a comprehensive drafting and review experience. Previously, AI would analyze your changes and immediately create commits. Now, the new Commit Composer view gives you complete control over the composition process, with options to auto-compose with AI or compose manually.
This feature is available through the Gitkraken MCP
Join the Commit Composer discussion and provide feedback.
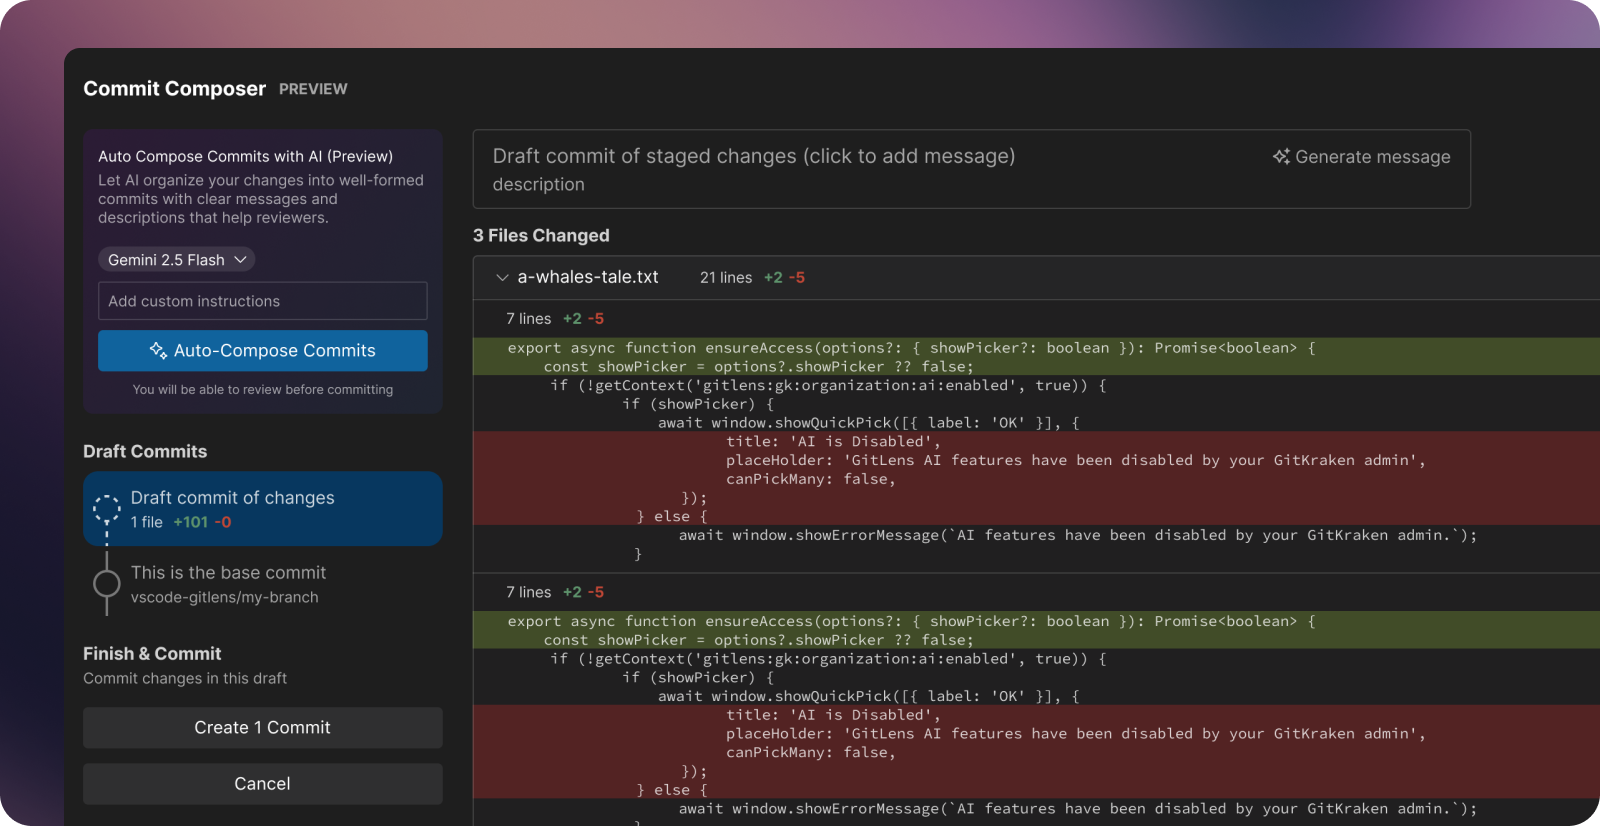
Interactive Draft Commits
When composing commits, GitLens now creates “draft” commits that you can review, modify, and refine before applying them to your repository. This new workflow lets you:
- Preview before committing: See exactly what will be committed before it touches your repository
- Switch Models: Try composition with different AI models
- Guide the AI: Provide custom instructions to match your team’s conventions and preferences
- Iterate and refine: Regenerate individual messages or entire commit compositions
- Review and edit: Manually tweak any commit message or approach
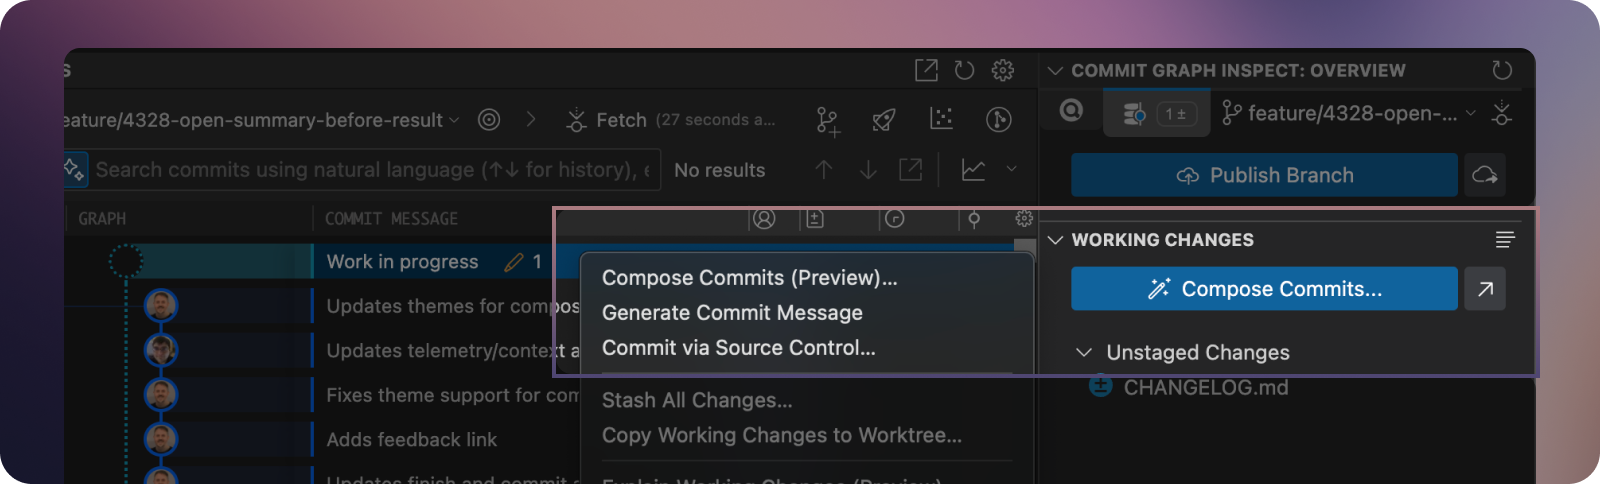
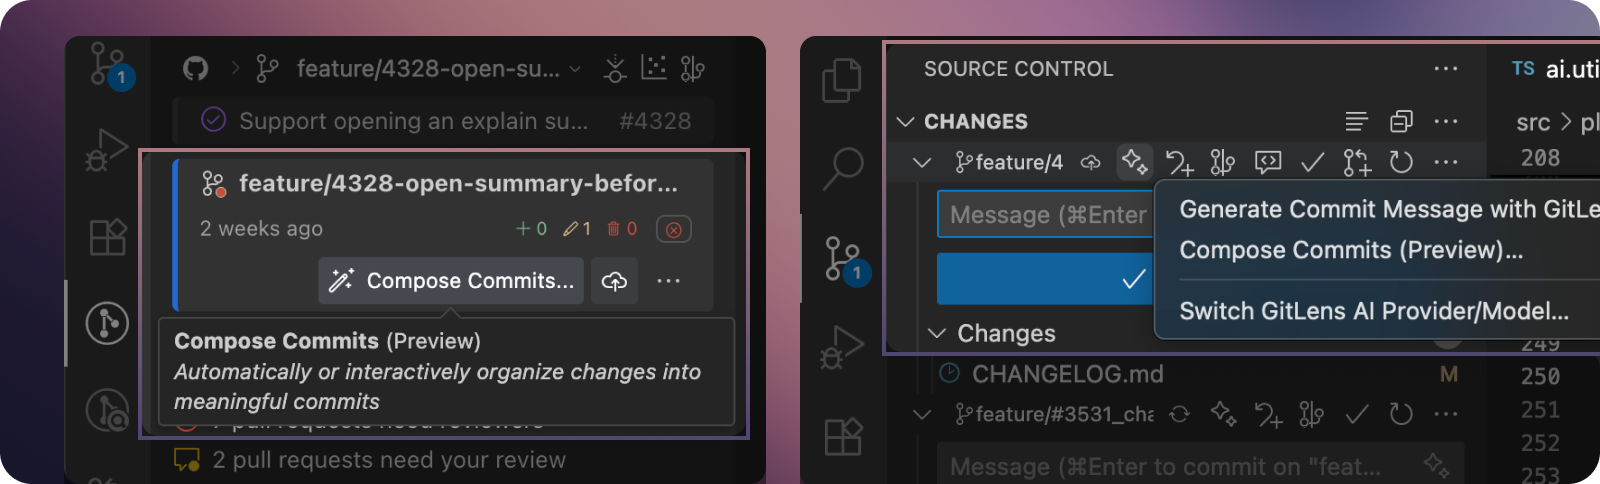
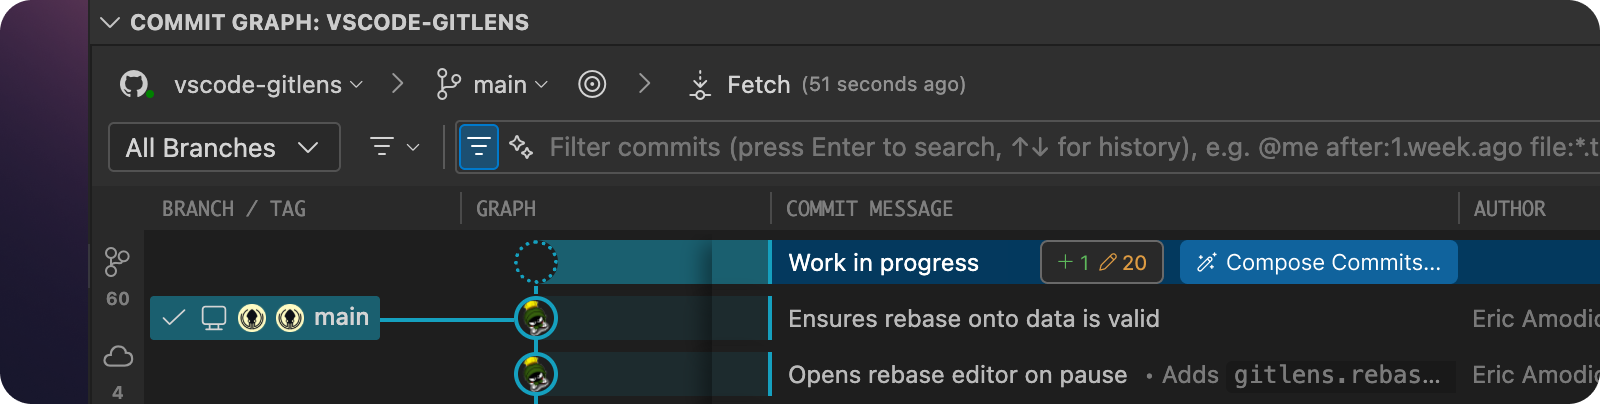
You can launch the new Commit Composer view from several places in GitLens:
- GitLens commit details view
- Context menu on the WIP row in the GitLens Commit Graph
- Active branch card in the GitLens Home View
- ✨ icon in the SCM view header
- Command palette: Search for “Compose Commits”
The foundation is now in place for even more powerful composition features in future releases, including intuitive drag-and-drop functionality for moving lines and hunks between commits, creating new draft commits on the fly, and reordering commit sequences.
Whether you prefer to let AI handle the heavy lifting or want granular control over every detail, Commit Composer provides the flexibility to create well-structured commit histories that make code reviews more effective and repository history easier to understand.
Commit Composer: Branch Recomposition
Commit Composer now lets you clean up and reorganize commits on existing branches, making it perfect for preparing pull requests or refining your commit history before pushing.
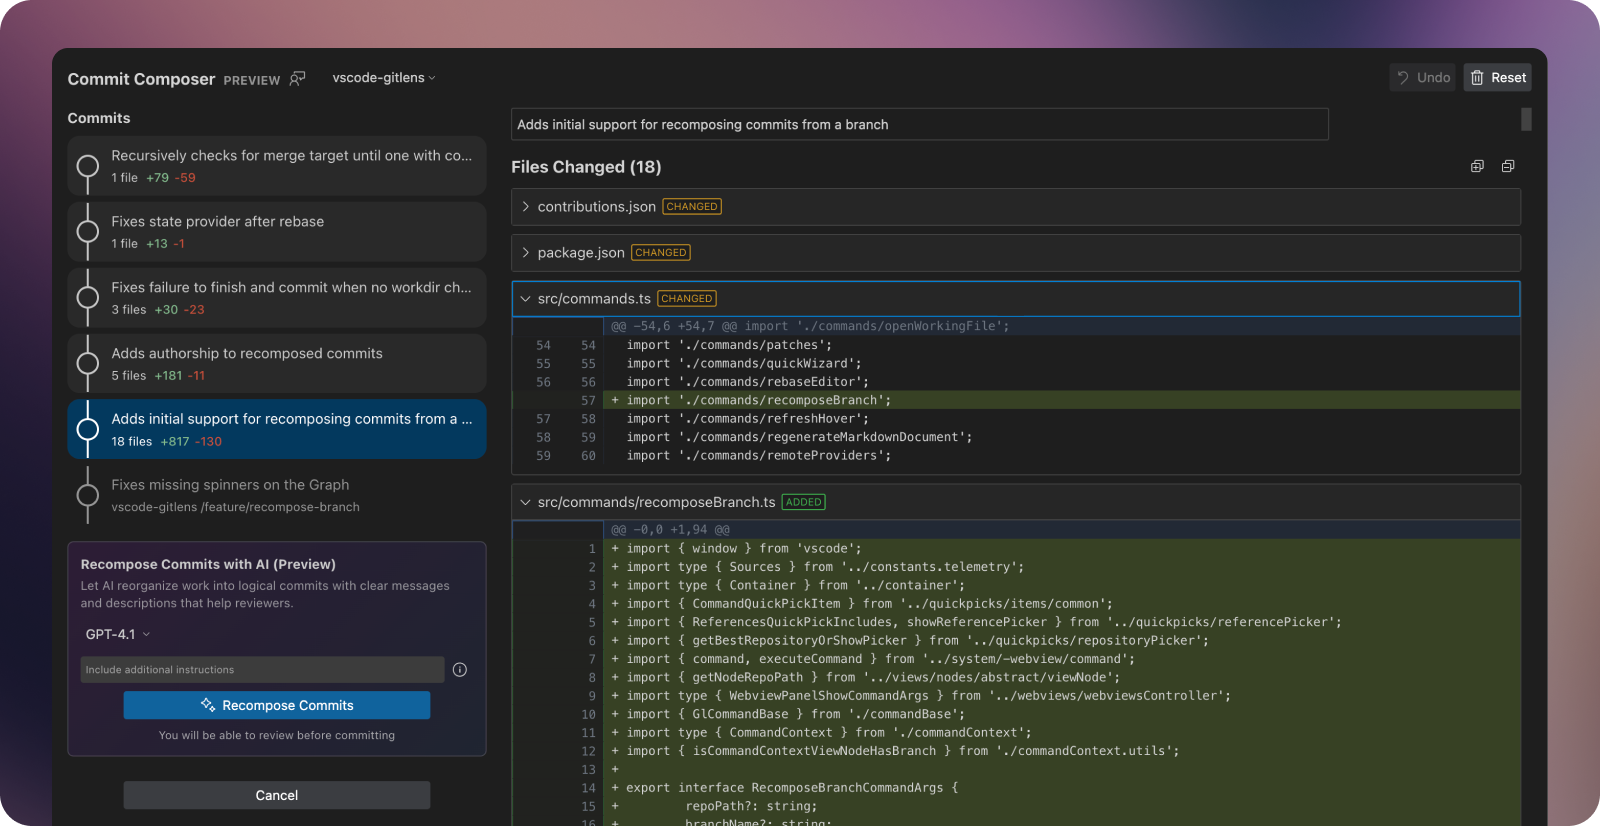
Recompose Entire Branches
Open Commit Composer from any branch in the Commit Graph (or anywhere branches appear in GitLens) to inspect and reorganize its commits. The composer creates draft commits you can review before applying changes to your repository.
Auto-Recompose with AI: Let AI analyze your branch and restructure commits into logical, well-documented units. Choose your preferred model and provide custom instructions to match your team’s conventions. (Pro tip: Set default instructions in the “Generate Commits: Custom Instructions” setting to save time.)
Manual Control: Review AI suggestions, regenerate specific commit messages, or manually edit messages and change organization. The composer gives you complete flexibility to craft the commit story that works best.
Enhanced Composer Capabilities
Commit Composer now handles edge cases that previously blocked composition:
- Untracked files: Working changes now include untracked files, so all modifications can be composed together
- New repositories: Compose your initial commits even before a base commit exists
- Performance boost: Significantly faster rendering when working with changes across many files
Commit Composer: Selective Recomposition
Commit Composer now lets you recompose specific commits within a branch, giving you precise control over cleaning up your commit history.
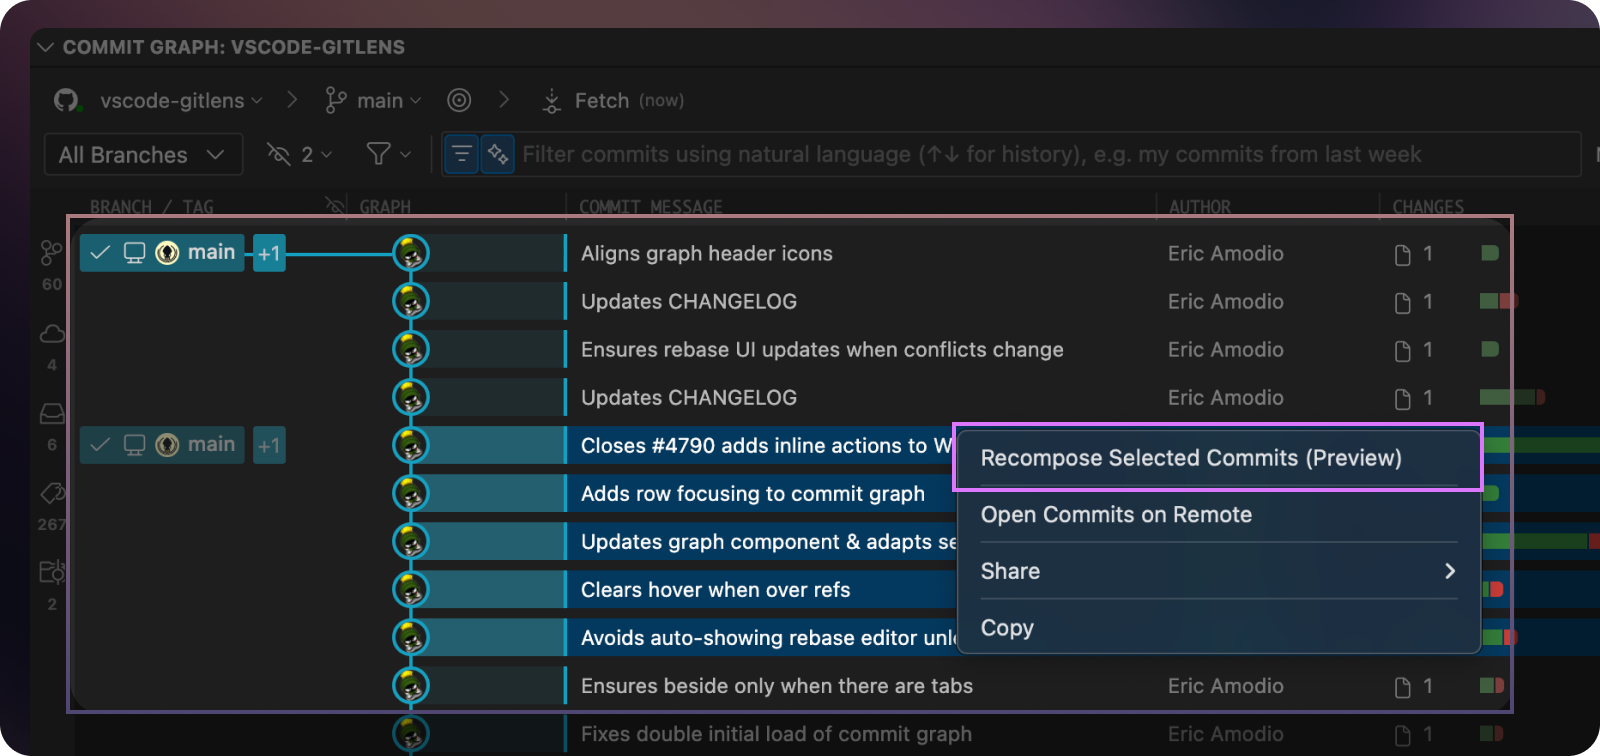
Previously, you could only recompose all working changes or an entire branch. Now you can select specific commits that need refinement—like those quick “wip” or “fix” commits made during rapid iteration—and let AI restructure just those changes with better messages.
Select multiple contiguous commits on the same branch using Shift or Cmd click, then right-click and choose “Recompose Selected Commits.” Commit Composer opens with only your selected commits as drafts, ready for AI-powered or manual refinement.
Commit Composer is also more discoverable, with a new button on the WIP row in the Commit Graph that opens the composer for all working directory changes. Additionally, when rebasing, you can now switch directly into Commit Composer from the Rebase Editor, canceling your rebase to let AI handle the composition instead.
Git Command Palette
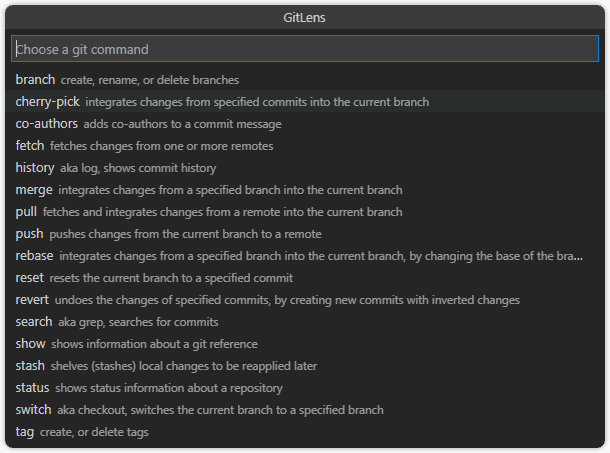
Adds a customizable Git Command Palette (gitlens.gitCommands) for guided, step-by-step access to many common Git commands. Quickly navigate Git actions, explore commit history, manage stashes, and more—all through intuitive, confirmable menus.
Quick Commit Access
-
Show Branch History (
gitlens.showQuickBranchHistory): Explore the commit history of any selected branch.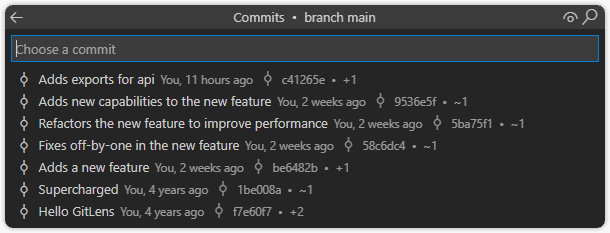
-
Show Current Branch History (
gitlens.showQuickRepoHistory): View the commit history of your current branch. -
Show File History (
gitlens.showQuickFileHistory): Access the full commit history of the current file.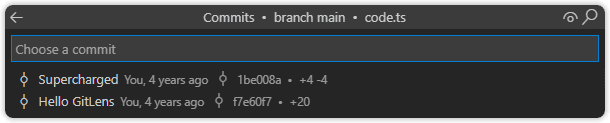
-
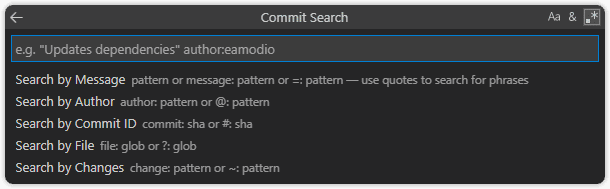
Search Commits (
gitlens.showCommitSearch): Use a quick pick menu to search by:- Message:
<message> - Author:
@<pattern> - Commit SHA:
#<sha> - File path or glob:
:<path/glob> - Patch changes:
~<pattern>
Refer to the Git log documentation for advanced usage.
- Message:
-
Show Commit Details (
gitlens.showQuickCommitDetails): Review commit information and actions.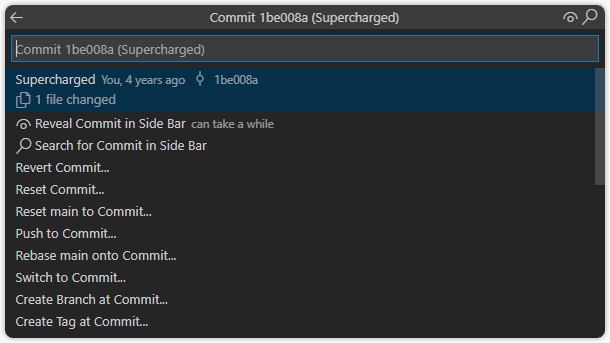
-
Show Line Commit Details (
gitlens.showQuickCommitFileDetails): Explore the file’s commit and take action on it.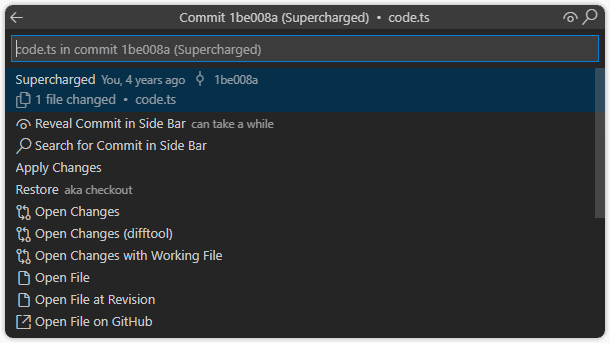
Quick Stash Access
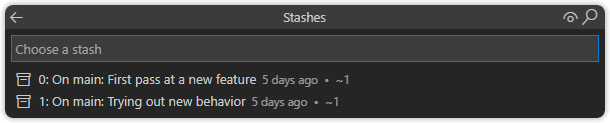
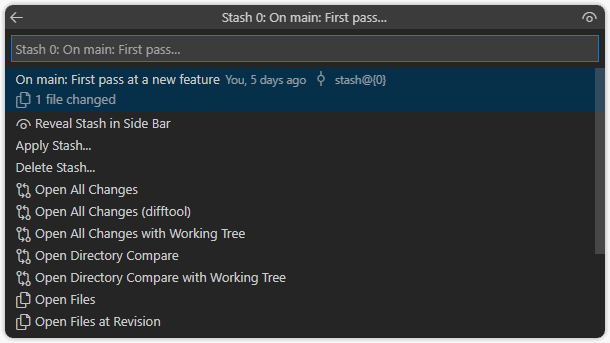
- Adds a Show Stashes command (
gitlens.showQuickStashList) to show a quick pick menu to explore your stashes.
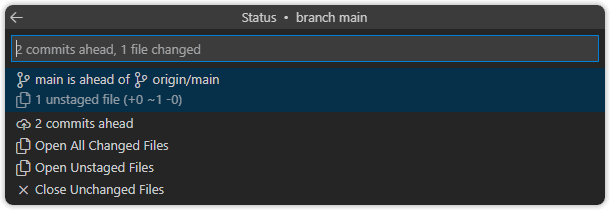
Quick Status Access
- Adds a Show Repository Status command (
gitlens.showQuickRepoStatus) to show a quick pick menu for visualizing the current repository status.
Interactive Rebase Editor
Adds a user-friendly interactive rebase editor to easily configure an interactive rebase session:
- Quickly re-order, edit, squash, and drop commits.
- Includes drag & drop support.
To use this directly from your terminal (e.g., when running git rebase -i):
-
Set VS Code as your default Git editor:
git config --global core.editor "code --wait" -
Or, to only affect rebase sessions:
git config --global sequence.editor "code --wait"
To use the Insiders edition of VS Code, replace
codewithcode-insidersin the commands above.
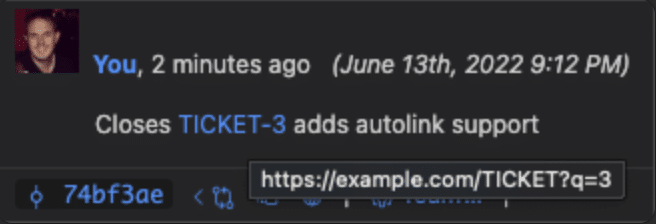
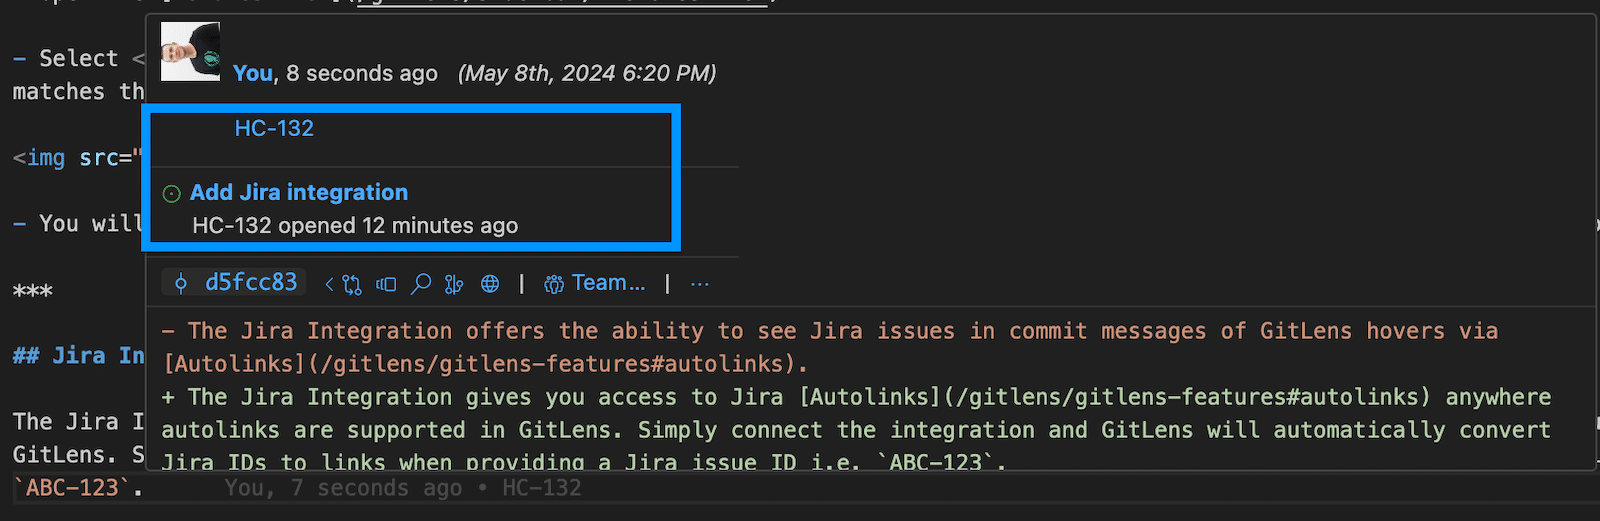
Autolinks
Use autolinks to convert external references—such as Jira issues or Zendesk tickets—into clickable links directly from commit messages.
Terminal Links
Terminal links optionally provide clickable references in the integrated terminal:
- Branches, tags, and commit ranges: Quickly explore their commit history.
- Individual commits: Review commit details and take further action.
Remote Provider Integrations
GitLens provides rich integrations with many remote providers, including GitHub, GitHub Enterprise, GitLab, Gitea, Gerrit, Bitbucket, Bitbucket Server, and Azure DevOps. You can also define custom remote providers or remote providers with custom domains.
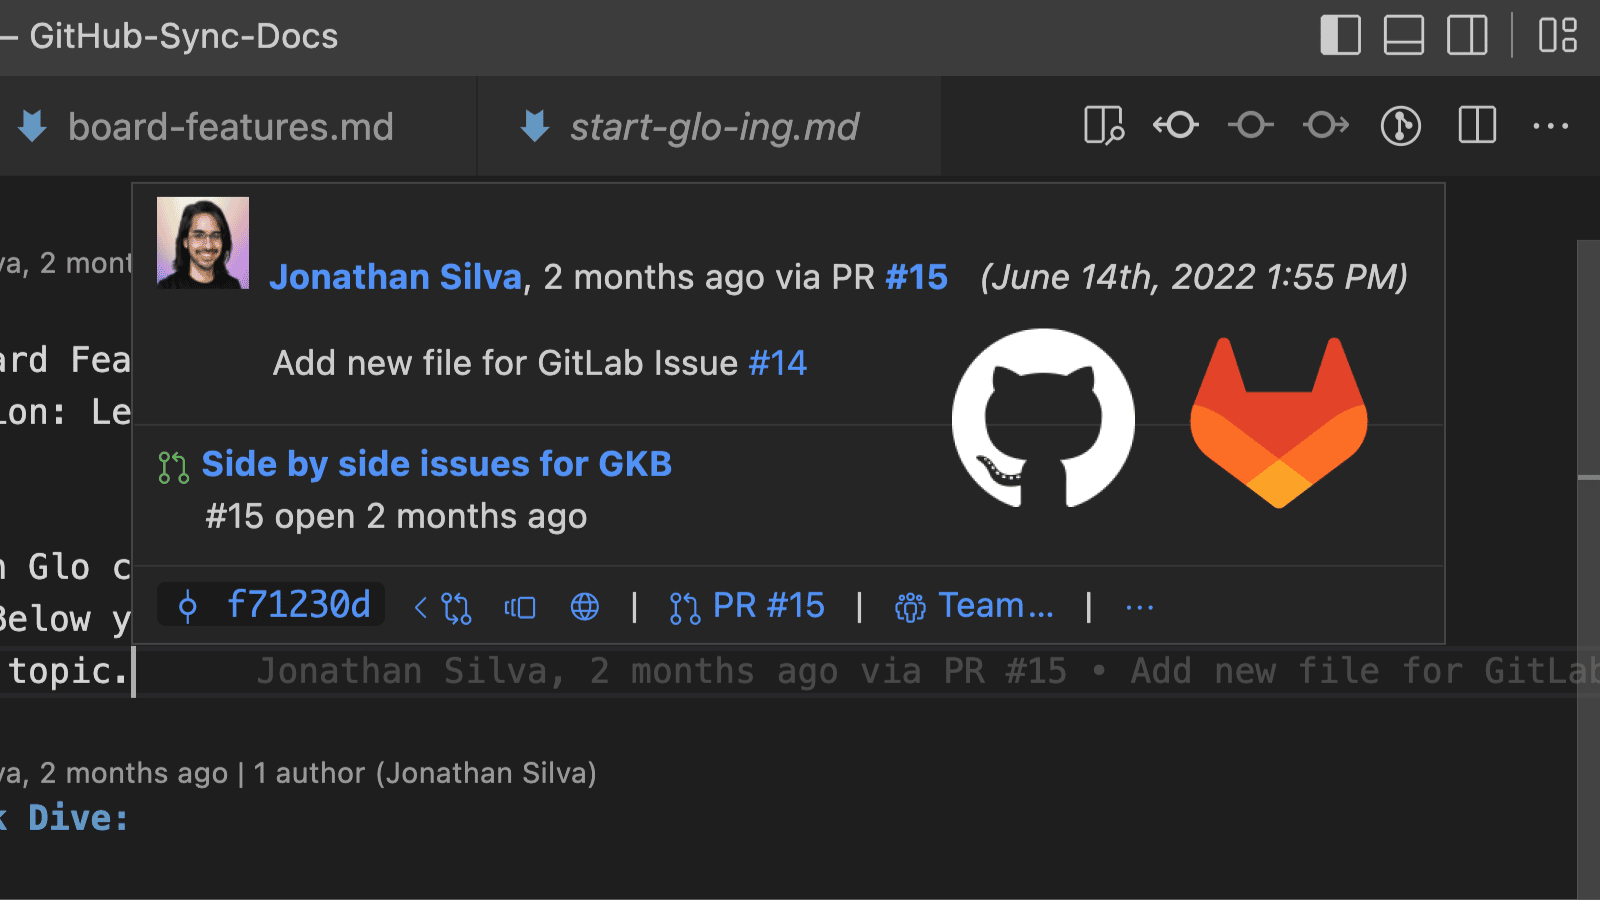
Basic integrations offer issue and pull request autolinking. Richer integrations, like GitHub or GitLab, include:
- Launchpad support
- Rich hover information for autolinks
- Pull request association with branches and commits
- Avatars for authors and commenters
These integrations also support various commands to open or copy URLs for files, commits, branches, and repositories:
- Open File from Remote (
gitlens.openFileFromRemote) — Open a local file from a URL on a remote provider - Open File on Remote (
gitlens.openFileOnRemote) — Open a file or revision on the remote provider - Copy Remote File URL (
gitlens.copyRemoteFileUrlToClipboard) — Copy the URL of a file or revision - Open File on Remote From… (
gitlens.openFileOnRemoteFrom) — Open a file or revision from a specific branch or tag - Copy Remote File URL From… (
gitlens.copyRemoteFileUrlFrom) — Copy the URL from a specific branch or tag - Open Commit on Remote (
gitlens.openCommitOnRemote) — Open a commit - Copy Remote Commit URL (
gitlens.copyRemoteCommitUrl) — Copy the commit URL - Open Branch on Remote (
gitlens.openBranchOnRemote) — Open a branch - Copy Remote Branch URL (
gitlens.copyRemoteBranchUrl) — Copy the branch URL - Open Branches on Remote (
gitlens.openBranchesOnRemote) — Open the branches view - Copy Remote Branches URL (
gitlens.copyRemoteBranchesUrl) — Copy the branches view URL - Open Comparison on Remote (
gitlens.openComparisonOnRemote) — Open a comparison view - Copy Remote Comparison URL (
gitlens.copyRemoteComparisonUrl) — Copy the comparison view URL - Open Pull Request on Remote (
gitlens.openPullRequestOnRemote) — Open a pull request - Copy Pull Request URL (
gitlens.copyRemotePullRequestUrl) — Copy the pull request URL - Open Repository on Remote (
gitlens.openRepoOnRemote) — Open the repository - Copy Remote Repository URL (
gitlens.copyRemoteRepositoryUrl) — Copy the repository URL
Connecting the GitHub and GitLab Integration
The GitHub and GitLab integrations connect through your GitKraken account at gitkraken.dev.
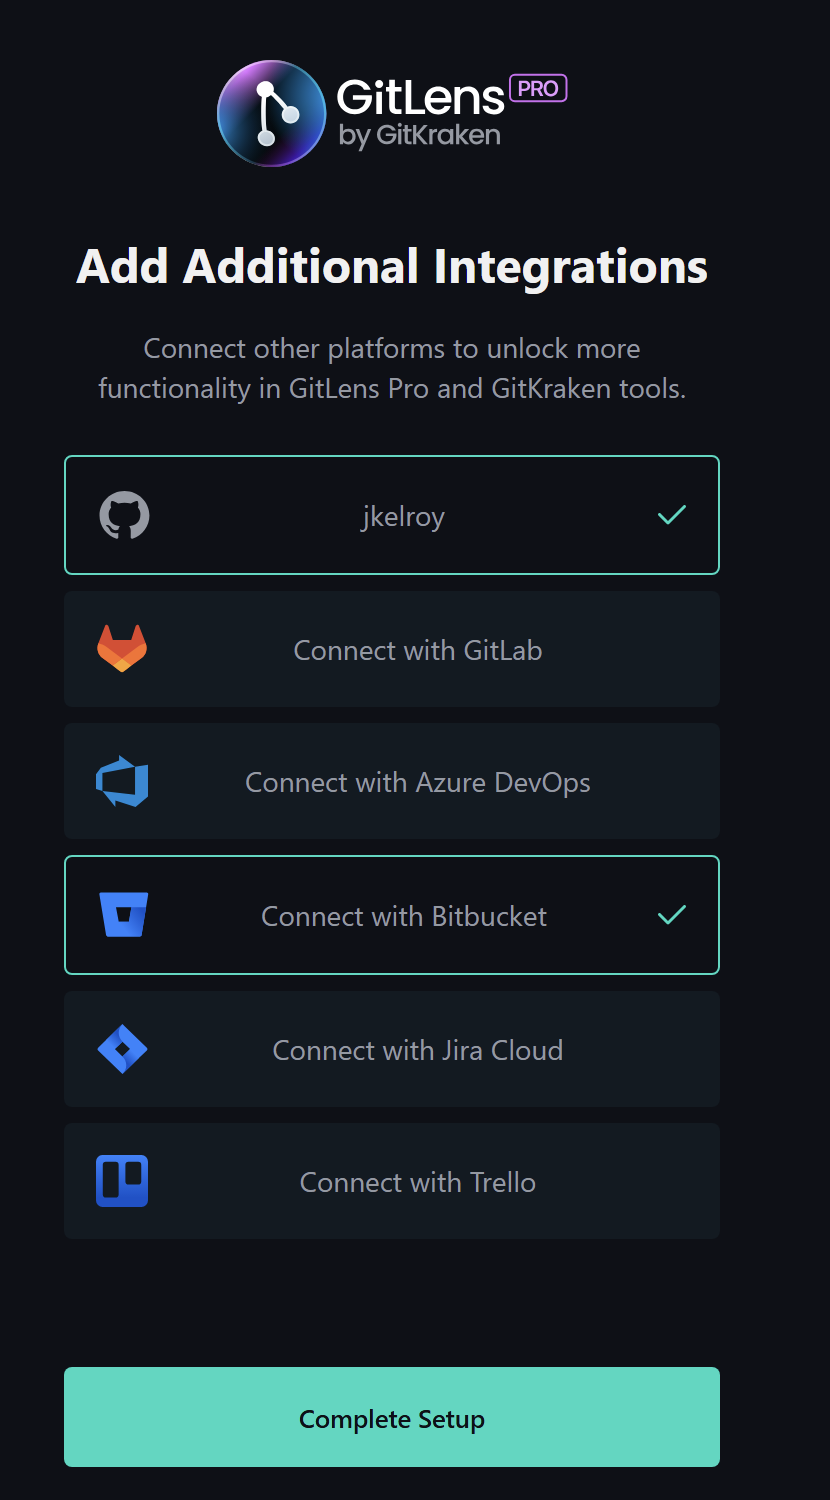
To connect an integration:
- Open the Command Palette (
Cmd/Ctrl+Shift+P). - Run
GitLens: Manage Integrations. - Alternatively, open GitKraken Account from the GitLens Activity Bar and select Integrations.

If you’re not already signed in, you’ll be prompted to log in to your GitKraken account. Then, select Connect with GitHub or Connect with GitLab, and follow the sign-in steps. You can connect multiple integrations if needed.
Finish the process by selecting Complete Setup to return to VS Code and begin using the integrations.
Community users are limited to basic functionality only.
GitHub Enterprise Server and GitLab Self-Managed Integration PRO
GitLens Pro offers a richer integration with GitHub Enterprise Server and GitLab Self-Managed.
Once authenticated, GitLens enhances autolinks in hovers with additional context. You’ll see your GitHub Enterprise Server or GitLab Self-Managed avatar, links to related pull requests, and a summary of pull request or issue details. Sidebar views for commits or branches also show this contextual information.
Connecting GitHub Enterprise Server or GitLab Self-Managed
To connect either integration:
-
Open
settings.json:- Use the Command Palette (
Cmd/Ctrl+Shift+P) > Preferences: Open User Settings (JSON)
- Use the Command Palette (
-
Add a
gitlens.remotesentry specifying the domain and type:
"gitlens.remotes": [{ "domain": "git.corporate-url.com", "type": "GitHub" }]Or
"gitlens.remotes": [{ "domain": "git.corporate-url.com", "type": "GitLab" }]- Open a repository from GitHub Enterprise Server or GitLab Self-Managed in VS Code.
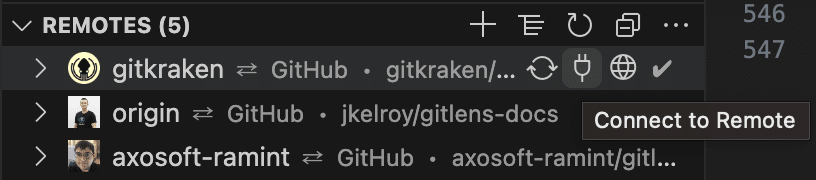
- Go to the Remotes View.
- Select Connect to Remote.
- If this option is missing, verify the format in your
settings.jsonmatches the example above.
- If this option is missing, verify the format in your
- Provide a Personal Access Token (PAT) with the required scopes when prompted, and press Enter to complete the connection.
Jira Integration PRO
The Jira Integration, connected through your GitKraken Account, enables Jira Autolinks wherever autolinks are supported in GitLens. Once connected, GitLens automatically converts Jira issue keys (e.g., ABC-123) in commit messages into clickable links.
This feature is only available for Pro subscription tiers or higher.
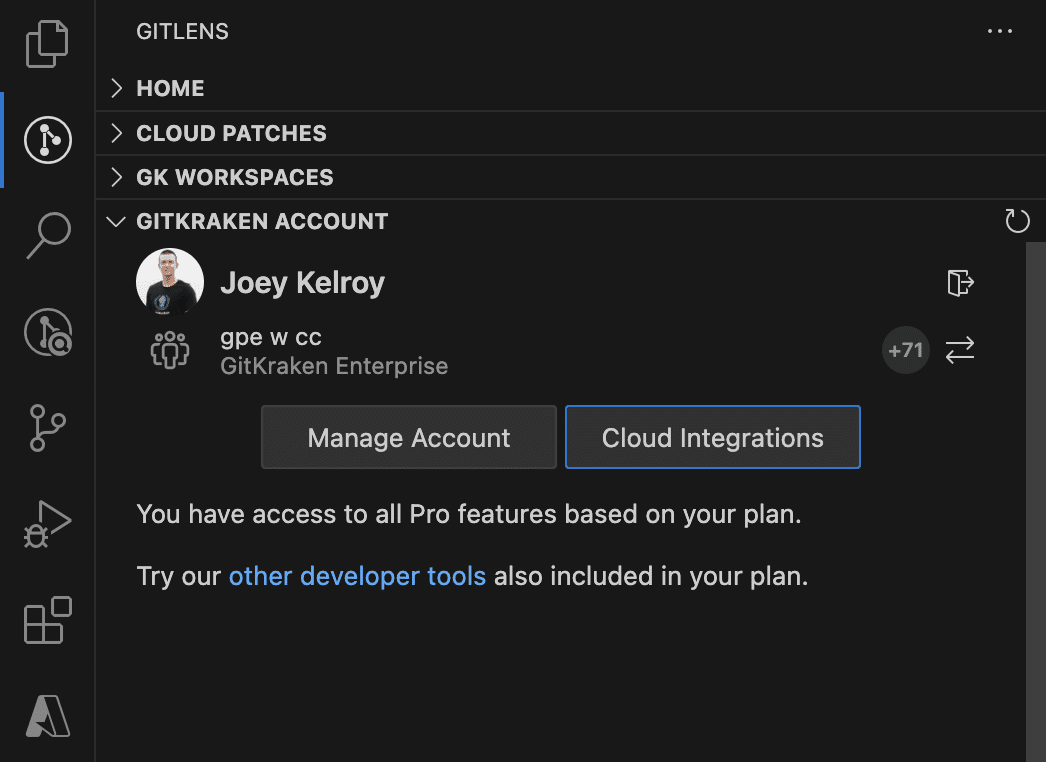
To connect the integration:
- Open the GitLens Sidebar.
- From the GitKraken Account view, select Cloud Integrations.
- Choose Jira Cloud, and authorize access to your Atlassian Account.
- Alternatively, visit your Integration Settings in a browser.
Powerful Commands
GitLens provides powerful commands to improve your workflow:
- Add Co-authors (
gitlens.addAuthors) — Add a co-author to the commit message input box. - Copy SHA (
gitlens.copyShaToClipboard) — Copy the commit SHA of the current line or the latest commit. - Copy Message (
gitlens.copyMessageToClipboard) — Copy the commit message from the current line or latest commit. - Copy Current Branch (
gitlens.copyCurrentBranch) — Copy the current branch name to the clipboard. - Switch to Another Branch (
gitlens.views.switchToAnotherBranch) — Quickly switch branches. - Compare References… (
gitlens.compareWith) — Compare two references. - Compare HEAD with… (
gitlens.compareHeadWith) — Compare HEAD with a selected reference. - Compare Working Tree with… (
gitlens.compareWorkingWith) — Compare the working tree with a selected reference. - Open Changes (difftool) (
gitlens.externalDiff) — Open file changes with the configured Git difftool. - Open All Changes (difftool) (
gitlens.externalDiffAll) — Open all working changes with the configured difftool. - Open Directory Compare (difftool) (
gitlens.diffDirectoryWithHead) — Compare working tree with HEAD using a difftool. - Open Directory Compare (difftool) with… (
gitlens.diffDirectory) — Compare with a selected reference. - Open File (
gitlens.openWorkingFile) — Open the working version of the current file. - Open Revision… (
gitlens.openFileRevision) — Open a selected file revision. - Open Revision from… (
gitlens.openFileRevisionFrom) — Open a revision from a specific reference. - Open Blame Prior to Change (
gitlens.openBlamePriorToChange) — Show blame for the prior revision of a line. - Open Changed Files (
gitlens.openChangedFiles) — Open all changed files in the working tree. - Close Unchanged Files (
gitlens.closeUnchangedFiles) — Close all files without changes. - Enable Debug Logging (
gitlens.enableDebugLogging) — Enable debug logging in the GitLens output. - Disable Debug Logging (
gitlens.disableDebugLogging) — Disable debug logging. - Copy as Patch (
gitlens.copyPatchToClipboard) — Copy patch data from views, changes, or stashes. - Apply Copied Patch (
gitlens.applyPatchFromClipboard) — Apply a patch from clipboard contents.
Deep Links
Deep Links are URLs that open specific GitLens resources, improving collaboration by sharing direct links to repositories, files, comparisons, and more. Resources that support Deep Linking include:
- Search & Compare — Link to comparisons in the Search & Compare view. Right-click a comparison, hover over Share, and select Copy Link to Comparison.
- GitKraken Workspaces — Link to a GitKraken Workspace. Right-click a Workspace, hover over Share, and select Copy Link to Workspace.
- Commit Graph — Link to remote repositories, commits, branches, and tags in the Commit Graph. Right-click the resource, hover over Share, and select Copy Link to
. - Files or Lines — Link to specific files or lines of code. Right-click highlighted lines or a file, hover over Share, and select Copy vscode.dev Link.
- Cloud Patches — Link to a Cloud Patch. After generating a Cloud Patch, click Copy Link from the success prompt.
Menus & Toolbars
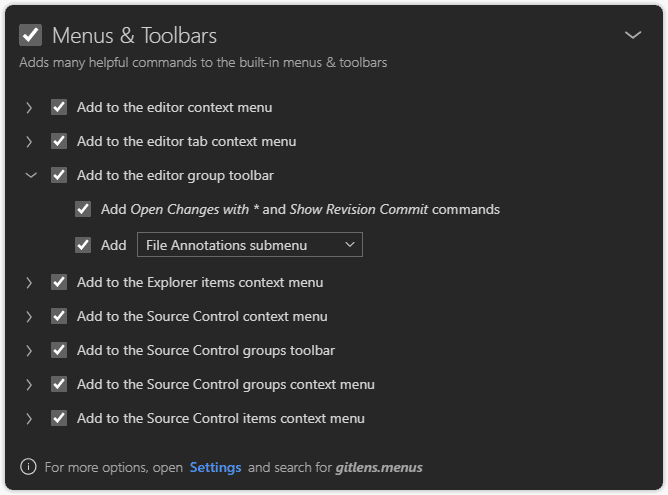
GitLens provides customizable menu and toolbar contributions to let you control where GitLens commands appear. You can easily manage these settings via the interactive settings editor.
For example, disabling Add to the editor group toolbar removes those items from the toolbar:
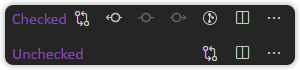
You can also expand each section to customize visibility and placement more granularly.
Modes
GitLens supports user-defined modes for quickly toggling between sets of settings.
- Shows the active mode in the status bar (optional, enabled by default)
- Toggle Review Mode (
gitlens.toggleReviewMode) — Quickly toggle Review mode.
- Toggle Review Mode (
- Switch Mode (
gitlens.switchMode) — Quickly switch between modes. - Zen Mode — Disables many visual elements for a focused experience.
- Toggle Zen Mode (
gitlens.toggleZenMode) — Toggle Zen mode.
- Toggle Zen Mode (
- Review Mode — Enables visual elements for code review.
Experimental Multi-diff Editor
VS Code 1.86 or later is required for these capabilities.
Commands using Multi-diff
- Open Folder Changes with Revision… and Open Folder Changes with Branch or Tag… via Command Palette, Explorer, and Source Control views.
- Inline Open All Changes in commits, stashes, and comparison views.
- Open All Changes and Open All Changes with Working Tree — Use the new multi-diff editor.
- Open All Changes, Individually and Open All Changes with Working Tree, Individually — Provide legacy behavior.
