

Last updated: November 2026
Using AI Agents in GitLens
GitLens 18 introduces integrated AI agent workflows directly inside your IDE. Instead of managing coding agents through scattered terminal tabs, external apps, or separate extensions, GitLens surfaces agent status, worktree context, and actionable Git workflows directly within the Commit Graph.
With GitLens, you can:
- Monitor active AI coding agents without leaving the IDE
- Track agent sessions tied to branches and worktrees
- Review AI-generated changes inside the Commit Graph
- Compose commits directly from agent-produced work
- Quickly identify sessions waiting for input
- Manage parallel worktrees and Working Changes visually
GitLens tracks sessions from Claude Code, Codex, GitHub Copilot CLI, and OpenCode through GitKraken Hooks.
Understand Agent Sessions
An agent session represents an active AI coding workflow associated with a repository, branch, or worktree.
GitLens tracks these sessions and surfaces their status throughout the interface so you can monitor progress and act on changes without switching between terminals, chat panels, or external applications.
Agent sessions appear in:
- The Commit Graph overview cards
- The Commit Graph details panel
- The Agent Sessions sidebar panel
Each session displays contextual Git information including:
- Associated branch
- Worktree
- Working changes
- Agent state
- Ahead/behind indicators
- Actions requiring attention
Install GitKraken Hooks
GitLens tracks agent sessions using GitKraken Hooks, which give GitLens real-time visibility into each session. Hooks are available for Claude Code, Codex, GitHub Copilot CLI, and OpenCode.
You can install hooks from several locations in GitLens:
- Commit Graph header
- Agent Sessions sidebar banner
- Integrations menu
- The Command Palette
- The Agents section of the GitLens settings, which lists each detected agent with its hooks status
Install Hooks
- Open the Command Palette.
- Run
GitLens: Install GitKraken Hooks for All AI Agents. - Reload VS Code or your IDE if prompted.
GitLens installs hooks for every supported agent it detects on your machine. To install hooks for a single agent, select Manage Agents in the Agent Sessions panel toolbar, then use the install button in that agent’s Hooks column.
Once installed, GitLens automatically detects sessions from those agents and surfaces their state throughout the UI.
Codex doesn’t run the installed hooks until you trust them. Run /hooks in Codex to trust the hooks, and trust them again after you reinstall them. GitLens shows this reminder when the install finishes, with a Start Codex Session button.
GitLens can answer permission requests directly only for Claude Code sessions. For other agents, GitLens shows the pending request, and you answer it in the agent’s session.
Uninstall Hooks
- Open the Command Palette.
- Run
GitLens: Uninstall GitKraken Hooks for All AI Agents.
To uninstall hooks for a single agent, use the uninstall button in that agent’s Hooks column in the Agents settings.
Understand Agent Status Pills
GitLens surfaces agent activity through status pills shown throughout the interface. Status pills are color-coded and animated to help you quickly identify what requires attention.
Running
The agent is actively processing changes or generating code. Running sessions display subtle pulse animations.
Waiting for Input
The agent requires your input before continuing. Waiting sessions display attention-grabbing animations and appear prominently in overview cards.
Idle
The session is connected but not currently performing actions.
Past
The session has ended. Past sessions stay listed, dimmed, until you archive them or until they are removed after 30 days. To list past sessions in the Agent Sessions panel, turn on Show Past Sessions in the panel toolbar.
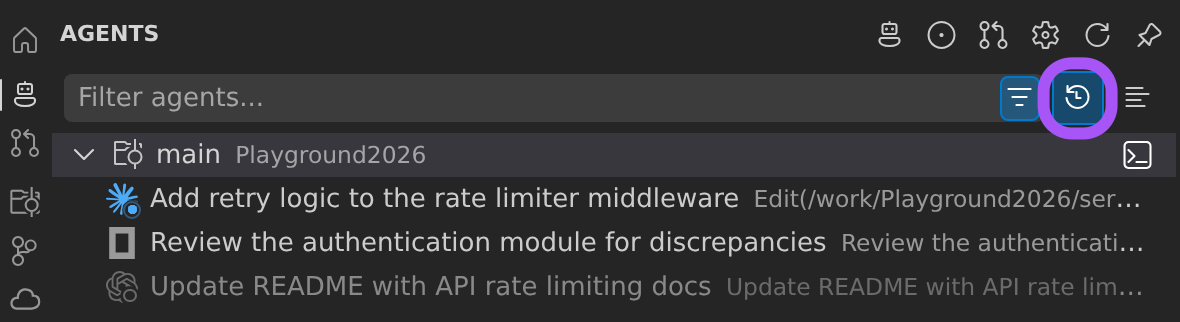
Resume a Past Session
You can resume a past session from any supported agent: Claude Code, Codex, GitHub Copilot CLI, or OpenCode. Resume actions appear on the session’s status pill, its card in the details panel, its session sheet, its Kanban card, and its row in the Agent Sessions panel. Each action names where the session resumes:
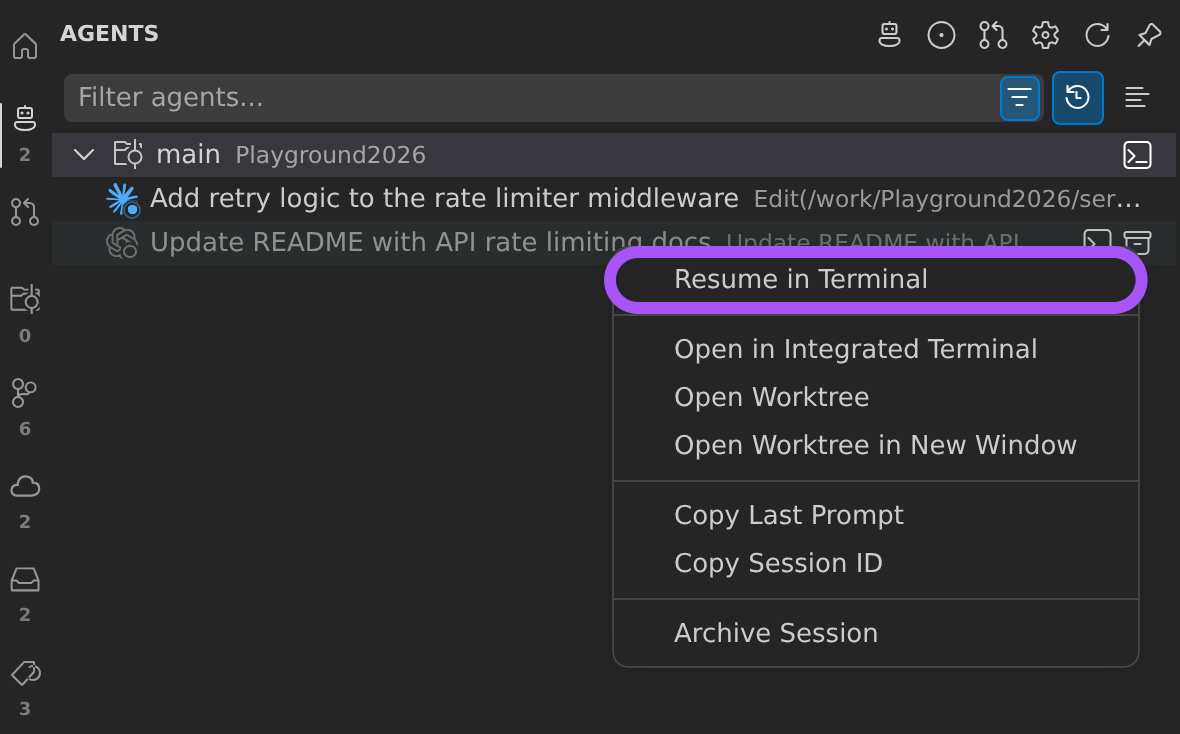
- Resume in Terminal opens a new integrated terminal in the session’s directory and runs the agent’s resume command.
- Resume in Claude Code Extension reopens the session in the Claude Code extension. This action appears only when the extension is installed and the session’s directory is open as a workspace folder.
To choose from a list of sessions, right-click a Working Changes row in the Commit Graph, or a worktree in a side bar view, and select Resume Agent Session…. The Resume Agent Session quick pick lists that worktree’s sessions under Active and Past. Select a session’s destination button to resume it there.
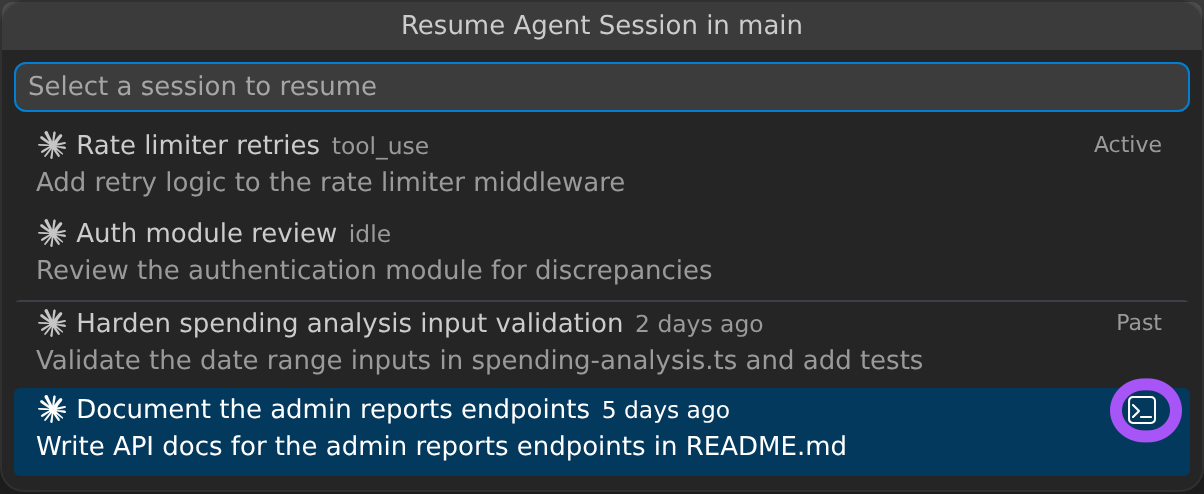
If you select a session without choosing a destination, the gitlens.agents.resumeTarget setting decides where it resumes:
- Not set (default): GitLens asks where to resume the first time a session can open in either place. Select the pin button in that prompt to remember your choice.
terminal: Always resume in a new integrated terminal.extension: Resume in the agent’s VS Code extension when it can open the session, otherwise in a terminal.
A past session’s sheet in the Commit Graph details panel shows a Resume button and an Archive action in its header.

Use the Agent Sessions Panel
GitLens 18 adds a dedicated Agent Sessions panel available from the Commit Graph sidebar, where it appears as Agents. The panel provides a centralized place to monitor all active sessions.
Panel Features
The panel includes:
- Session status pills
- Branch and worktree associations
- Quick actions to open, resume, and archive sessions
- Past sessions, shown when Show Past Sessions is on
- List and tree layouts
- Session grouping by workspace or worktree
Switch Between List and Tree Layouts
Use the layout toggle in the Agent Sessions panel toolbar to switch between list and tree layouts. Tree layout is especially useful when working across multiple repositories or worktrees.
Act on a Session from Its Context Menu
Right-click a session in the Agent Sessions panel or in the Commit Graph details panel to act on it without opening the agent. The menu shows only the actions that apply to that session:
- Allow, Always Allow, and Deny answer a pending permission request.
- Approve Plan, Reject Plan, and View Plan handle a plan the agent proposed.
- Open Session opens a live session. For a past session, Resume in Terminal or Resume in Claude Code Extension resumes it.
- Open in Integrated Terminal, Open Worktree, and Open Worktree in New Window open the session’s worktree.
- Copy Last Prompt and Copy Session ID copy session details to the clipboard.
- Archive Session removes a past session from the list.
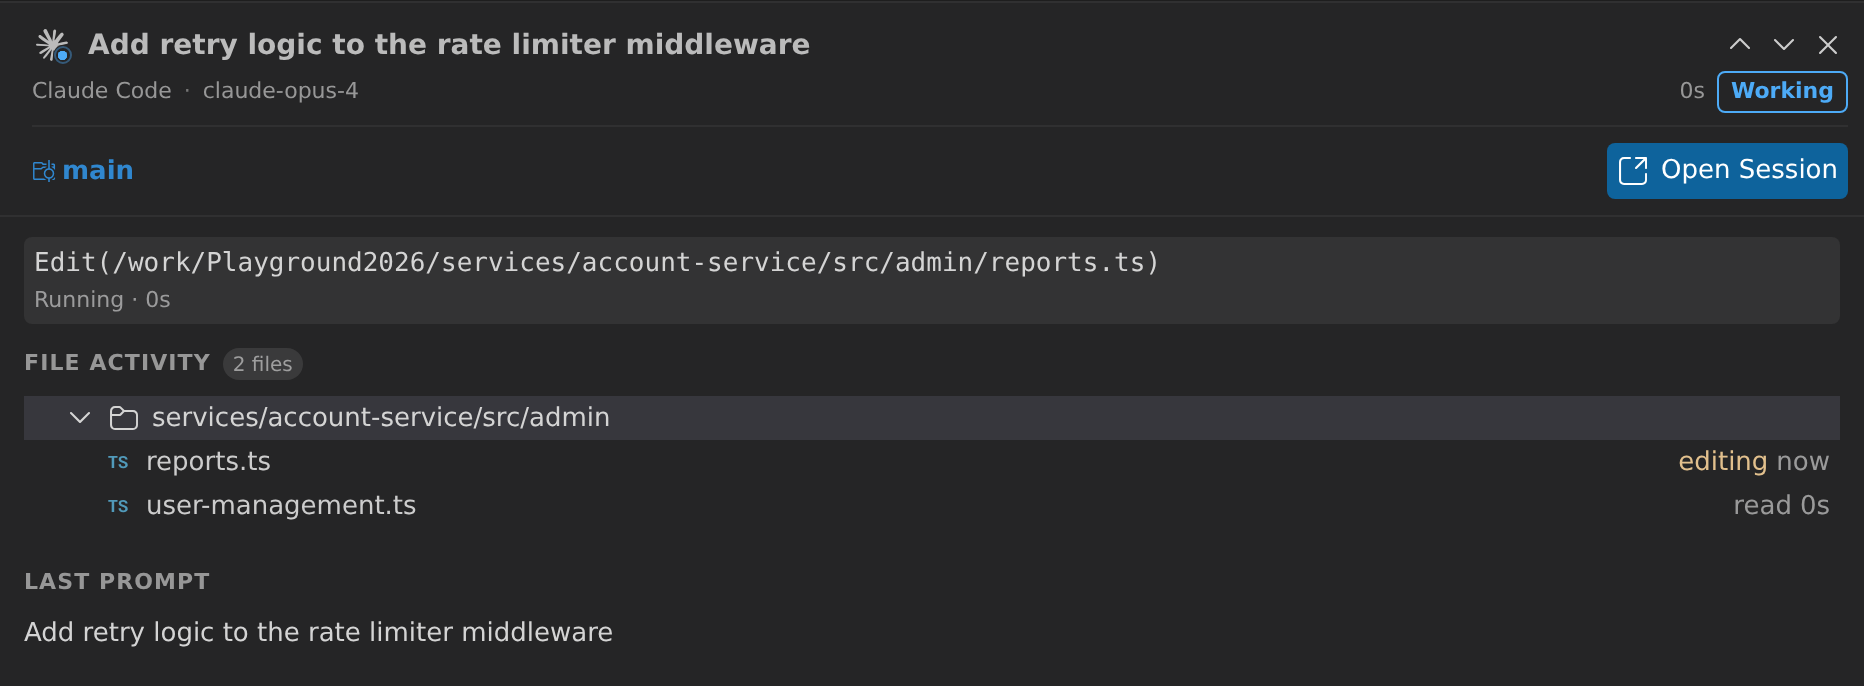
Open a Session Sheet
Select a session card in the Agents section of the Commit Graph details panel to open that session’s sheet in the details panel. The sheet gathers what you need to follow or pick up a session:
- The session’s status, agent, and the worktree and branch it runs in
- Actions for the session’s current state, such as Open Session, Allow and Deny for a pending request, or Resume and Archive for a past session
- What the agent is doing now, and File Activity listing the files it read and edited
- The Last prompt and First prompt
- Also worked in, which lists other worktrees the session visited
Use the previous and next arrows in the sheet to move between agent sessions.
Review Agent-Generated Code
GitLens 18 turns the Commit Graph into a full review surface for AI-assisted workflows.
From the Commit Graph details panel you can:
- Inspect working changes
- Compare revisions
- Review AI-generated code
- Generate commits with Commit Composer
- Resolve conflicts
- Stage and unstage files
Open the Commit Graph Details Panel
- Open the Commit Graph.
- Select a commit, branch, or Working Changes row.
- Toggle the details panel if it is hidden.
The panel can be docked on the right side or at the bottom of the Commit Graph. Hold Alt while toggling the panel to switch docking locations.
Jump from a Terminal to Its Worktree
When an agent runs in a terminal or a Claude Code conversation tab, you can go straight to the worktree it works in. Right-click the terminal tab, or the title of a terminal editor or Claude Code tab, and select one of these actions:
- Open in Commit Graph opens the Commit Graph with that worktree’s Working Changes row selected.
- Focus in Commit Graph also focuses the Commit Graph on the worktree’s branch.
- Open in New Window opens the worktree folder in a new window.
GitLens resolves the worktree from the agent session running in the terminal, or otherwise from the terminal’s current folder. For a Claude Code tab, GitLens matches the tab to its agent session.
Run AI Code Review in the Commit Graph
GitLens 18 adds AI-powered review workflows directly inside the Commit Graph.
Start an AI Code Review
- Open the Commit Graph.
- Select a Working Changes row or commit.
- Open the details panel.
- Switch to Review mode.
GitLens generates:
- Review summaries
- Suggested focus areas
- Severity indicators
- File-level context
This helps you validate AI-generated changes before committing or opening a pull request.
AI Code Review requires GitLens Pro.
Compose Commits from Agent Changes
Commit Composer is integrated directly into the Commit Graph details panel. You can generate structured commits from working changes without leaving the Commit Graph.
Compose a Commit
- Open the Commit Graph.
- Select a Working Changes row.
- Open the details panel.
- Switch to Compose mode.
- Review proposed commit groupings.
- Edit the generated commit message if needed.
- Commit the changes.
Compose mode supports:
- Multi-diff previews
- Staged and unstaged files
- Untracked files
- AI-generated commit messages
Manage Multi-Worktree Workflows
GitLens 18 introduces multi-worktree Working Changes rows in the Commit Graph. Instead of showing changes only for the active worktree, the Commit Graph displays a Working Changes row for every connected worktree.
This makes it easier to:
- Monitor parallel agent workflows
- Compare work across tasks
- Review uncommitted changes
- Resolve conflicts
- Compose commits from multiple worktrees
Each Working Changes row updates live as files change. The row shows its branch in an inline branch pill. Rows for other worktrees also carry a worktree row marker, and a row with a paused operation shows that state, such as Rebasing.
Start an Agent Session in a Worktree
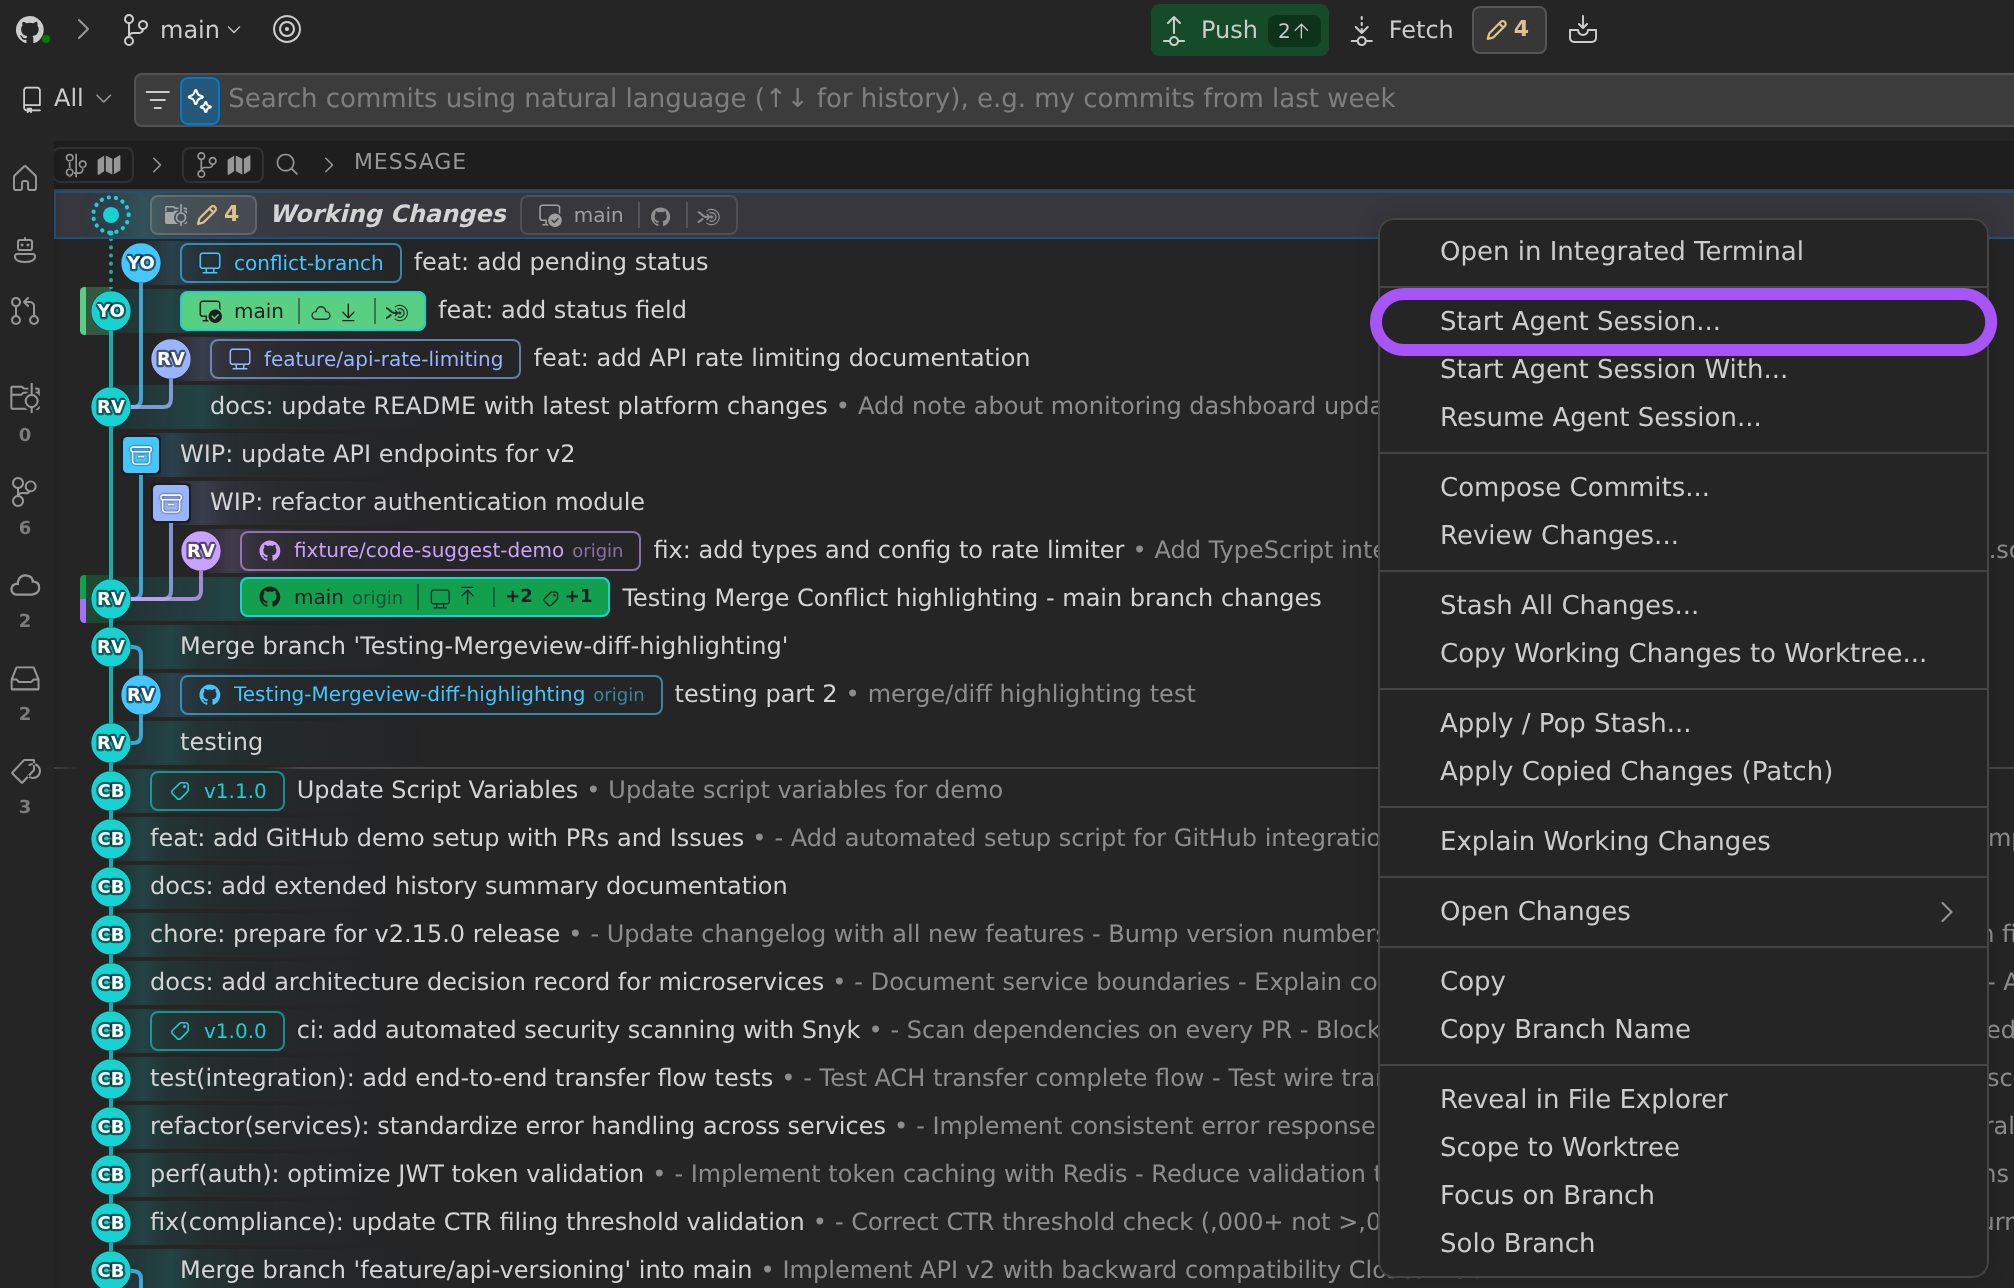
Right-click a Working Changes row in the Commit Graph, or a worktree in a side bar view, to launch an agent in that worktree:
- Start Agent Session… starts your default agent. If no default agent is set, GitLens asks you to choose one.
- Start Agent Session With… always asks which agent to start.
- Resume Agent Session… lists the worktree’s sessions so you can resume one.
A CLI agent starts in a new terminal at the worktree. The gitlens.openInTerminalLocation setting controls whether that terminal opens in the terminal panel or as an editor tab. A chat or extension agent receives a prompt to work in the worktree.
Follow the Active Terminal
When the Commit Graph is visible, it follows your active terminal or Claude Code conversation tab and selects the Working Changes row of the worktree that terminal is in. If an agent session runs in the terminal, the Commit Graph selects that session’s worktree. Following never opens the Commit Graph for you, and a tip appears the first time it moves the selection.
To stop following, select Stop Following Active Terminal from the Commit Graph’s overflow menu, or set gitlens.graph.followTerminal.enabled to false. Select Follow Active Terminal to turn it back on.
By default, the Commit Graph ignores terminals in other repositories. Set gitlens.graph.followTerminal.allowRepositorySwitching to true to let it switch repositories.
Use Working Changes Scroll Markers
The Commit Graph minimap includes scroll markers that highlight Working Changes rows. You can customize marker colors or enable and disable markers in settings.
Use Focus Branch Mode
Focus Branch mode reduces Commit Graph noise when working on a specific branch or task. When enabled, the Commit Graph focuses on the branch you select.
Enable Focus Branch Mode
- Open the Commit Graph.
- Open the branch visibility menu in the Commit Graph header.
- Select Focus Branch, then select a branch to focus.
You can also right-click a branch and select Focus on Branch.
While focused:
- The Commit Graph follows the branch’s first-parent history
- The minimap zooms to the relevant commit range
- Simplify Merge History applies automatically
- The branch visibility menu shows the focused branch, with the tooltip “Showing branch Only”
Focusing a branch is separate from scoping the Commit Graph to a worktree with Scope to Worktree.
Pin a Branch in the Commit Graph
GitLens 18 allows you to pin an important branch to the leftmost column of the Commit Graph. This keeps long-lived reference branches like main or develop visible while you navigate complex histories.
Pin a Branch
- Right-click a branch row.
- Select:
Pin BranchPinned branches remain visible across Commit Graph sessions.
Resolve Conflicts in the Commit Graph
Conflict resolution workflows extend directly into the Commit Graph. You can resolve merge conflicts from Commit Graph Working Changes rows or the Interactive Rebase editor. Conflict states appear inline inside the details panel.
Open the Commit Graph in a New Window
GitLens 18 adds support for opening the Commit Graph in a detached window. This is especially useful for multi-monitor setups, large repositories, persistent review workflows, and parallel agent workflows.
Open in a New Window
From the Commit Graph menu, select:
Open in New WindowStart Tasks and Reviews in Kepler
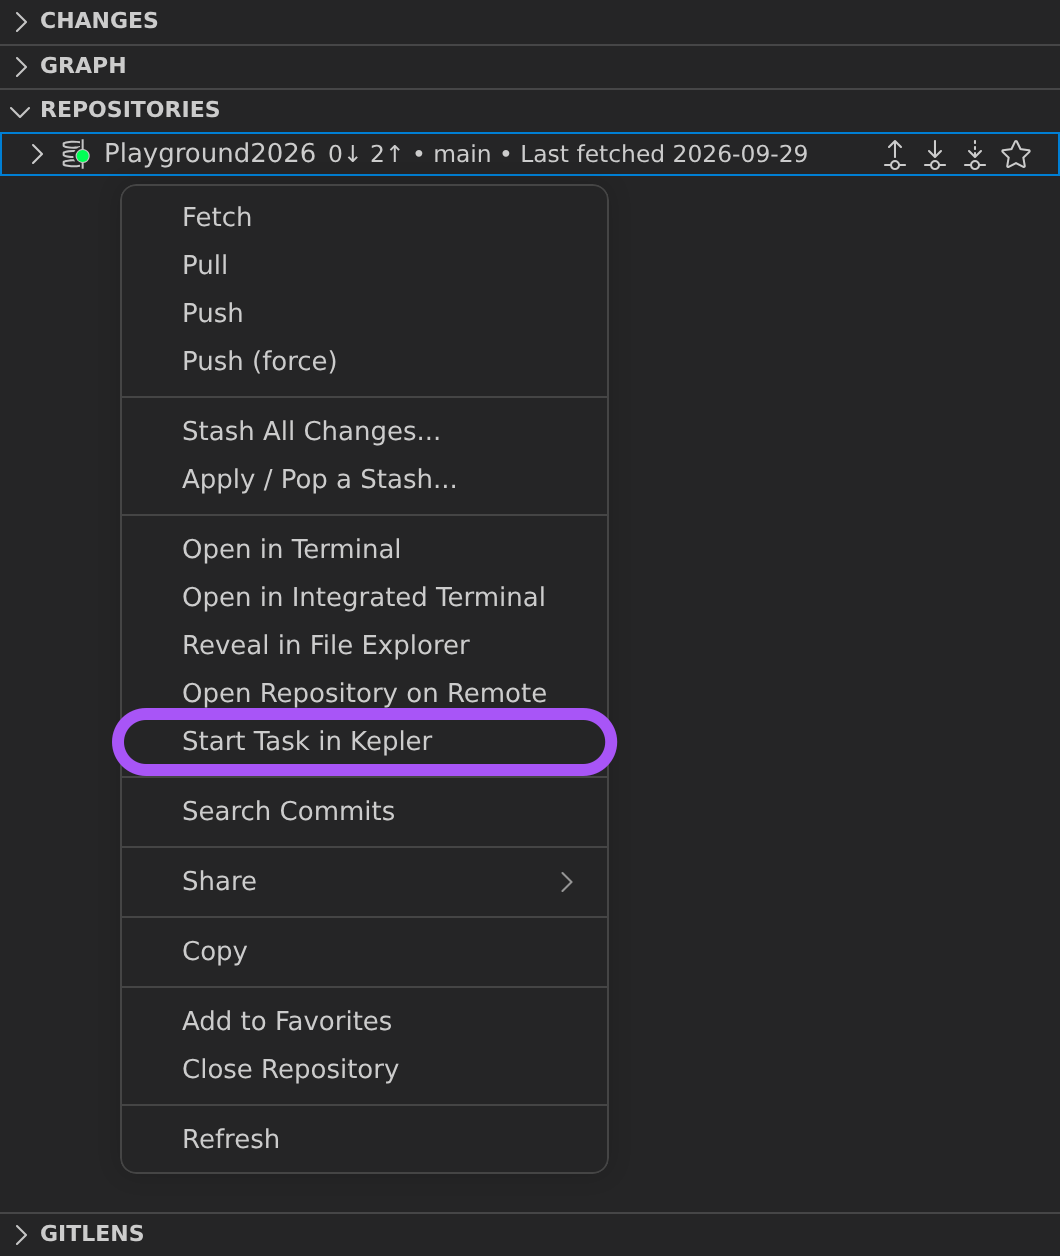
Kepler is GitKraken’s agentic development environment, a desktop app that runs AI agents across a task, from an issue or pull request to a merged change. If you use Kepler, GitLens can hand an issue, a pull request, or a repository to Kepler’s task composer, so you set up and run the work there instead of in VS Code. Kepler creates its own worktree for the task, so GitLens doesn’t create a branch or worktree.
You can start a Kepler task from these places:
- Start Task in Kepler: Right-click a repository in the Repositories view.
- Start Review in Kepler: Right-click a pull request in a GitLens view, in the Launchpad view, or in the Commit Graph.
- Open in Kepler: Choose this option in the first step of Start Work or Start PR Review, above Open in an agent and Continue manually. To skip that step and always use Kepler, set
gitlens.ai.openInAgenttokepler.
GitLens offers Kepler only for providers that Kepler supports: GitHub, GitHub Enterprise, GitLab, GitLab Self-Managed, Azure DevOps, and Bitbucket for pull requests, and the same providers except Bitbucket, plus Jira, Linear, and Trello, for issues. Kepler options don’t appear in VS Code for the Web. If Kepler isn’t installed, GitLens shows a message with a Get Kepler button. When GitLens detects Kepler on your computer, the Kepler step in the Welcome view counts as complete.
Related Features
GitLens agent workflows work especially well alongside:
These end-to-end workflows build on the same agent features:
