

Last updated: October 2026
An agent has stopped and says it is done. Now you read what it actually did.
All of that happens in the task’s worktree: the Git working copy the agent made its changes in. The task view rail groups a task’s worktrees under Changes: that’s where you go to review them. See the task view.
Reading a diff has two surfaces, and they answer different questions:
| Surface | What it is for |
|---|---|
| The worktree tab’s changes panel | The table of contents: which scope, how much changed, the list of files, and the commit box |
| The Changes overlay | The reading surface: a full-window diff, one file or many, with the file tree and commit box beside it |
Every file in the panel leads into the overlay, opened on exactly the scope the panel was showing.
The worktree tab
Open a worktree from the rail’s Changes group and it opens in a tab of its own: a strip of verbs across the top, the changes panel below it.
The strip
| Control | What it does |
|---|---|
| The branch pill | The branch this checkout is on. Its chevron opens Open changes, Copy branch name, Copy worktree path, Show in Finder (macOS), Show in Explorer (Windows) or Show in file manager (Linux), Refresh, Detach worktree… and Delete worktree…. During a stopped rebase or merge it also holds Continue {operation} and Abort {operation}… |
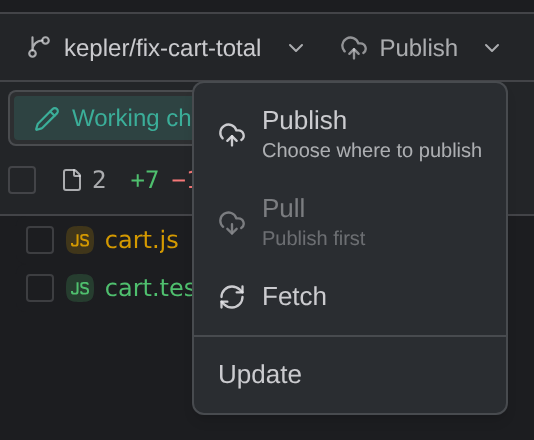
| The sync control | One button whose verb follows the branch’s state (Publish, Push, Pull, Fetch or Update), with the counts beside it. See Publishing and syncing the branch |
| Open in | Hands the checkout to another app. The split button runs your default; the chevron lists the rest, ending with Open on {provider} where the branch lives on a supported host |
| Run a command | The repository’s configured commands, and Manage commands…. See Settings |
The strip’s controls stay quiet until you need them: each draws its outline only on hover, on keyboard focus, or while its menu is open.
The strip fits itself to the column one step at a time rather than all at once at a breakpoint: the sync control’s counts fold first, leaving its icon; then the branch name truncates; then Open in and Run a command drop out of the row. Both stay a right-click, or the tab’s own menu, away.
For a shell in this checkout, use the rail row’s New terminal here, or Cmd/Ctrl+J. Terminals live in the drawer beneath the columns, not on this strip. See The Task View.
The changes panel
The panel is two rows of controls over a list of files, with the commit box under the list.
| Part | What it does |
|---|---|
| Working changes / Commits | The scope. Each side carries its own count, so you can see where the work actually is before switching |
| All / Select | On Commits only. All is every commit this branch adds against its merge target; Select narrows to one commit or a range you pick from the list |
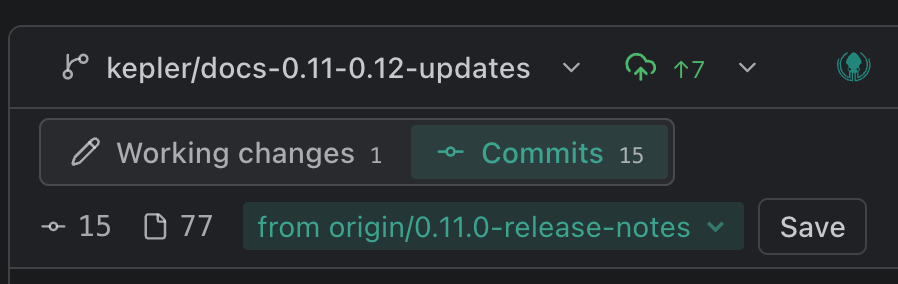
| The counts | Commits, files and the line delta, then from {branch}: the merge target the counts are measured against. Click it to compare against another branch. See Merge targets |
| View as tree / View as list | How the files are drawn |
| Show all files | Shows every file in the checkout, not only what changed |
| Filter files | Narrows the list |
The scope is chosen once and then left alone. Kepler won’t flip you to Commits the moment the last working change is committed, or back to Working changes because an agent touched a file. Either would move the list under whoever was reading it.
Show all files is independent of the scope, so browsing every file in the checkout survives a scope switch.
The header above the commit list says how far the branch has come: {count} commits ahead of {branch}, with branched here marking the merge base.
A wholly untracked folder with hundreds of files, such as a build output nobody ignored or a test sandbox, shows as one muted row with its file count instead of thousands of rows. Show files lists them; until you do, line totals that leave them out are marked partial. Staging, discarding and committing take the folder as a whole, and the confirmation names its file count.
The Changes overlay
Click a file, or Open changes from the branch pill’s menu, and the overlay takes the window.
The overlay is where you act on a diff, not only read it. In Working changes you can edit a file in place, stage it, commit it, resolve its conflicts, discard it or delete it. In any scope you can leave review comments for your agent. See Staging and committing and Review comments.
The layout
| Part | What it holds |
|---|---|
| The tree | The same file tree the panel had, over the same scope, with its own scope and layout controls. In Working changes, each row has a staging checkbox and the commit box sits beneath the list |
| The viewer | The diff, or several diffs stacked when you opened a folder or a selection. Its header carries the review comments control once you’ve written one |
Hide changes panel collapses the tree and hands its width to the viewer. With the tree hidden, the scope picker and a Jump to file… switcher move onto the viewer’s own header, so you never lose the way back.
Moving around
| Gesture | What it does |
|---|---|
| Click a file | Opens it on its own |
| Cmd/Ctrl-click | Adds a file to the set on screen |
| Shift-click | Extends the selection to a range |
| Click a folder | Opens every file in it, stacked |
| Alt+↑ / Alt+↓ | Previous and next file |
| Cmd/Ctrl+P | Filter files, or Jump to file… when the tree is hidden |
| Escape | Closes the overlay. With an unsaved edit, it asks first |
The header counts what you are reading: {index} of {total}, and {count} files shown once a filter is narrowing it.
Reading a diff
- The file path heads each diff, with its +/− line stats.
- Added lines are green, removed lines red.
- Unmodified regions are collapsed, leaving three lines of context around each change.
- Expand all and Collapse all act on the whole stack; a single diff folds from its own header.
- Wrap lines on the viewer’s header wraps long lines instead of scrolling them sideways.
- A file that is unchanged in the current scope is drawn as Unchanged in this scope rather than hidden, so a Show all files browse reads the whole checkout.
- A conflicted file is marked ! in the tree and the viewer.
Right-click a file row for its own menu: Stage file or Unstage file, Discard changes, Delete, Open in editor, and an Open in submenu with your editors, Open in default app, Show in Finder (macOS), Show in Explorer (Windows) or Show in file manager (Linux), and Open file on {provider} where the file exists on a supported host. Copy path and Copy relative path end the menu. Select several rows and the items act on all of them.
Editing in place
In Working changes, the diff is the file on disk: click into it and type. The header marks such a file Editable, and Cmd/Ctrl+S saves.
An unsaved edit shows Unsaved with Save and Discard beside it. Nothing throws it away silently: Escape, closing the overlay, or moving to another file, scope or worktree asks Save your edit? first. A file with an unsaved edit can’t be staged or committed until you save or discard it, since Git records what is on disk.
Editing a file reached through a symlink saves to the file it points at, and the link stays a link. A symlink’s own change (the path it points to) is read-only. Commits are history, so the Commits scope is never editable.
Stacked or split
Stacked puts removals and additions in one column; Split puts the old and new file side by side. The toggle sits on the viewer’s header, and Settings → Appearance → Diff view sets what it starts on.
Split needs room for two columns of code. Below roughly 640 pixels of viewer width the diff falls back to Stacked whatever the setting says. The header says Too narrow for a split diff rather than truncating both sides into noise.
Diffs that are not code
| Case | What you see |
|---|---|
| Images and SVGs | Before and After previews, each with its size on disk |
| A new file | The whole file, syntax-highlighted, rather than an all-additions diff |
| A file with no textual change | No textual changes to display |
Diffs normalize line endings, so a file that changed from CRLF to LF does not read as a rewrite.
When a scope can’t be read
A failed read says so rather than standing in for an empty one: Couldn’t load these changes, with Try again, and Git did not say why. when Git offered no reason. An empty scope reads No working changes or No changes in this scope; a branch with no base yet reads No base branch to compare against yet.
Review comments
Read the diff, mark what needs fixing, and hand the whole list to the agent in one go.
| To comment on | Do this |
|---|---|
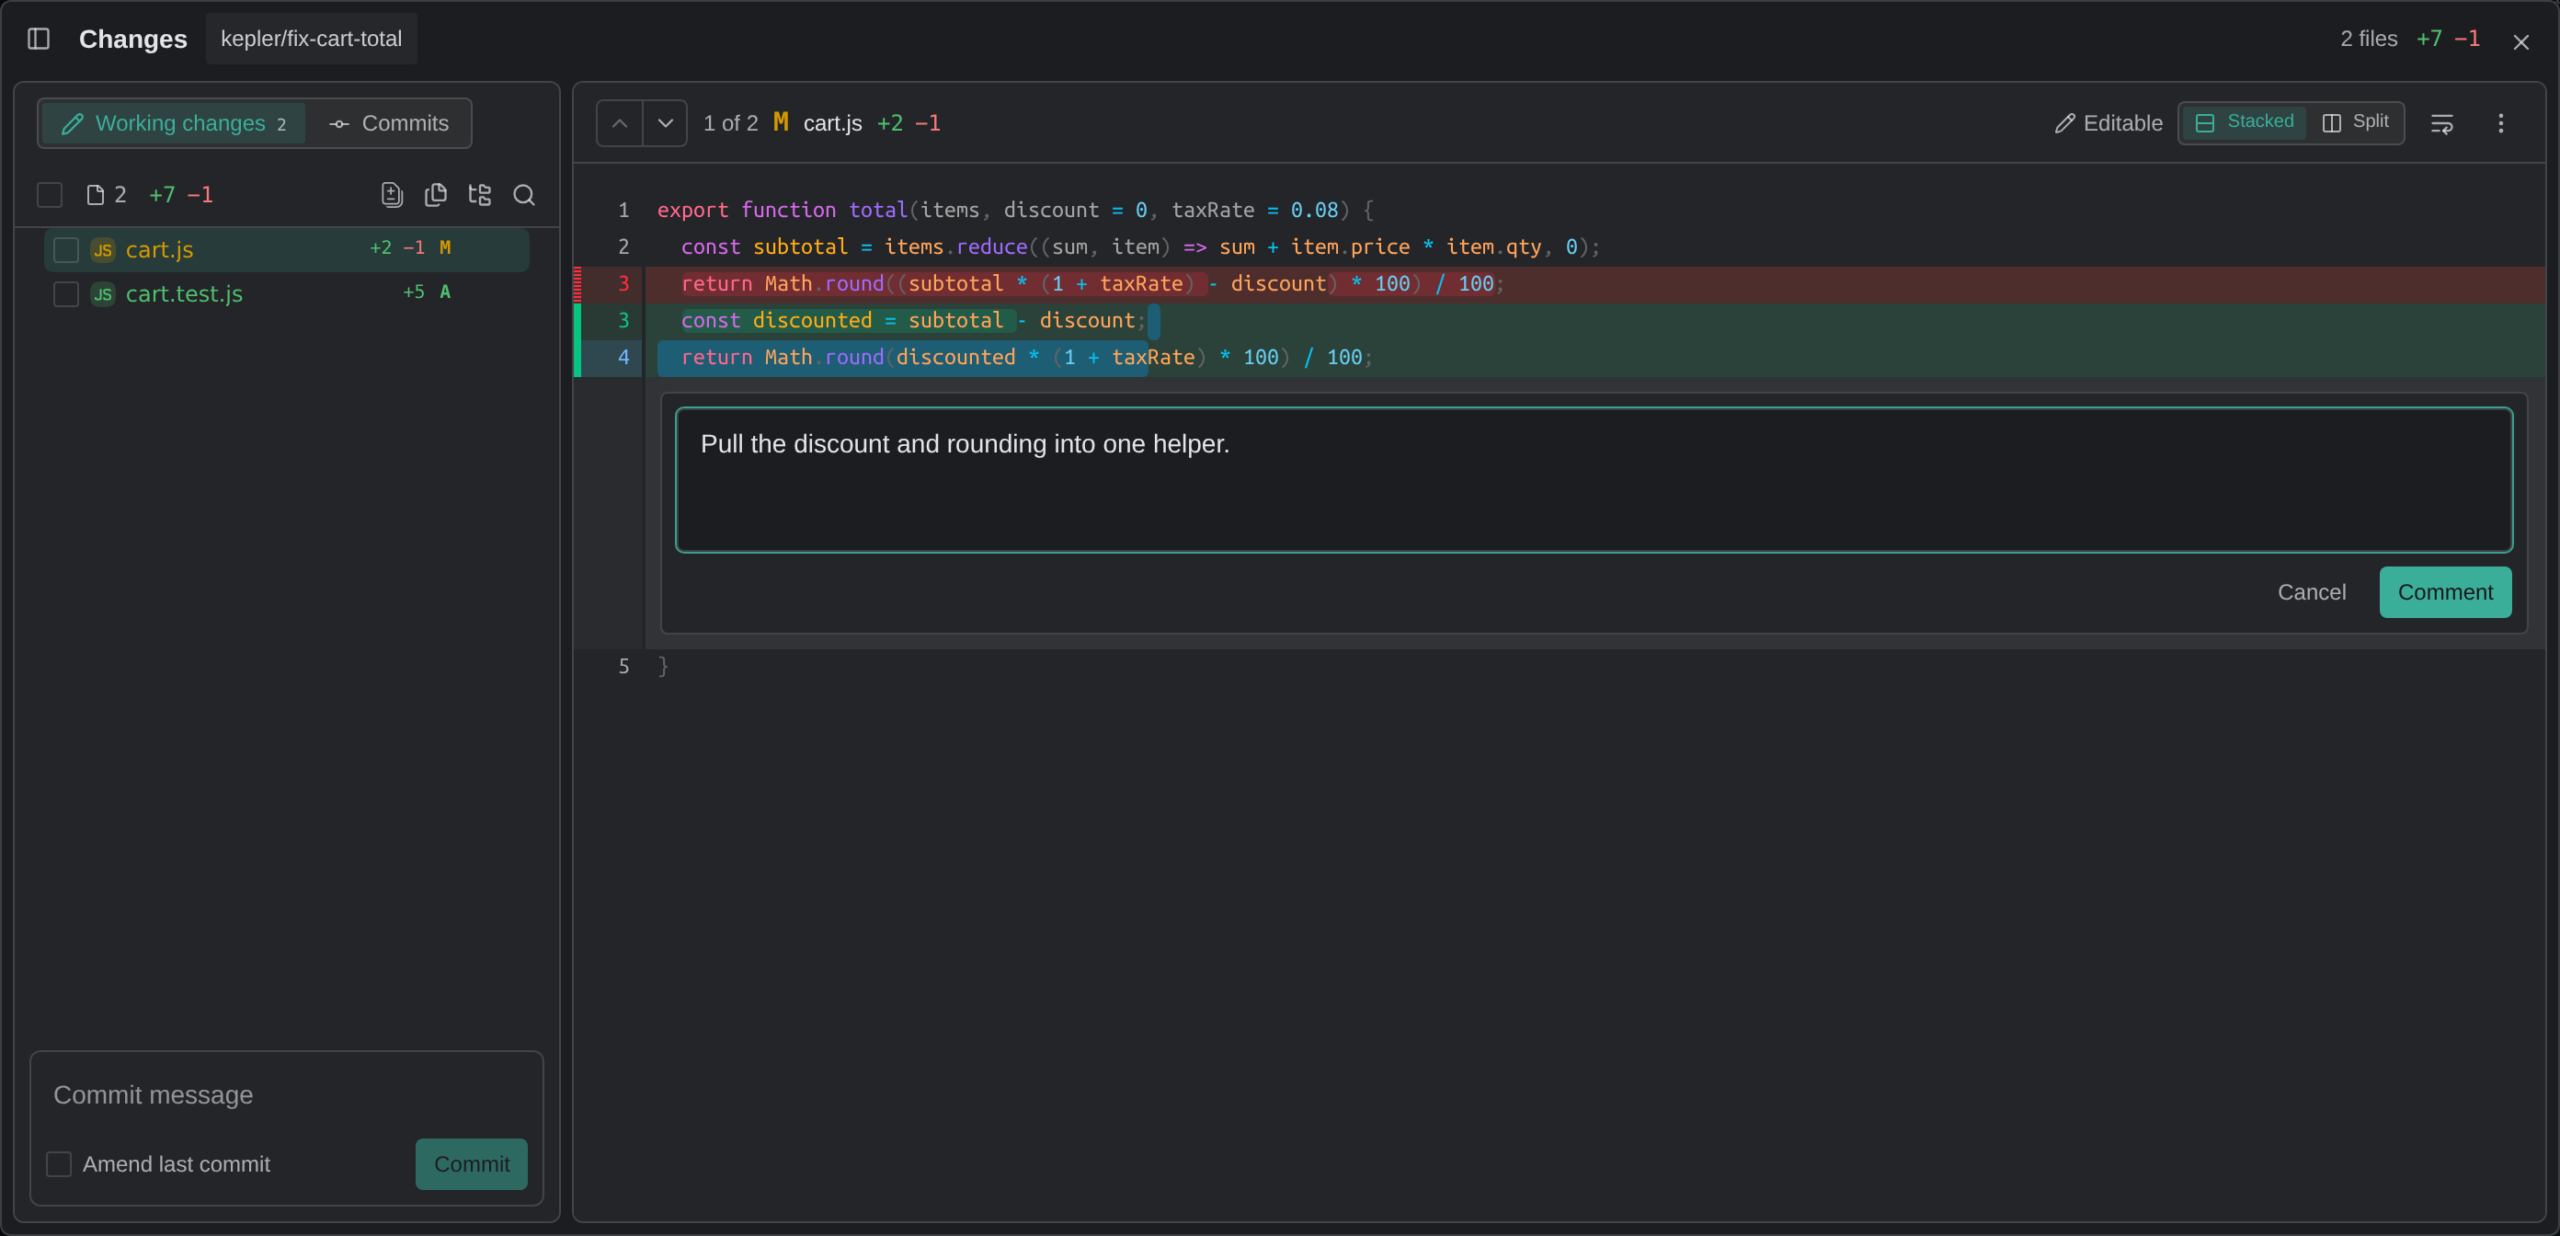
| One line | Hover it and click the + beside its line number |
| A range | Click the + on the first line, then Shift-click the last, or extend with Shift+↑ / Shift+↓ |
| What you selected in the editor | Cmd/Ctrl+Shift+C, which also works on the line the caret is on |
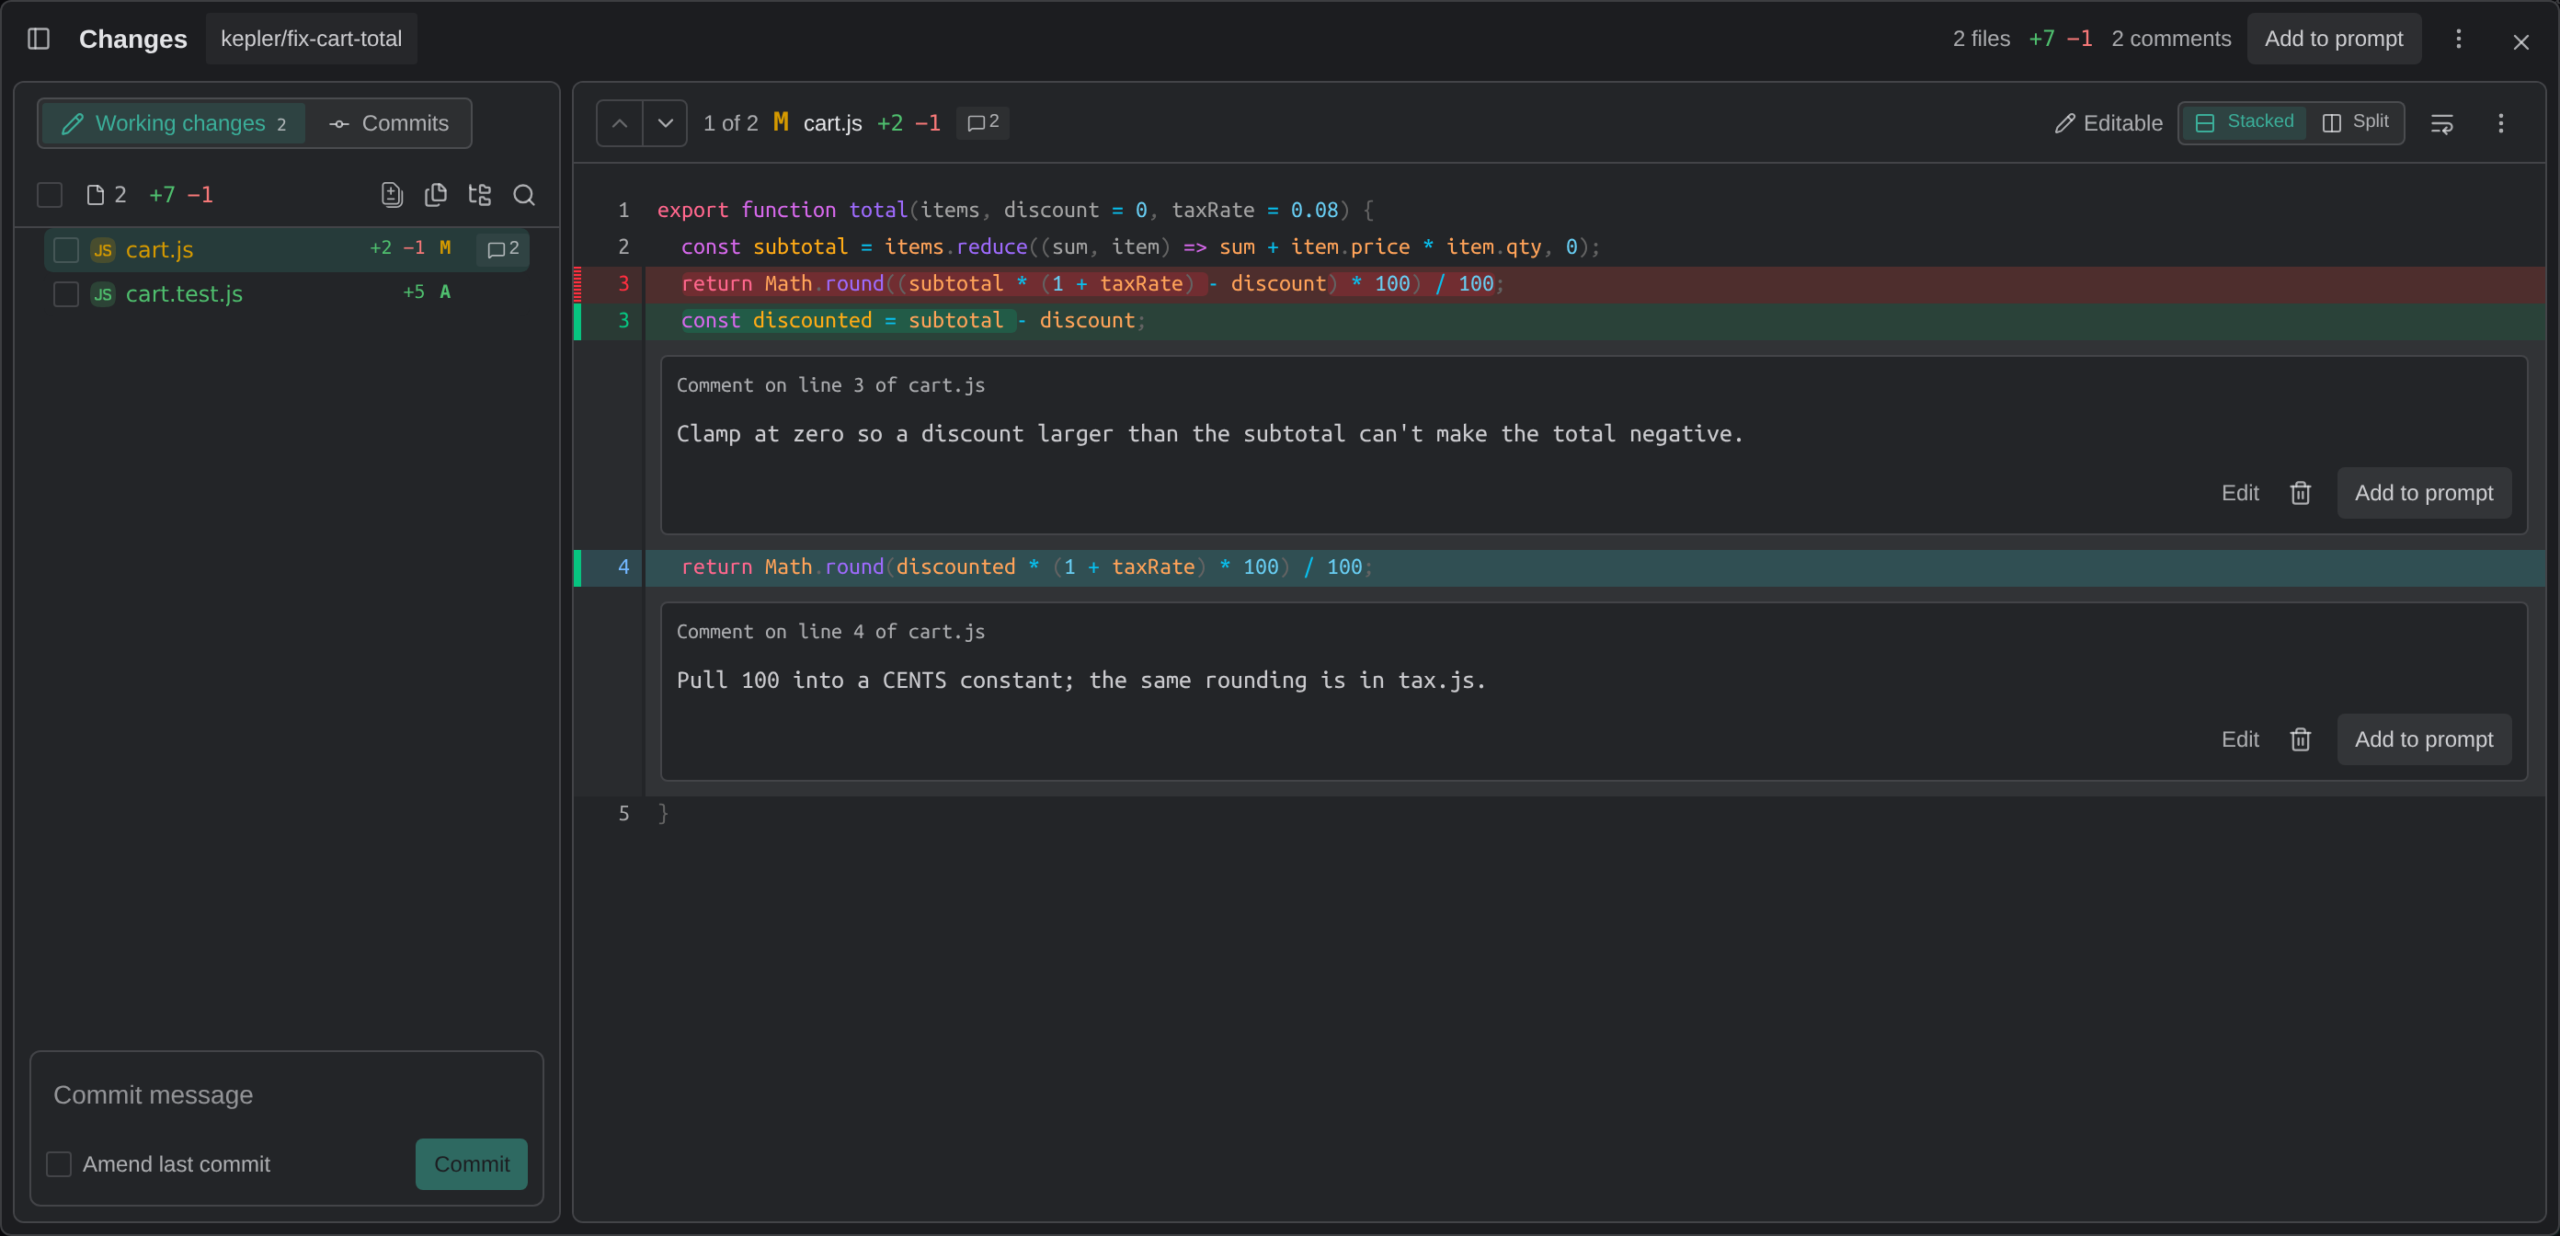
A draft opens under the last line. Type your note and press Comment, or Cmd/Ctrl+Enter. Each comment becomes a card under its lines, with Edit and Delete comment. Comments work on every diffed file in a stack, in Working changes and Commits alike; a file shown whole, such as a new file, takes none. The file header and its tree row show how many comments a file has.
Comments stay in Kepler. Nothing is posted to your Git host, and the agent doesn’t see them until you send them.
The viewer’s header sums them up: {count} comments, Add to prompt, and a Comment options menu with Discard all comments. Add to prompt turns every comment into one block and adds it to the composer of the session running in that worktree. Each comment in the block carries its path:lines, the quoted code, and your note. It does not send: you read the prompt, add to it, and press Send yourself. Each card has its own Add to prompt for sending just that one. Sent comments are cleared from the diff.
Add to prompt needs a session in this task running in the same worktree as the diff; the button’s tooltip names the session it will write into. From the Dashboard, open the task first.
Typed text is never thrown away: Escape only leaves a draft’s field, and a draft with text survives closing the overlay or moving to another file. A comment whose lines changed or whose file left the scope is kept and listed as {count} comments outside this diff rather than drawn under the wrong code.
Staging and committing
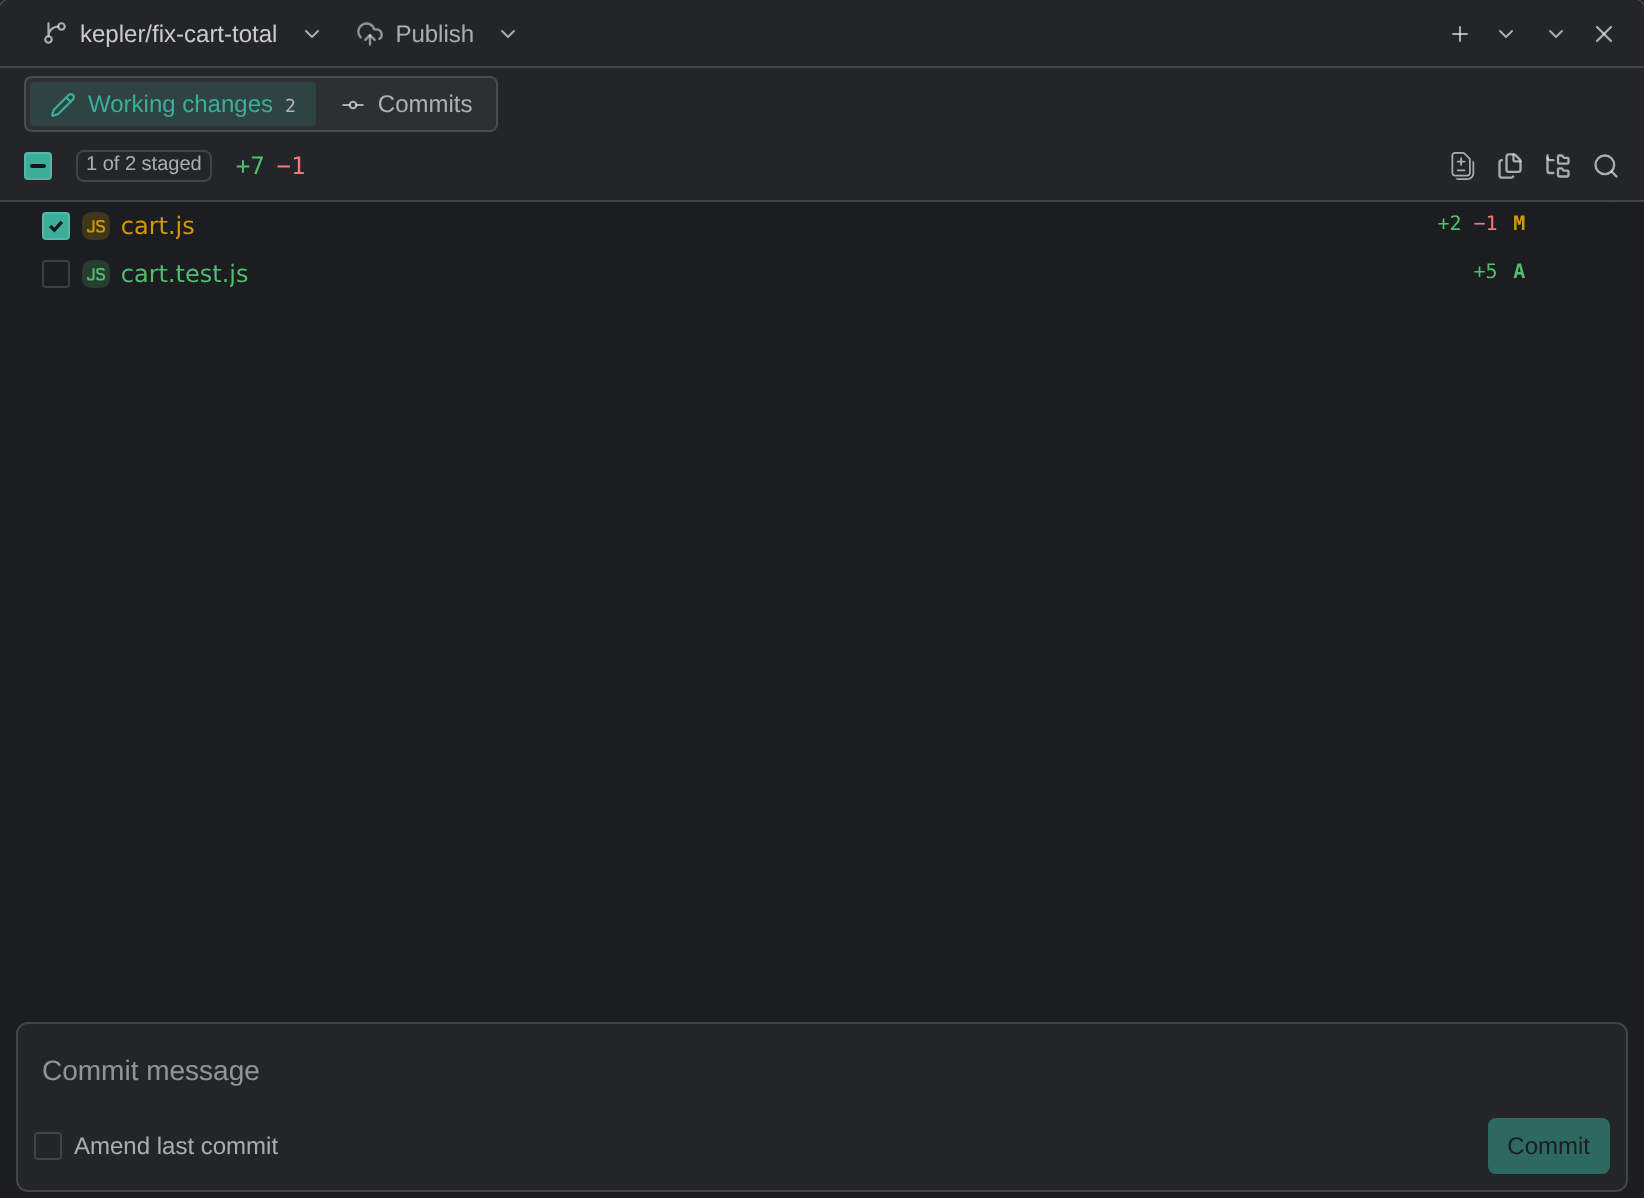
In Working changes, the tree is where you stage and the commit box beneath it is where you commit. The panel and the overlay share one commit box per worktree, so a message you start in one is waiting in the other, and it’s kept when the overlay closes.
Staging
- Each file and folder row has a checkbox: tick it to stage, untick to unstage. The tree’s header box stages or unstages everything listed, and its badge reads {staged} of {total} staged.
- A filter narrows what the header box acts on, so a file you filtered out is never swept up with the rest.
- Discard changes asks first. Your current version goes to the Trash (the Recycle Bin on Windows), so you can get it back.
- Delete removes the file from disk without touching the index, so Git reports the deletion like any other. It moves the file to the Trash too.
Where Kepler can’t use a Trash, the confirmation says the change is permanent before you confirm it.
The commit box
The commit box is framed like the prompt composer: one message field whose first line is the subject. A counter appears once the subject passes 50 characters.
| Control | What it does |
|---|---|
| The message field | Cmd/Ctrl+Enter commits |
| Amend last commit | Rewrites the last commit instead of adding one. Ticking it fills an empty box with the last commit’s message, and the button reads Amend commit. An amend can change only the message, with nothing staged. Amending a commit you’ve already pushed asks Amend a pushed commit? first, because the next push will have to force |
| Commit | Commits what is staged |
When the button can’t commit yet, its tooltip says why: Stage changes above to commit, Enter a commit message, Save or discard your edit first, Wait for staging to finish, or Resolve the conflicts first.
The commit is exactly what you were looking at. It waits for staging still in flight. If an agent changes the index in the meantime, Kepler refuses the commit, keeps your message, and says The staged files changed since you looked. Check them, then commit again.
When a Git hook stops the commit, the box says A Git hook stopped the commit and shows the end of the hook’s output, with Show output for the rest. A hook that never finishes can be stopped with Cancel commit.
Resolving merge conflicts
When a merge, rebase, cherry-pick or revert stops on conflicts, the conflicted files show with a !.
| To resolve a file | Do this |
|---|---|
| By hand | Edit it in the viewer, save, then tick its checkbox or choose Mark resolved. If conflict markers are still in it, Kepler asks first |
| Take one side whole | Use current version or Use incoming version from the row menu. Your hand-merged copy goes to the Trash first |
Once nothing is conflicted, finish the operation. A stopped merge, cherry-pick or revert finishes with a commit from the commit box. A rebase continues from the branch pill’s menu: Continue rebase, locked until every conflict is resolved. Abort {operation}… puts the branch back the way it was before the operation started.
Other ways to commit
| How | When |
|---|---|
| Ask the agent | The common case. The agent that wrote the change commits it, and you read the result |
| The worktree’s terminal | git add, git commit, your own aliases. New terminal here on the worktree’s rail row opens one already in the right folder |
| AI Compose | Hand an agent the tools to reorganize messy changes into clean, focused commits. See Agent tools: AI Sync and AI Compose |
Publishing and syncing the branch
The strip’s sync control is one button, and its verb is whatever the branch actually needs.
| State | The button reads | What it does |
|---|---|---|
| Behind or diverged from its merge target | Update, or Review conflicts when updating would conflict | Opens the update view in the worktree panel. See below |
| No upstream | Publish, with Creates {remote}/{branch} on the remote | Publishes the branch |
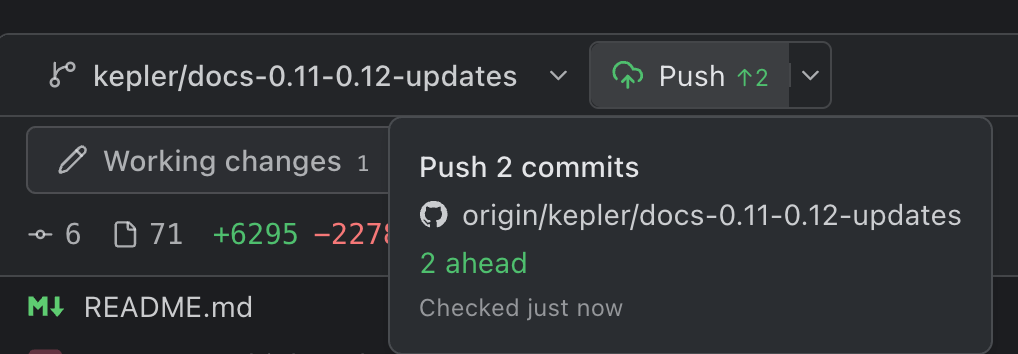
| Ahead | Push, with {count} ahead | Pushes |
| Rebased by an applied update | Force push, with Rebased onto {target} — force push to update the remote | Replaces the remote’s old commits after you confirm Force push? |
| Behind | Pull, with {count} behind | Pulls. A branch that is both ahead and behind its upstream reads Behind, pull first on Push |
| In step | Fetch, with Up to date | Updates your remote-tracking refs |
Counts only move on a fetch, so the control says when it last looked: Checked {time}.
The chevron beside it lists Push (or Publish), Pull and Fetch, plus:
- Force push: Rewrites the remote branch. Offered when the branch has diverged from its upstream, as a deliberate, separate click.
- Update: where the branch stands against its merge target, and the way into the update view.
After you apply a rebase, the remote still has the branch’s old commits, so Force push becomes the main button instead of a menu item. The Force push? confirmation explains that the branch was rebased and that Kepler refuses the force push if someone else pushed in the meantime.
Updating from the base
The update view rebases or merges the branch onto its merge target. It works on a copy first, and your branch changes only when you apply the result.
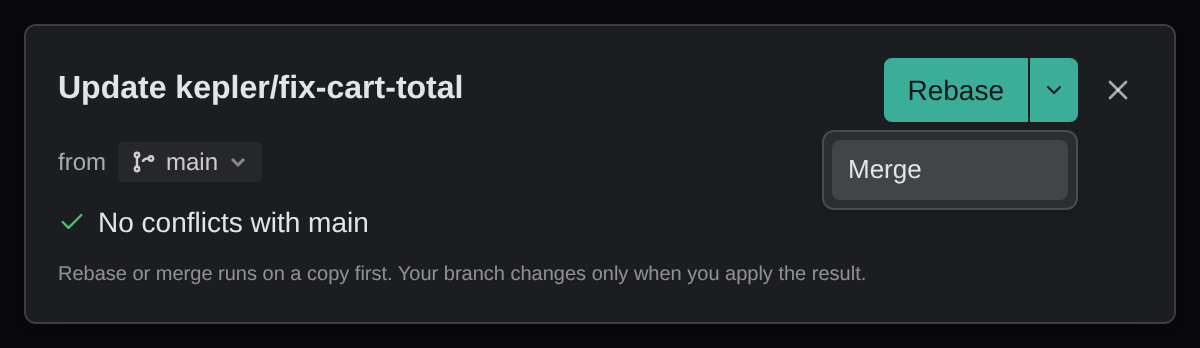
To update the branch from its merge target, follow these steps:
- Open the update view from the sync control. The title reads Update {branch}, with from {branch} under it. Kepler picks the detected base. To use another base, choose it from the picker.
- Press Rebase, or choose Merge from its menu. To abandon a run in progress, press Stop. Your branch is never touched.
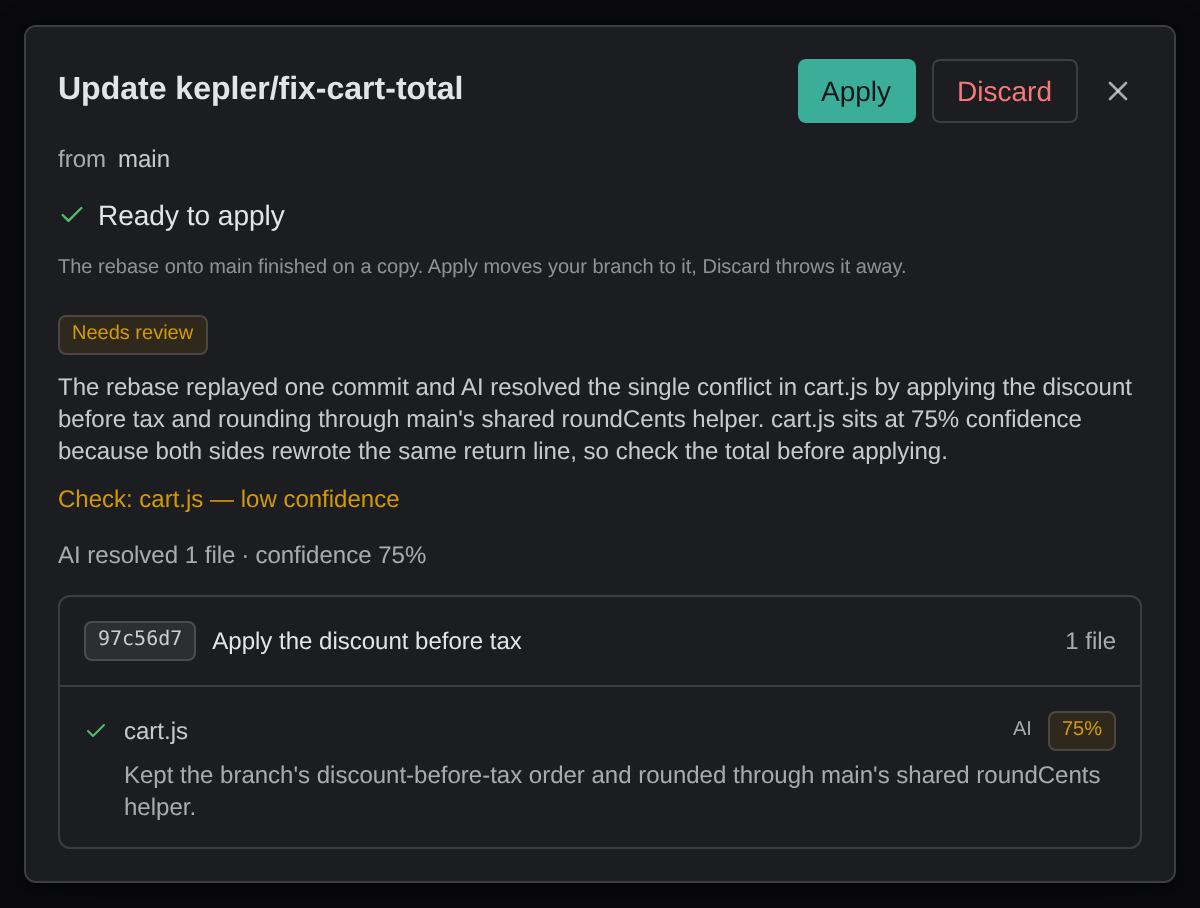
- When the copy reaches Ready to apply, press Apply to move your branch to it, or press Discard to throw the copy away. If the branch can push, the Apply menu also offers Apply & push. After a rebase, Apply & push force-pushes, because the remote still has the old commits.
- To undo an applied update, press Roll back. The view returns to Ready to apply and keeps the result, so you can apply it again. The sync control’s menu offers the same thing as Roll back update.
The Roll back menu holds two more options:
- Roll back and discard: returns the branch to where it was and throws the result away.
- Roll back & push: rolls back and then force-pushes the restored branch. This option appears only when the branch can push.
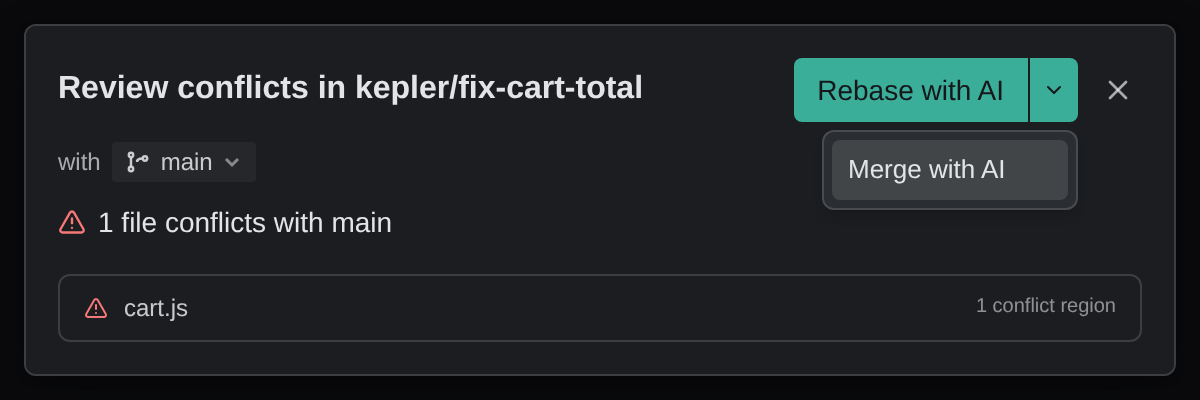
When updating would conflict, the sync control reads Review conflicts. The view title reads Review conflicts in {branch}, with with {branch} under it, and lists the conflicting files instead of offering a plain update. Pick a file to see its conflicting hunks.
You have two ways through the conflicts:
- Resolve them with AI. Press Rebase with AI, or choose Merge with AI from its menu. See Resolve update conflicts with AI.
- Resolve them yourself. Rebase in the worktree’s terminal and resolve each file in the file tree.
Resolve update conflicts with AI
AI conflict resolution runs the rebase or merge on a copy and resolves each conflicted file for you. Your branch changes only when you apply the result.
AI conflict resolution needs all of the following:
- A paid GitKraken plan. On the Community plan, the button shows a padlock and its tooltip reads AI conflict resolution needs a paid plan.
- AI Sync turned on in Settings → Agents → Agent tools. While it’s off, the tooltip reads Turn on Sync in Settings → Agents → Agent tools to resolve conflicts with AI.
- A GitKraken sign-in. If you aren’t signed in, the run stops with Sign in to GitKraken to resolve conflicts with AI.
To resolve conflicts with AI, follow these steps:
- Open the update view from Review conflicts on the sync control.
- Check the base under the title. To use another base, choose it from the picker.
- Press Rebase with AI, or choose Merge with AI from its menu.
- Watch the progress line, which reads Resolving conflicts · {count} files resolved. To abandon the run, press Stop.
- Read the review when the run reaches Ready to apply. The next section describes what the review shows.
- Press Apply, or Apply & push if the branch can push. To throw the result away, press Discard.
Read the AI review
The review explains what the AI changed so you can decide whether to apply it. It contains the following parts:
- A verdict badge: No issues found, Needs review or Blocked.
- A summary: a short explanation of the run, followed by any Check: items that name a file and the reason to look at it, such as low confidence, possible issue or left unresolved.
- A summary line: AI resolved {count} files · confidence {confidence}%.
- A card for each commit: the commit’s short SHA and subject, or Merge for a merge run, and its file count. A card shows Resolving… while the AI works on it.
- A row for each file: the method used and a confidence badge, followed by the AI’s reasoning for that file. A low confidence shows as a warning.
Each file row shows one of the following methods:
| Method | Meaning |
|---|---|
| AI | The AI wrote the resolution |
| Ours | Kept this branch’s version |
| Base | Kept the base branch’s version |
| Deleted | Resolved by deleting the file |
| Auto | Resolved mechanically, without the AI |
| Skipped | Left unresolved |
The review persists across reloads and windows, so you can close the view and come back to it before you apply.
Merge targets
A branch’s merge target is the branch it will merge into: what its commits, counts and Update are measured against. Kepler detects one, and you can change it.
| To | Do this |
|---|---|
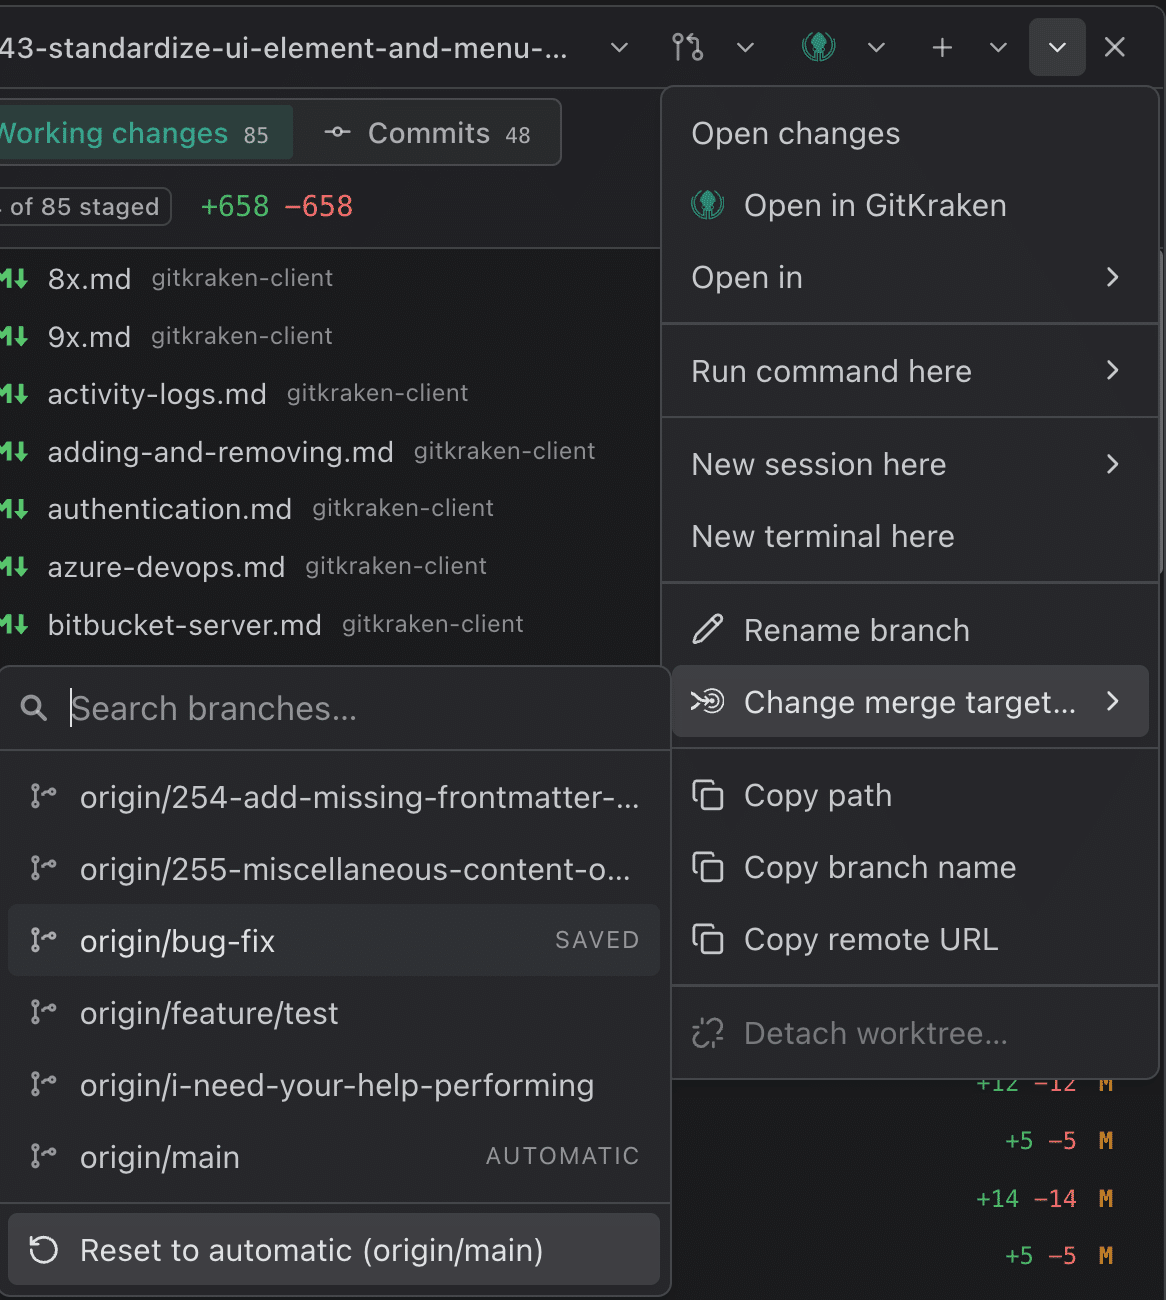
| Compare against another branch for now | Click from {branch} in the panel or the overlay and pick a branch. The commit list, counts and strip follow it, and the label’s tooltip reads For this view only. Nothing is saved |
| Keep that comparison | Click Save as merge target, beside the pick. In a narrow panel it reads Save. Only remote branches can be saved |
| Change it outright | Change merge target… from the merge target chip on the Dashboard, or from the worktree’s menu in the task view. Remote branches only; choosing one saves it |
| Go back to the detected one | Reset to automatic ({ref}) in the picker |
| Update the branch from its merge target | Rebase onto {target} or Merge {target} into this branch from the merge target chip’s menu on the Dashboard. Both open the update view |
Kepler and GitLens share a branch’s merge target, so a change made in GitLens shows up in Kepler while it’s running.
A branch that landed in its merge target without a pull request counts as merged. That includes rebase- and squash-merged branches, which Git itself doesn’t see as merged; Kepler checks their content. The Dashboard says Merged into {target}.
Where else changes show up
The Dashboard’s task preview shows each worktree as a two-row worktree pill:
- The top row: the branch and repository, its menu, the pull request, and the sync control.
- The bottom row: chips for the uncommitted files, the commits and the merge target, with Open in and Run beside them. Each chip has a hover card that says what a click does, and a right-click menu of its own. Clicking the uncommitted or commits chip opens the same Changes overlay, on that scope, without going to the task page first.
- A task with several worktrees shows one pill at a time. Its leading edge shows the position ({position}/{count}) and expands to Show all {count} worktrees. The branch name becomes a switcher you can also step through with the arrow keys, and Auto-switch to active worktree lets it follow whichever worktree is busiest.
See The Kepler Interface.
A file path in a terminal is a link, too: one of its options shows the file in the Changes overlay’s viewer, scrolled to the line.
Update many worktrees at once
To bring several worktrees up to date with their bases in one pass, use Update in Settings → Repositories → Worktree cleanup. The Update worktrees panel checks each worktree and lists what it will update and what it skips, such as a worktree with uncommitted changes or one where an agent is working. Choose Rebase or Merge, then press Update or Update + Push. Nothing changes until you pick an action, and Roll back undoes a worktree’s update. See Settings.
Opening a pull request
Kepler has no “create pull request” button. You open the pull request outside Kepler: the agent opens it, you run a command in the worktree’s terminal, or you use your host’s website. Kepler’s part starts once the pull request exists: it tracks the pull request as a task resource. Three paths attach one:
| Path | What happens |
|---|---|
| The agent publishes it | When an agent publishes a pull request, Kepler reads the result, checks that it belongs to one of the worktree’s remotes, and attaches it to the task: no action from you |
| The agent attaches it | Agents can attach a link to the task themselves through Kepler’s workspace tools. Kepler works out from the URL whether it is a pull request, an issue, or a plain link, and fetches its title and status where it can. Kepler attaches the link even when that lookup fails. The same tools detach one, including a link you attached yourself |
| You attach an existing one | Add resource → Pull requests in the task view searches your connected hosts. Add to task attaches what you pick |
Kepler asks an agent to attach only the pull request the task is actually about, not every URL it reads while investigating. Anything the agent attaches shows up in the task right away.
Attaching a pull request also unlocks the Address Feedback Action on that task. See Actions and Pull Request Integrations.
Agent tools: AI Sync and AI Compose
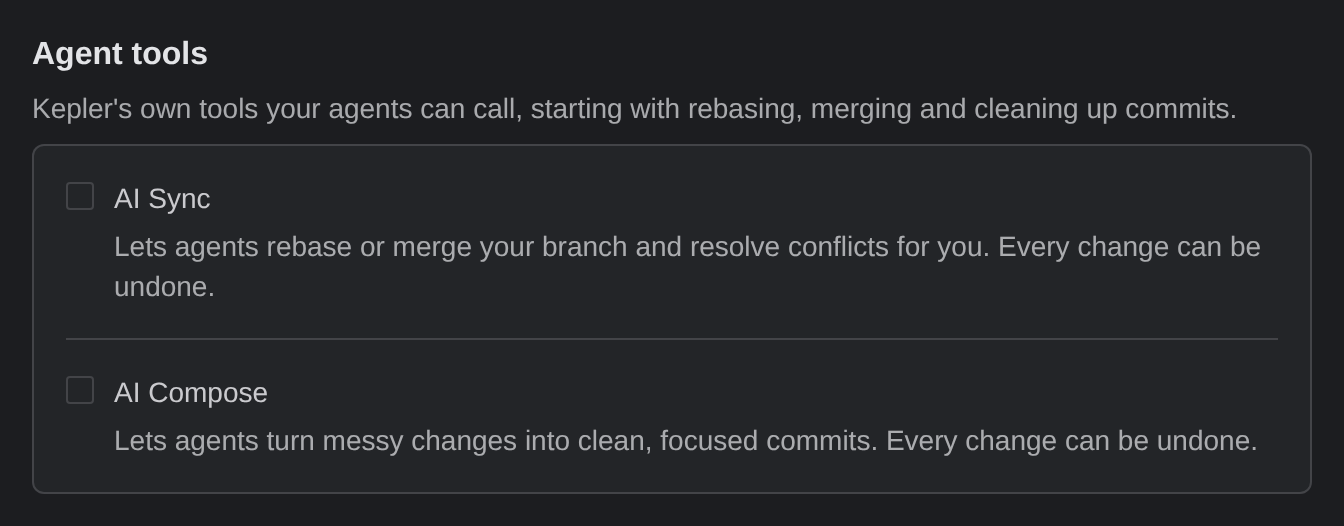
AI Sync and AI Compose give agents Git tools they don’t otherwise have. Both are off until you turn them on, and both need a paid GitKraken subscription. Turn them on in Settings → Agents → Agent tools, which Kepler describes as Kepler’s own tools your agents can call, starting with rebasing, merging and cleaning up commits. The section lists the following tools:
| Tool | What it gives agents |
|---|---|
| AI Sync | Lets agents rebase or merge your branch and resolve conflicts for you. Every change can be undone. |
| AI Compose | Lets agents turn messy changes into clean, focused commits. Every change can be undone. |
With a tool turned on, the agents in your sessions gain the matching tools, and you ask for the work in the chat. AI Sync also powers the Rebase with AI and Merge with AI buttons in the update view. See Resolve update conflicts with AI.
| Tool | How an agent uses it |
|---|---|
| AI Sync | Updates the branch from its base with a rebase or merge, and resolves conflicts as it goes. By default, the agent prepares the result for review and leaves the branch untouched until it applies the result. You can read the outcome first and have it applied or rolled back. AI Sync backs up every run. It also drops commits whose changes are already upstream, which helps after a squash-merge. Tell the agent what matters, such as which side is authoritative and what it must preserve, and it passes that guidance to the conflict resolver |
| AI Compose | Plans the reorganization first and applies it as a second step, so you can read the plan before anything moves. It can also split a multi-commit branch into a stack, and undo what it applied |
When you turn either tool on, Kepler confirms that New agent sessions will pick up this change. A running session keeps the tools it started with. To use a new tool, start a new session.
Both sets of tools default to the session’s own worktree. Each can also name another worktree attached to the same task, so one session can tidy a branch it doesn’t sit in.
On the Community plan, both rows still appear, with a padlock and the tooltip Not available on the Community plan. Upgrade to unlock. Everything else on this page works on the Community plan, except AI conflict resolution.
Related
- The Task View: the rail, the columns, and where the worktree opens
- Tasks and Resources: worktrees, and detaching or deleting one safely
- Agent Sessions: directing the agent that produced these changes
- Actions: Review on a task reviews exactly this uncommitted work
- Settings: Diff view, Agent tools, and Worktree cleanup
