
Last updated: June 2026
Use this page to learn how coding agents work in GitKraken Desktop and how to use Agent Sessions View to create, monitor, and manage coding agent sessions. Read this page if you want to use external coding agent CLIs such as Claude Code, Codex CLI, Copilot CLI, Gemini CLI, or OpenCode from inside GitKraken Desktop.
On-premises note: GitKraken Desktop gives on-premises teams one place to run multiple coding agents. Agent availability depends on your security policy, network access, and which CLIs your organization allows. OpenCode and Gemini CLI can run in fully air-gapped environments when you point them to an internal model endpoint. Claude Code, Codex CLI, and Copilot CLI are also supported when your organization permits them and the required services are reachable from your environment.
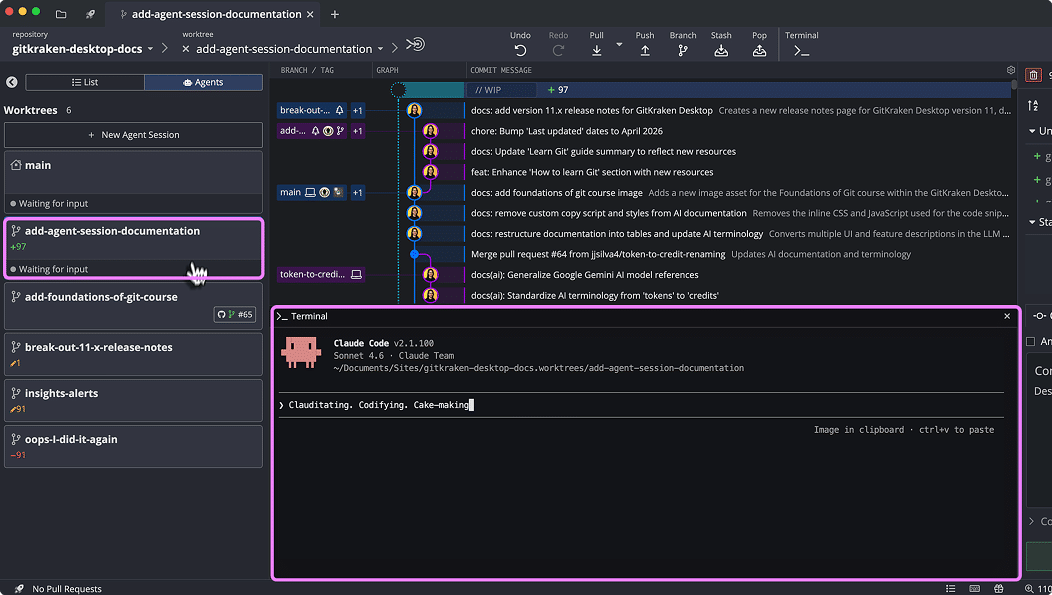
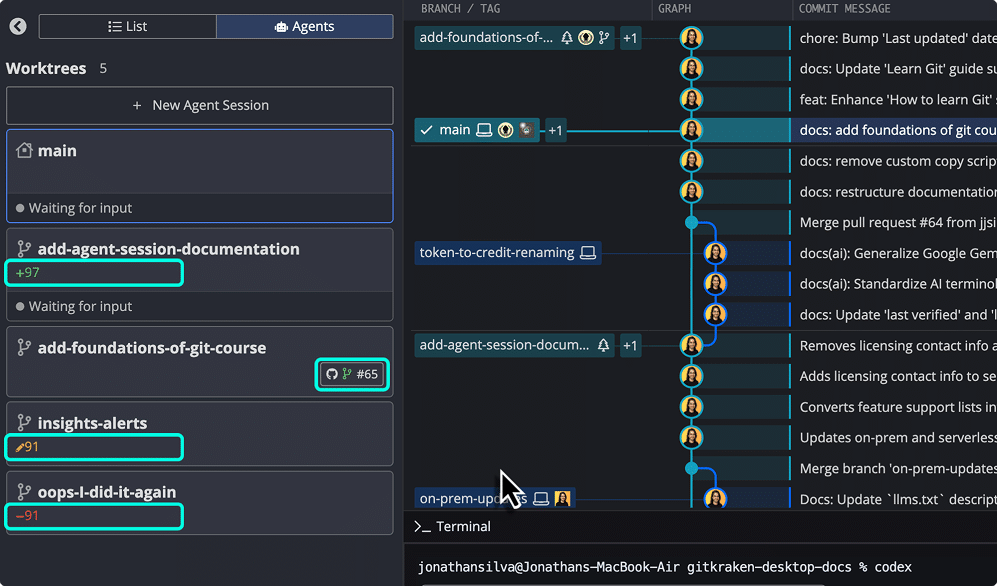
A coding agent is an external CLI that can work on code in a terminal session. In GitKraken Desktop, each agent session runs that CLI in its own worktree. Agent Sessions View shows those worktrees as agent-focused cards so you can start parallel work, monitor progress, and switch back when an agent needs attention.
GitKraken Desktop explicitly integrates with a set of supported coding agent CLIs. You can also run other coding agents manually in the embedded terminal, even if they do not appear in the coding agent configuration.
This page also helps answer common questions such as:
- How do I use Claude Code with GitKraken Desktop?
- How do I run Copilot CLI as a coding agent in GitKraken?
- How do I use Codex CLI, Gemini CLI, or OpenCode in GitKraken Desktop?
- Can I run multiple coding agent sessions at the same time?
Requirements and limits
- Product: GitKraken Desktop with Agent Sessions View enabled
- Coding agent CLI: Install and configure a supported coding agent CLI in Preferences > External Tools > Coding Agent
- Session model: Each agent session runs in its own Git worktree and working directory
- Repository setup: Setup commands are configured per repository in Preferences > Repo-Specific Preferences > Agents
- Status support: Agent status indicators are available for Claude Code (as of version 12.0.0) and OpenCode (as of version 12.2.0)
- View settings: New agent session worktrees inherit hidden refs, hidden remotes, soloed refs and remotes, and collapsed folders and remotes from the source repository
- Other agents: You can still run other coding agents manually in the embedded terminal, even if GitKraken does not explicitly integrate with or detect them
- On-premises environments: Available coding agents may be limited by your organization’s security restrictions, internal approvals, or air-gapped network design
| What you want to do | Supported | Where in GitKraken Desktop | Notes |
|---|---|---|---|
| Start a coding agent session | Yes | Agent Sessions View, or worktree context menu in the Left Panel | Creates a worktree (when starting a new session), runs setup commands, and launches the coding agent CLI |
| Start multiple coding agent sessions at the same time | Yes | Agent Sessions View | Each session runs in a separate worktree |
| Choose a different base branch for a new session | Yes | New Agent Session form | Default base branch is HEAD. The base branch selector is searchable |
| Choose a coding agent CLI for a session | Yes | New Agent Session form | Falls back to the coding agent set in Preferences. Available options depend on the CLIs installed and allowed in your environment |
| Monitor agent progress | Yes | Agent Sessions View card | Cards show WIP changes, ahead/behind, and agent status |
| Respond when an agent is waiting for input | Yes | Agent Sessions View and embedded terminal | Claude Code can show a Waiting for input status in the card |
| Manage a worktree from Agent Sessions View | Yes | Three-dot action menu on each worktree card | Open, lock/unlock, remove, or remove and delete the branch |
| Configure coding agent CLIs | Yes | Preferences > External Tools > Coding Agent | GitKraken auto-detects installed CLIs. In on-premises environments, the usable CLIs depend on what your organization allows and can reach |
| Configure setup commands for a repository | Yes | Preferences > Repo-Specific Preferences > Agents | Commands run before the agent launches |
| Filter and sort the worktree list | Yes | Sort and filter controls in Agent Sessions View | Filter by status or branch to focus on the sessions that matter |
Quick start for coding agents in GitKraken Desktop
To open Agent Sessions View:
Click Agents in the List | Agents segmented control at the top of the Left Panel.
To start a coding agent session:
Click + New Agent Session at the top of Agent Sessions View to start a session immediately with generated defaults. To customize the branch name, base branch, or coding agent before starting, click the split button arrow next to the button to open the customization options.
You can also start an agent session from an existing worktree. Right-click the worktree in the Left Panel and choose the option to start a coding agent session there.
To monitor an agent session:
Review the card for branch name, WIP changes, ahead/behind counts, and agent status.
To filter or sort agent sessions:
Use the sort and filter controls at the top of Agent Sessions View. Filter by status or branch to narrow the list when you are running many parallel sessions.
To respond when an agent is waiting for input:
Open that worktree or switch to its terminal session and respond there.
To configure coding agent CLIs:
Go to Preferences > External Tools > Coding Agent.
To configure setup commands for the current repository:
Go to Preferences > Repo-Specific Preferences > Agents.
What coding agents, agent sessions, and Agent Sessions View mean
Use these terms consistently when working with Agent Sessions View:
| Term | What it means |
|---|---|
| Coding agent | An external coding agent CLI such as Claude Code, Codex CLI, Copilot CLI, Gemini CLI, or OpenCode |
| Coding agent session | A running session of a coding agent CLI started from GitKraken Desktop |
| Worktree | A separate Git working directory used for that agent session |
| Agent Sessions View | The Left Panel view that shows worktrees as agent session cards |
| List view | The standard Left Panel view for worktrees and branches |
Agent Sessions View and List view use the same underlying worktrees. The difference is how GitKraken Desktop presents them:
- Use List view when you want a branch-focused view.
- Use Agent Sessions View when you want an agent-focused view with status and quick actions.
Why use Agent Sessions View instead of only List view? Agent Sessions View shows the same worktrees you already use in GitKraken Desktop, but it organizes them around agent activity such as progress, status, and actions. You can switch between List and Agents at any time without losing work.
Missing the toggle? If the List | Agents switch is not visible in the Left Panel, open Preferences > UI Customization and enable Show Agents view in left panel.
How to toggle agents view
To show or hide the List | Agents toggle at the top of the Left Panel, go to Preferences > UI Customization and toggle the Show Agents view in left panel setting.
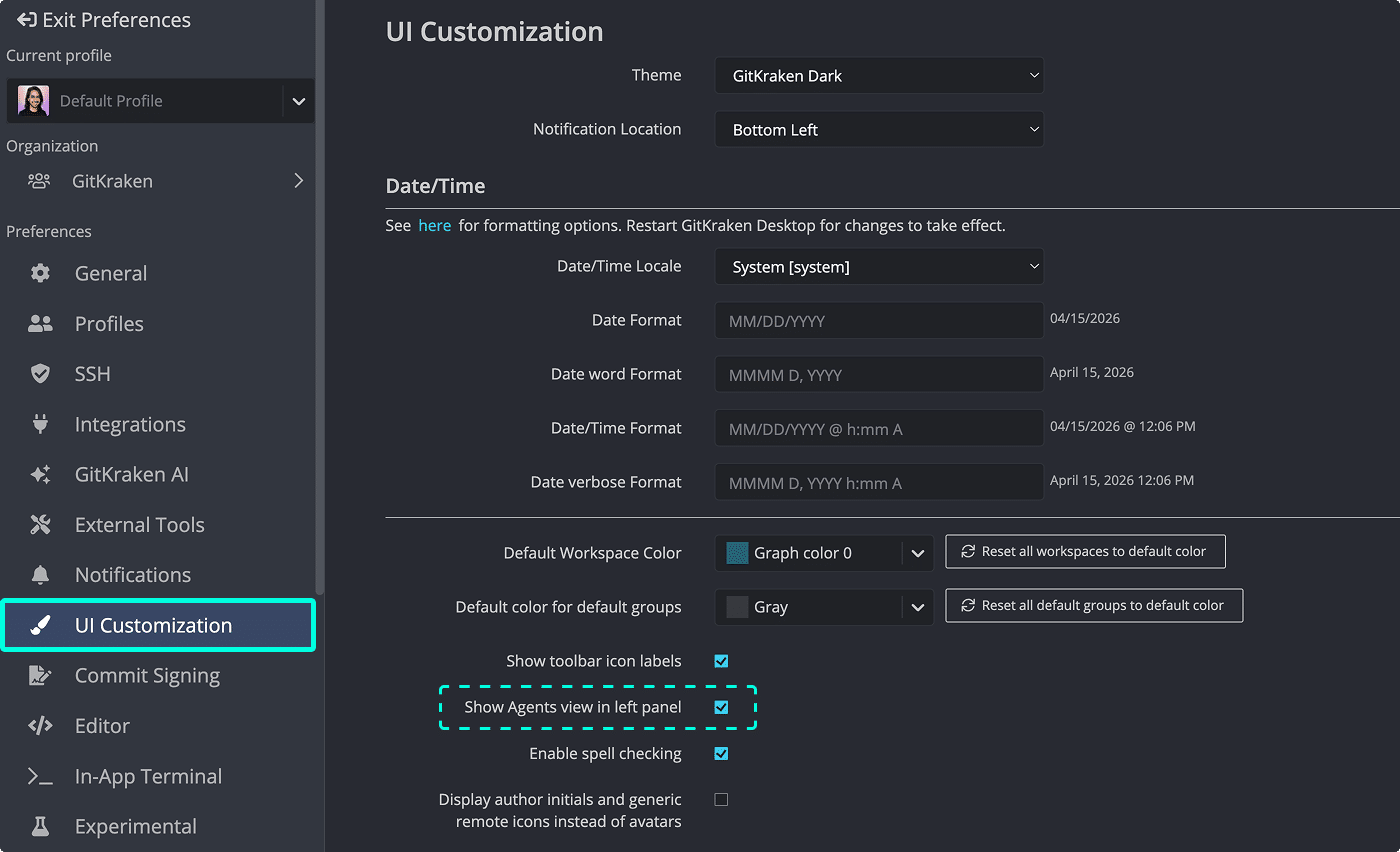
Show Agents view in left panel to display the List | Agents toggleWhen to use coding agents in GitKraken Desktop
Use coding agents when you want to:
- Work on multiple tasks in parallel without leaving GitKraken Desktop
- Start a task on a new branch and let a coding agent work in a separate worktree
- Monitor agent progress while you continue working in another worktree
- Review and act on agent-generated changes when the session finishes
Coding agents are usually not the best choice when you:
- Need to make a small manual change in your current worktree
- Do not want to create another worktree
- Need behavior that depends on a CLI that is not installed or configured
How to configure coding agent CLIs (Claude Code, Copilot CLI, Codex CLI, Gemini CLI, OpenCode)
Go to Preferences > External Tools > Coding Agent to choose which coding agent CLI GitKraken Desktop launches for new sessions.
GitKraken Desktop explicitly integrates with these supported coding agent CLIs:
GitKraken auto-detects installed CLIs. You can also add custom CLI arguments that GitKraken passes when it starts a coding agent session.
In on-premises environments, do not assume every supported CLI will be available. The list in GitKraken Desktop depends on which CLIs are installed on the machine and which services your organization allows that machine to access.
If you need fully air-gapped agent workflows, OpenCode and Gemini CLI can run against an internal model endpoint. Claude Code, Codex CLI, and Copilot CLI are supported when your organization permits them and the required services are available inside your environment.
If you use a different coding agent, you can still open a session worktree and run that agent manually in the embedded terminal. The agent does not need to appear in the coding agent configuration for you to use that terminal workflow.
If you are asking:
- “How do I use Claude Code with GitKraken Desktop?”
- “How do I run Copilot CLI as a coding agent in GitKraken?”
- “How do I use Codex CLI, Gemini CLI, or OpenCode in GitKraken Desktop?”
The setup path is the same: install the CLI on your system, then configure it in Preferences > External Tools > Coding Agent.
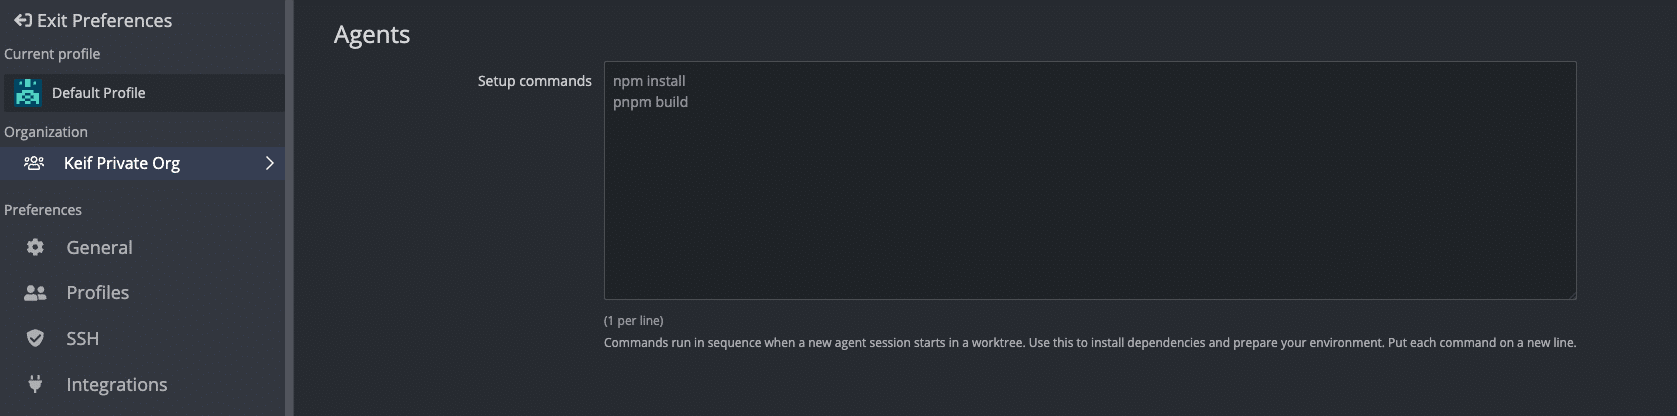
How to configure setup commands for coding agent sessions
Setup commands run in sequence in the new worktree before the coding agent launches. Use setup commands to prepare the repository for the session, for example:
npm installpnpm installpnpm build
Put each command on its own line.
Go to Preferences > Repo-Specific Preferences > Agents to define setup commands for the current repository.
Because these settings are under Repo-Specific Preferences, setup commands apply only to the repository you configure them in.
How to create a new coding agent session
- Open Agent Sessions View by clicking Agents in the Left Panel.
-
Click + New Agent Session to start a session immediately. GitKraken Desktop generates a branch name automatically and uses the coding agent configured in your Preferences.
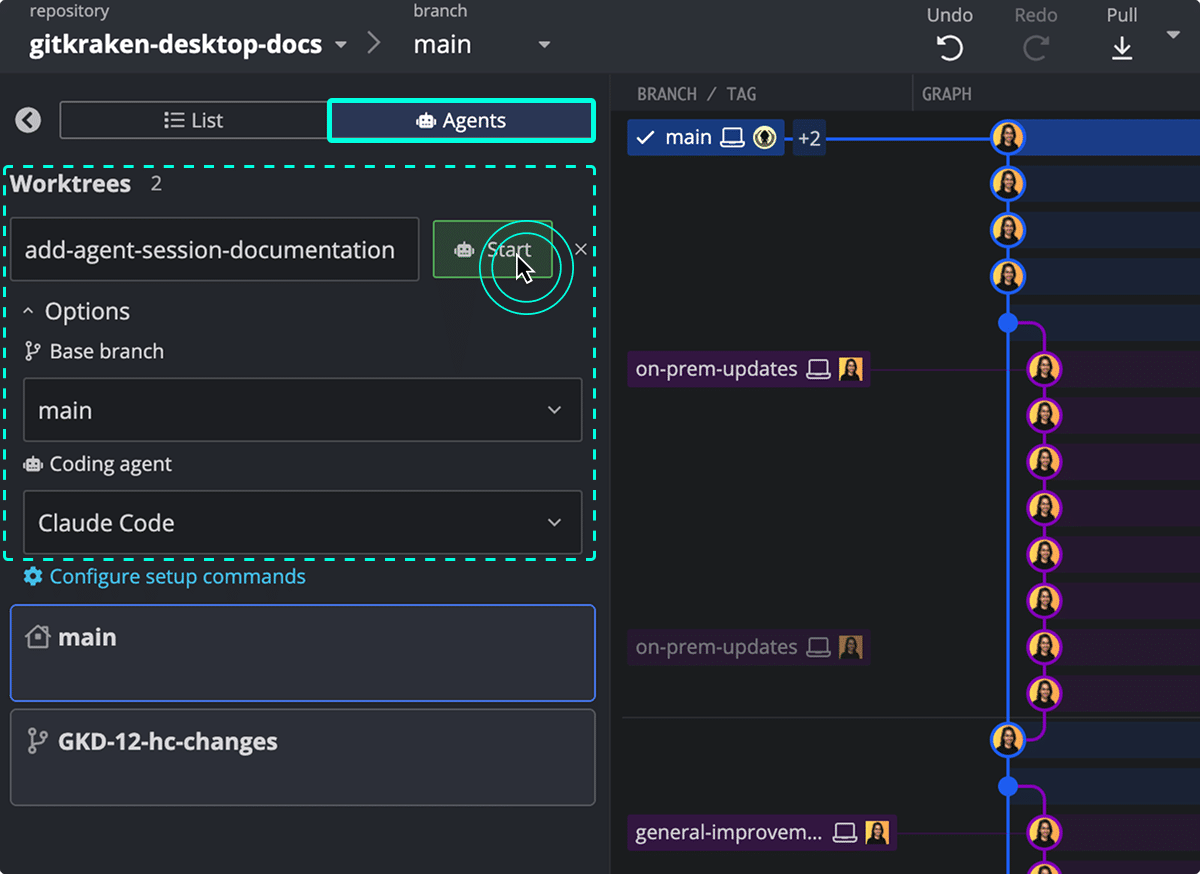
Agent Sessions View in GitKraken Desktop showing the New Agent Session button at the top, with a split button arrow for accessing customization options. To customize before starting, click the split button arrow next to the button to open the options form:
Option Use it to Default Branch name Set a specific branch name for the new worktree Auto-generated Base branch Create the new worktree from a different branch. The selector is searchable, so you can type to filter long branch lists HEADCoding agent Launch a specific coding agent CLI for this session Coding agent set in Preferences To update repository setup, click Configure setup commands to open Preferences > Repo-Specific Preferences > Agents.

The New Agent Session customization form showing branch name input, Base branch selector, Coding agent dropdown, and a Configure setup commands link.
GitKraken Desktop creates a new worktree from the selected base branch, runs any configured setup commands, and launches the selected coding agent in the embedded terminal. The new worktree inherits hidden refs, hidden remotes, soloed refs and remotes, and collapsed folders and remotes from the source repository, so you do not need to re-hide branches or remotes after starting the session.
How to start an agent session from an existing worktree
You can start a coding agent session in a worktree that already exists, without creating a new one:
- In the Left Panel, right-click the worktree you want to use.
- Select the option to start a coding agent session.
GitKraken Desktop launches the configured coding agent CLI in that worktree’s terminal session.
How to monitor coding agent progress and session status
Each card in Agent Sessions View represents one worktree and one coding agent session.
| Card element | What it shows |
|---|---|
| Branch name | The branch checked out in that worktree |
| WIP change summary | The count of uncommitted file changes |
| Ahead / behind | Commit counts relative to the remote |
| Agent status | Whether the agent is running, waiting for input, or done |
| Merged PR pill | Whether the branch has an associated merged GitHub pull request |
The status bar at the bottom of each card shows the current session state. Status indicators are available for Claude Code (as of version 12.0.0) and OpenCode (as of version 12.2.0). If the branch has a merged GitHub pull request, a merged PR pill appears on the card.
When you start a session, the card shows a Running status. If you have Claude Code hooks enabled, the card may show a different status that reflects what the agent is doing.
When an agent needs attention, the card can show a bell icon and a Waiting for input label. This lets you see that the session needs a response without switching to the terminal first.
If you remove a worktree from the card menu, the card shows visual feedback while the deletion is in progress so you know the action is being processed.
You can keep working in another worktree while monitoring these cards. When a session finishes, switch to that worktree to review the results.
How to filter and sort agent sessions
Use the sort and filter controls at the top of Agent Sessions View to manage large groups of parallel sessions:
- Filter by status to focus on sessions that are waiting for input, running, or finished.
- Filter by branch to find a specific session quickly.
- Sort the list to bring the most relevant sessions to the top.
These controls affect only how sessions appear in Agent Sessions View. They do not change the underlying worktrees or sessions.
How to monitor and respond to coding agent prompts
Use this workflow when a coding agent pauses and waits for input.
- Watch the card in Agent Sessions View for a bell icon or a Waiting for input status.
- Open that worktree from the card.
- Switch to the embedded terminal for that agent session.
- Review the prompt from the coding agent CLI.
- Respond in the terminal to continue the session.
This workflow is especially useful when you run multiple coding agent sessions at the same time and need to see which session needs attention first.
How to open, review, and manage a coding agent worktree
For general worktree tasks outside coding agents, see Manage Git Worktrees in GitKraken Desktop.
Each worktree card in Agent Sessions View has a three-dot action menu so you can manage that worktree without leaving the Agents view. Right-click the card or open the three-dot menu to see the available actions:
| What you want to do | Action in the card menu | Result |
|---|---|---|
| Open the session worktree | Open this worktree | Switches to that worktree |
| Open the session in another tab | Open worktree in a new tab | Opens the worktree in a new GitKraken tab |
| Prevent the worktree from being pruned, moved, or deleted | Lock this worktree | Locks the worktree |
| Re-enable normal worktree management | Unlock this worktree | Unlocks the worktree |
| Remove the session worktree | Remove this worktree | Deletes the worktree and its working directory |
| Remove the worktree and delete its branch in one step | Remove worktree and delete branch | Deletes the worktree and its associated branch |
Use these actions after the agent finishes so you can review changes, push the branch, create a pull request, or clean up the worktree.
How to install, uninstall, or reinstall agent status plugins and hooks
GitKraken Desktop uses agent-specific integrations to report live status in Agent Sessions View. Only event metadata is sent. Prompt content, agent output, and source code are not captured.
Claude Code status hooks
The GitKraken CLI registers hooks on Claude Code’s lifecycle events (session start/end, tool use, prompt submission, permission requests, and similar) and forwards those events to the local gk process to display agent status.
Uninstalling Claude Code hooks
- Click the Preferences icon on the top right.
- Navigate to the External Tools tab.
-
In the Coding Agent area, next to Claude Code Hooks, click Uninstall Hooks.
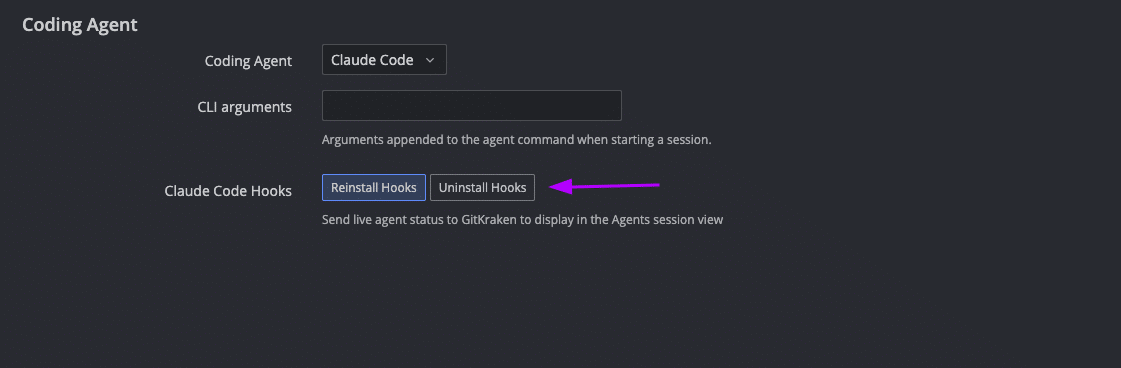
How to uninstall Claude Code agent status hooks in the GitKraken UI.
Reinstalling Claude Code hooks
- Click the Preferences icon on the top right.
- Navigate to the External Tools tab.
-
In the Coding Agents area, next to Claude Code Hooks, click Reinstall Hooks.
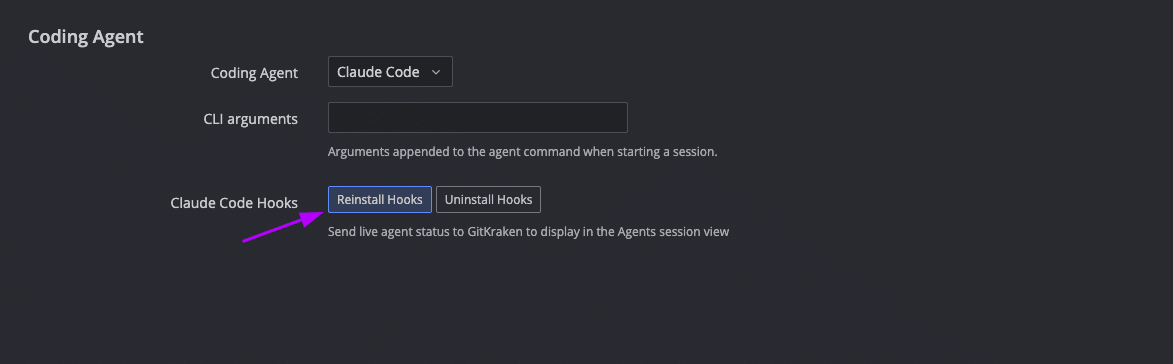
How to reinstall Claude Code agent status hooks in the GitKraken UI.
OpenCode status plugin
GitKraken Desktop uses an OpenCode plugin to report live agent status for OpenCode sessions.
Installing the OpenCode plugin
- Click the Preferences icon on the top right.
- Navigate to the External Tools tab.
- In the Coding Agent area, next to OpenCode Plugin, click Install Plugin.
Uninstalling the OpenCode plugin
- Click the Preferences icon on the top right.
- Navigate to the External Tools tab.
- In the Coding Agent area, next to OpenCode Plugin, click Uninstall Plugin.
Typical workflow for coding agents and worktrees
- You are working on a feature in your current worktree.
- A second task comes in, such as a bug fix or a small refactor.
- You open Agent Sessions View and start a new coding agent session on a new branch such as
fix/login-crash. - GitKraken Desktop creates a worktree, runs setup commands, and launches the coding agent CLI.
- You continue working in your original worktree while monitoring the new agent session card.
- If the card shows Waiting for input, you switch to that session and respond in the terminal.
- When the agent finishes, you open the worktree, review the diff, and push or open a pull request.
- After the work is merged or no longer needed, you remove the worktree.
Common questions about coding agents in GitKraken Desktop
Can I run multiple coding agent sessions at the same time?
Yes. Each coding agent session runs in its own worktree and working directory, so you can run parallel sessions in the same repository.
What happens when I start a coding agent session?
GitKraken Desktop creates a worktree, checks out the new branch, runs any configured setup commands, and then launches the selected coding agent CLI in the embedded terminal.
Do Agent Sessions View and List view show different worktrees?
No. They show the same underlying worktrees. The difference is the presentation: List view is branch-focused, and Agent Sessions View is agent-focused.
Where do I choose Claude Code, Copilot CLI, Codex CLI, Gemini CLI, or OpenCode?
Go to Preferences > External Tools > Coding Agent. You can also choose a different coding agent in the New Agent Session form for a single session.
Are all supported coding agents available in on-premises environments?
No. In on-premises environments, available coding agents depend on your organization’s security policy, network restrictions, and approved tools.
OpenCode and Gemini CLI can run in fully air-gapped environments when they are configured to use an internal model endpoint. Claude Code, Codex CLI, and Copilot CLI are also supported when your organization permits them and the required services are reachable.
Can I use a coding agent that GitKraken Desktop does not explicitly integrate with?
Yes. GitKraken Desktop explicitly integrates with supported coding agent CLIs such as Claude Code, Codex CLI, Copilot CLI, Gemini CLI, and OpenCode, but you can still run other coding agents manually in the embedded terminal. The agent does not need to appear in the coding agent configuration for you to use that terminal workflow. In on-premises environments, this manual path is often the best option for internally approved tools that are not part of the built-in list.
Where do I configure repository setup before the agent starts?
Go to Preferences > Repo-Specific Preferences > Agents. Setup commands run in sequence in the new worktree before the coding agent launches.
Why does GitKraken install hooks or plugins for agent status?
GitKraken registers hooks with Claude Code and installs a plugin for OpenCode. These integrations report agent status events (such as when an agent starts, finishes, or changes state) to a local GitKraken process, which displays them in Agent Sessions View. Only status metadata is sent. Prompt content, agent responses, and source code are not transmitted.
