
Last updated: May 2026
Use this page to create, switch, lock, and remove Git worktrees in GitKraken Desktop when you need multiple branches checked out at the same time. Worktrees keep separate working directories while sharing the same repository history, which makes them useful for parallel feature work, testing, review workflows, and coding agent sessions.
If you use coding agents in GitKraken Desktop, Agent Sessions View builds on the same underlying worktree model. See Coding Agents in GitKraken Desktop for agent-specific setup, session management, and status details.
Requirements and limits
- GitKraken Desktop version: Worktrees are supported in version 10.5.0 and later
- Worktree model: Each worktree has its own working directory and index but shares repository history with the main repo
- Change visibility: Once committed, changes made in one worktree become visible in other worktrees
- Lock behavior: Locking a worktree prevents accidental changes while you work elsewhere
- Removal behavior: Removing a worktree detaches that working directory from the repo via the Left Panel workflow
- Best fit: Use worktrees when you need multiple branches checked out simultaneously instead of repeatedly switching one working directory
| Action | What it does | Affects shared history | Notes |
|---|---|---|---|
| Create worktree | Creates another working directory for a branch | No | Requires GitKraken Desktop 10.5.0 or later. New worktrees inherit hidden refs, hidden remotes, soloed refs and remotes, and collapsed folders and remotes from the source repository |
| Open worktree | Switches you into that working directory | No | Available from the Left Panel |
| Lock worktree | Prevents accidental changes to that worktree | No | Useful when working elsewhere temporarily |
| Remove worktree | Detaches that working directory from the repository | No | Removes the worktree entry, not shared history |
| Remove worktree and delete branch | Removes the worktree and deletes its associated branch in one step | No | Available from the worktree context menu in the Left Panel |
| View worktrees through Agent Sessions View | Shows the same worktrees in an agent-focused interface | No | Adds coding agent session context, quick actions, and a merged PR pill when the branch has a merged GitHub pull request |
| Commit in a worktree | Records history from that worktree | Yes | Committed changes become visible across all worktrees |
Quick Start
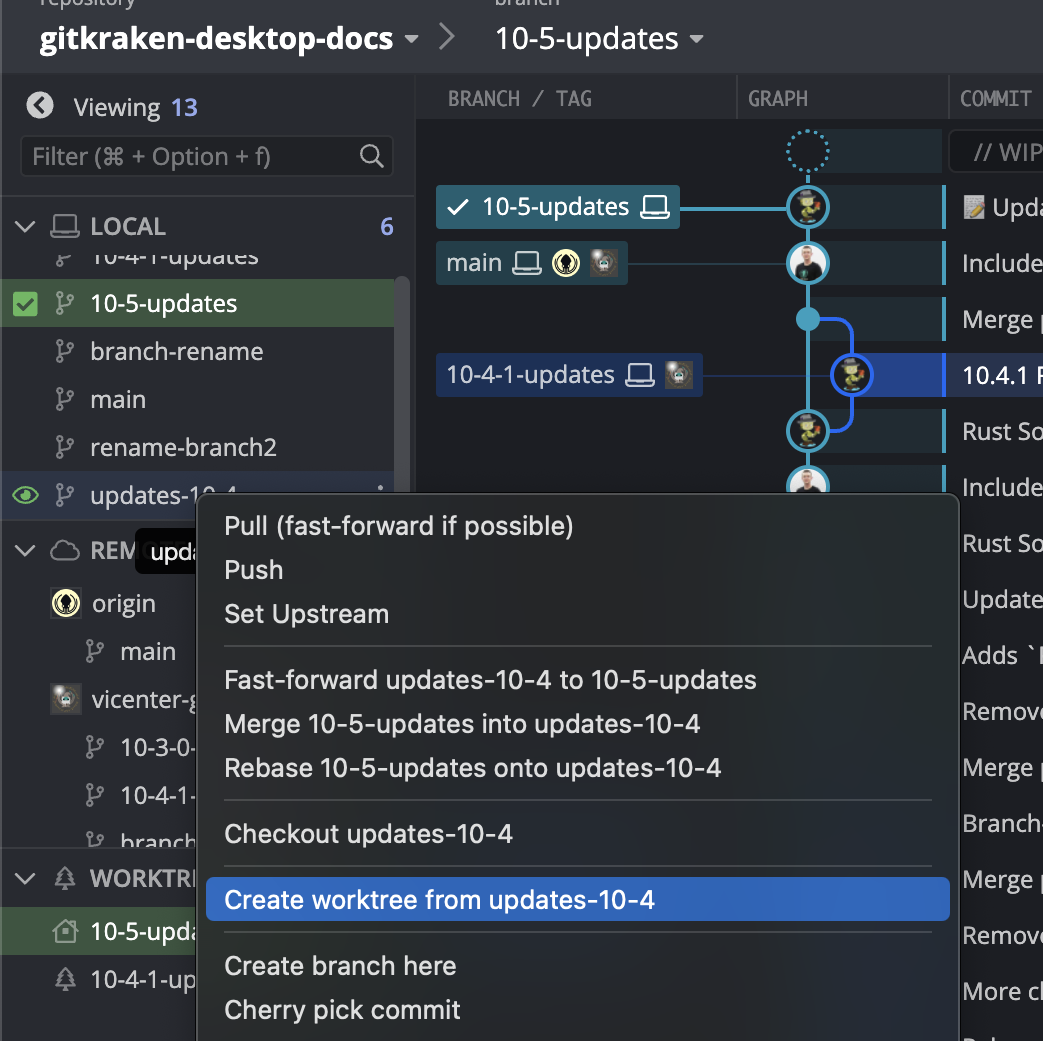
To create a worktree:
- Right-click a branch in the Repository View.
- Select Create worktree.
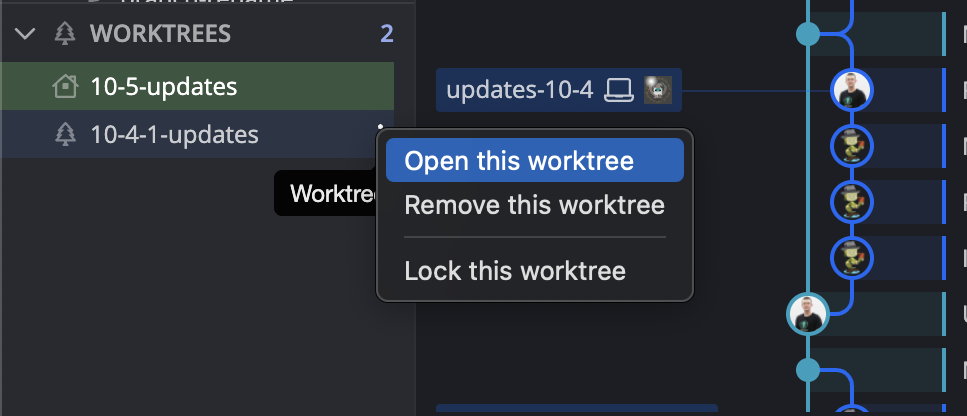
To switch between worktrees: Right-click a worktree in the Left Panel and choose Open this worktree, or check out the corresponding branch from the Repository View. To open the worktree in a separate GitKraken tab instead, choose Open worktree in a new tab.
To remove a worktree: Right-click it in the Left Panel and select Remove this worktree. To remove the worktree and delete its associated branch in one step, choose Remove worktree and delete branch.
To lock or unlock a worktree: Right-click the worktree and choose Lock this worktree or Unlock this worktree. Locking prevents accidental changes while you work in another worktree.
Worktrees share Git history with the main repository. Changes committed in one worktree are visible in others. Hover over a worktree in the Left Panel to see its full file path. Worktrees are supported in GitKraken Desktop 10.5.0 and later.
What Git worktrees are
A Git worktree is a linked working copy of your repository. Each worktree:
- Has its own working directory and index
- Shares Git history with the main repository
- Lets you keep different branches checked out simultaneously
Worktrees are useful when you want to:
- Work on multiple features or fixes without switching branches
- Build or test alternate versions of your code
- Experiment safely while keeping your main branch clean
- Review pull requests without halting other work
Once committed, changes in one worktree become visible in others.
Using coding agents? Agent Sessions View in GitKraken Desktop uses Git worktrees behind the scenes. If you want to run Claude Code, Codex CLI, Copilot CLI, Gemini CLI, or OpenCode in GitKraken Desktop, see Coding Agents in GitKraken Desktop.
How to use worktrees in GitKraken Desktop
GitKraken Desktop has supported worktrees since version 10.5.0. In the Left Panel, you can work with those worktrees in two ways:
- List view for general branch and worktree management
- Agent Sessions View for coding agent sessions that run in worktrees
Both views use the same underlying worktrees. The difference is the presentation:
- Use List view when you want to create, switch, lock, or remove worktrees directly
- Use Agent Sessions View when you want to create, monitor, and manage coding agent sessions in worktrees
From the Left Panel, you can:
- Create and switch between worktrees
- Remove or lock/unlock worktrees
- Hover over a worktree to see its full file path
See Coding Agents in GitKraken Desktop if you want to:
- install and use a supported coding agent CLI
- start a coding agent session in a new worktree
- monitor agent status such as Waiting for input
- manage agent sessions from Agent Sessions View
How to create a worktree
To create a worktree:
- Right-click a branch in the Repository View
- Select Create worktree
New worktrees inherit view settings from the source repository, including hidden refs, hidden remotes, soloed refs and remotes, and collapsed folders and remotes. You no longer need to re-hide branches or remotes after creating a worktree.
How to switch worktrees
To switch to another worktree:
- Right-click the desired worktree in the Left Panel and choose Open this worktree
- Right-click the desired worktree in the Left Panel and choose Open worktree in a new tab to open it in a separate GitKraken tab instead of replacing the current one
- Or check out the corresponding branch from the Repository View
How to remove a worktree
To remove a worktree:
- Right-click it in the Left Panel
- Select Remove this worktree
To remove a worktree and delete its associated branch in a single step:
- Right-click the worktree in the Left Panel
- Select Remove worktree and delete branch
Use this option when you are done with the worktree and no longer need its branch, for example after merging a feature or finishing a coding agent session.
How to lock or unlock a worktree
To change lock status:
- Right-click the worktree and choose Lock this worktree or Unlock this worktree
Locking a worktree prevents accidental changes while you work elsewhere.
Tip: A merged PR pill on a worktree card in Agent Sessions View means the branch has a merged GitHub pull request. Use this as a signal that it is safe to remove the worktree and delete the branch.
