
Last updated: March 2026
A nested repository is a Git repository that exists inside the working directory of another Git repository. In other words, it’s a repository within a repository. Each nested repository functions independently, with its own commit history, branches, and remote configurations.
On this page:
- Permissions
- How nested repositories work
- Practical use for developers
- Some challenges with using nested repositories
- Nested repository as a formal feature
- Adding a nested repository with Git Submodule
- Connecting a nested repository with Git Integration for Jira Cloud app
- Connecting an integration that contains nested repositories
Permissions
GitHub
To use GitHub submodules, you need at least read access to the “Contents” and “Metadata” of the repository itself, as well as any submodule repositories. This ensures that you can clone and update the submodules properly.
GitLab
Managing permissions for nested repositories (projects within groups and subgroups) involves assigning roles to users or groups, which determine their access levels. The minimum role is Reporter, which allows viewing code and issues but not creating or editing them.
Azure DevOps
To access Git submodules in Azure DevOps, the build service account must have access to both the main repository and the submodule repository. If the “Protect access to repositories in YAML pipelines” setting is enabled, you may need to explicitly reference the submodule in your pipeline to avoid permission errors.
Bitbucket
To access a Bitbucket submodule, you need read access to the submodule repository for the user or SSH key being used. Ensure that the user has the appropriate permissions set in Bitbucket for both the parent and submodule repositories.
AWS CodeCommit
To work with AWS submodules, ensure that the IAM user or role has the necessary permissions to access the repositories and perform actions like cloning and updating submodules. This typically includes permissions for Git operations and access to the specific resources involved in your project.
How Nested Repositories Work
When you place a Git repository inside another repository’s directory, it does not automatically become part of the parent repository. The parent repository does not track the nested repo’s files unless they are plainly added, which can sometimes cause confusion in version control workflows.
Practical Use for Developers
Nested repositories can be useful in specific development scenarios:
-
Develop modular projects
Developers working on large projects can organize their code into separate repositories while keeping them inside a main project folder.
-
Manage third-party dependencies
Developers can include third-party projects or libraries as nested repositories rather than manually copying their source code. This helps maintain dependencies up to date by pulling changes from the remote repository when needed.
-
Standalone version control
Each nested repository keeps its own history and branches, allowing teams to work on different components independently. This is useful when sub-teams or external collaborators need full control over a specific module.
-
Custom development environments
Some teams maintain separate repositories for configuration files, infrastructure scripts, or experimental features inside their main project repository. This allows for quick testing and switching between configurations without affecting the core project.
Some Challenges with Using Nested Repositories
While nested repositories offer benefits, they also present challenges:
-
Files are not tracked
The parent repository does not automatically track the nested repository’s files unless they are manually added.
-
Conflicts on merging can occur
If multiple developers work on both the parent and nested repositories, conflicts can arise when merging changes.
-
Requires extra steps on deploying projects
Deploying projects with nested repositories may require extra steps to ensure all repositories sync correctly.
Nested Repository as a Formal Feature
Various Git hosting services and platforms implement distinct policies for managing nested repositories. Although Git does not natively support “nested repositories” as a formal feature, certain services offer equivalent functionality under different names or terms.
For example:
- GitHub: Supports submodules with .gitmodules file tracking.
- GitLab: Provides UI support for managing submodules.
- Bitbucket: Supports submodules with limited UI visibility.
- Azure DevOps: Allows working with submodules inside projects.
Adding a Nested Repository with Git Submodule
While GitHub does not allow nested repositories (Git doesn’t allow this for bare repositories), you can use submodules to nest repositories on the “client side” in the working tree:
-
Clone the parent directory.
-
Add the sub-repository as a submodule:
git submodule add https://github.com/<username>/<sub_repo>.gitThe
<sub_repo>module is then linked to the parent repo and can be found in the<sub_repo>directory. -
Commit (
.gitmodulesand<sub_repo>), push, and you’re done.
git submodule add command works on most Git services that support it. Check your Git service documentation for how to add a submodule.
Connecting a Nested Repository with Git Integration for Jira Cloud App
Connecting a nested repository is similar to adding a plain Git repository through Git Integration for Jira Cloud.
-
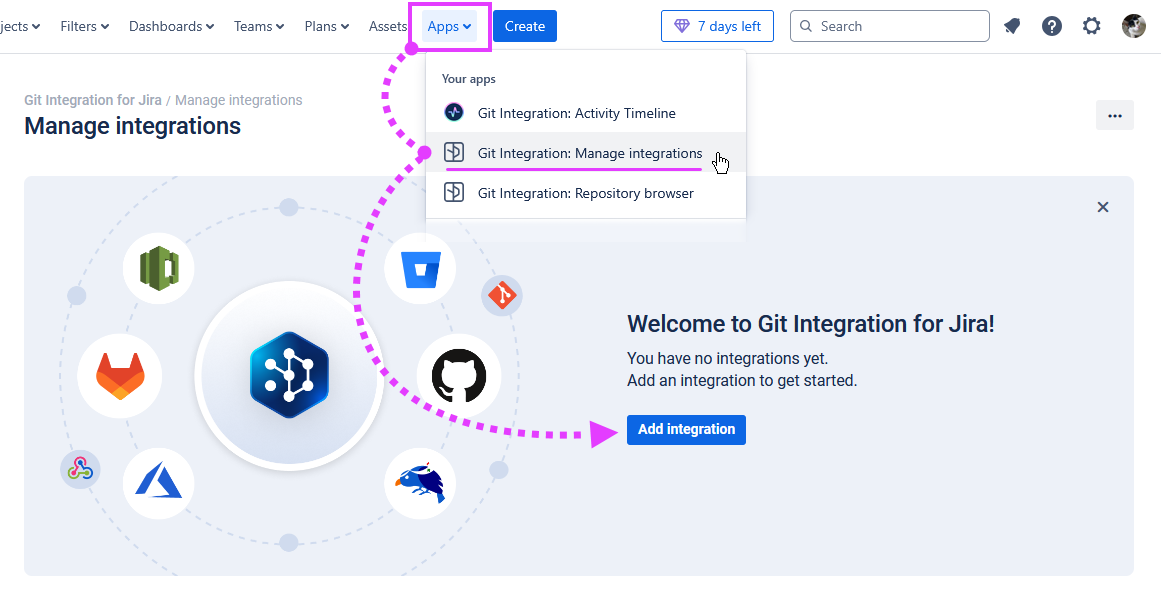
Go to the Manage integrations configuration page from your Jira dashboard Apps menu ➜ Git Integration: Manage integrations.
-
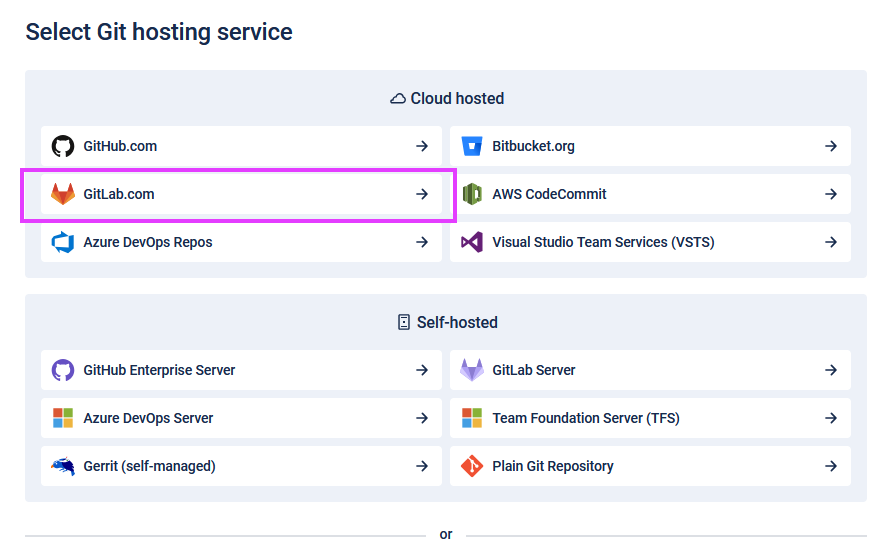
Click Add integration, then click Plain Git repository on the list of hosting services or use the Quick start panel. The following screen appears.

-
For the Quick start panel, paste the clone URL of the submodule from your git service portal. If you clicked Plain Git Repository, paste the clone URL of the submodule from your git service portal on the following screen.
For this guide, we use GitLab as an example.

-
On the Connect single Git repository screen, the input fields depend on the type of clone URL you’re using:
-
HTTPS authentication – Enter your credentials such as username and password. For the password, provide the PAT as the password.
-
SSH authentication – Provide the private ssh key. If your SSH key requires a passphrase, provide that as well.
For this guide, we use HTTP(S) authentication as an example. Enter Username and PAT (personal access token) as the password. Click Add integration to proceed.
-
-
On the Settings screen, leave all options as is. Click Finish to complete this setup.
The nested repository configuration is added to the Manage integrations list.
Connecting an Integration That Contains Nested Repositories
Adding an integration containing nested repositories is similar to connecting a new integration via Git Integration for Jira Cloud.
-
Go to the Manage integrations configuration page. Click Add integration. The following screen appears.
-
For this session, we use GitLab as an example. Click the GitLab full-feature integration icon on the integration panel. The following screen appears.

-
You can use either OAuth or PAT integration connection. For OAuth integration, enter the required credentials. For PAT integration, enter the personal access token.
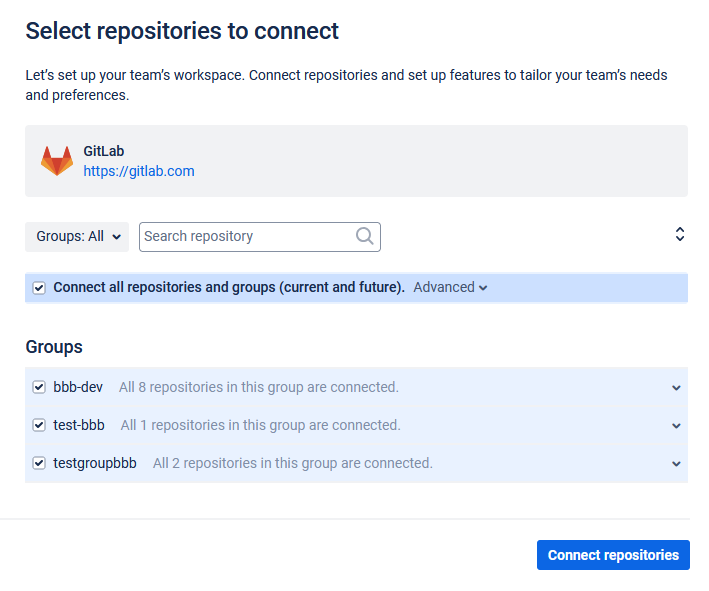
Click Connect and select repositories to continue.
Git Integration for Jira Cloud scans the remote git service and connects detected repositories.
-
On the Select repositories to connect screen, select one or more repositories to connect or connect all repositories and groups. Click Connect repositories to continue.
-
On the Configure additional options screen, leave all options as is. Click Save options to complete this setup.
The integration configuration containing nested repositories is added to the Manage integrations list.
To view the nested repository settings, go to the Manage repositories page and navigate to that specific nested repository.
Prev: Using the Single git integration wizard
Next: Self-signed HTTPS integration
