
Last updated: March 2026
Connect SSH git repositories to Jira Cloud using Git Integration for Jira.
On this page:
Generate SSH Keys
Before connecting an SSH repository, generate an SSH key pair. Use a 4096-bit RSA key for optimal security.
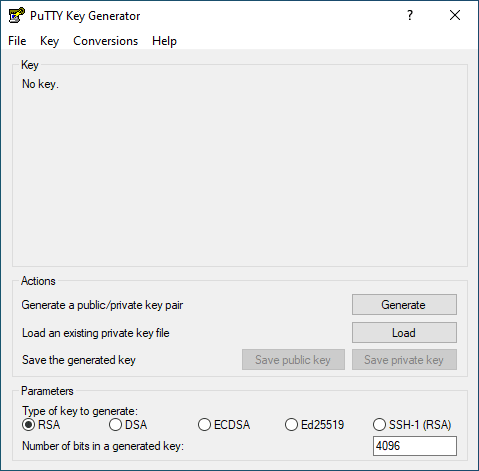
Generate SSH Keys on Windows
Windows users should use PuTTY and PuTTYgen to generate SSH keys.
-
Launch PuTTYgen.
-
Set Type of key to generate to RSA.
-
Set Number of bits in a generated key to 4096.
-
Click Generate.
-
Move your mouse pointer randomly over the blank area until the progress bar fills and the key pair generates.
-
(Optional) Enter a Passphrase to secure the key.
-
Click Save public key and Save private key to save both keys to files.
-
Copy the generated public key from the text box. Use this key on your git host’s SSH configuration page.
- In PuTTYgen, select Conversions ➜ Export OpenSSH key.
- Upload this file to Git Integration for Jira ➜ SSH keys, or provide it when connecting SSH git repositories.
You can also generate SSH keys using Git Bash. For details, see Generate SSH via Git Bash.
For platform-specific instructions, see Generating SSH Keys.
Generate SSH Keys on Linux/MacOS
Run this command to generate an RSA SSH key:
ssh-keygen -t rsa -b 4096 -m pem -C "[email protected]"
Convert SSH Key Format
Git Integration for Jira requires RSA format for private SSH keys. Convert your existing key pair with this command:
ssh-keygen -p -P "old_password" -N "new_password" -m pem
Connect an SSH Git Repository
-
Generate an SSH key pair using the steps above.
-
Copy the SSH clone URL from your git host repository page.
-
In Jira, go to Apps ➜ Git Integration: Manage integrations.
-
Click Add integration in the top-right corner.
-
Under the Self-hosted group, select Plain git repository.
-
Paste the SSH clone URL into the Host URL field.
-
Paste your private SSH key into the text box, or click Upload Key File to upload the key file.
-
Enter the key’s Passphrase if you set one. Otherwise, leave it blank.
-
Click Add Integration to complete the setup.
The connected repository appears in your git configuration page.
