
Last updated: March 2026
![]()
Integrate GitLab CE/EE with Jira Cloud
This feature tracks added or deleted repositories from a remote GitLab server (EE/CE) and automatically imports those Git repository references into Jira.
GitLab v10+ stopped accepting username/password credentials for API access and will only recognize Personal Access Tokens (PAT) and OAuth authentications. Service users are strongly advised to switch from using username/password for newer versions of GitLab Server (CE/EE) to using PAT.
For GitLab Server service users, they won’t see the issue until they upgrade their GitLab Servers to version 10 and higher. Git Integration for Jira app offers pre-v10 GitLab Server service users as a Legacy connection option.
By the end of March 2024, GitLab legacy integrations will be deprecated in the Manage integrations screen. To prevent any integration issues:
- Please upgrade your GitLab server;
- Remove legacy integrations; and
- Connect a new GitLab integration to your GitLab CE/EE.
Quickly learn how to connect GitLab CE/EE git repositories via Git Integration for Jira Server app.
What’s on this page:
- Integrate GitLab CE/EE with Jira Cloud
- Permissions
- Creating a personal access token
- Automatic token rotation
- Using Git service integration
- Single git repository integration
- Setting up GitLab web links
- Viewing git commits in Jira Cloud
- Working with branches and merge requests with GitLab CE/EE
- Default branch
- Creating Branches
- Creating merge requests
- More Integration Guides
Permissions
GitLab can have users with different access level to a group or project. If the user’s connected GitLab repositories to Jira are not accessible or commits are not showing for that user — it’s related to permission issues. This can be a per user, repository or a project level restriction.
If you encounter access permission issues, you will need to ask your Git administrator to grant you the required level of access to specific projects. If you are a Git administrator, you will need to setup a GitLab user with the minimum required permissions to view GitLab projects from Jira.
Take the following cases for example:
-
The personal access token (PAT) that the GitLab user provided doesn’t have the correct permissions within GitLab to view source code for specific repositories.
-
The GitLab user doesn’t have access privileges to a GitLab repository or is not a member of a group that has access to specific repositories.
We recommend creating a specific GitLab user for the integration. This way, the GitLab user can have specific permissions to do the given tasks.
For minimum access (read-only) permissions:
-
Set the user account profile’s PAT scope to read_repository.
-
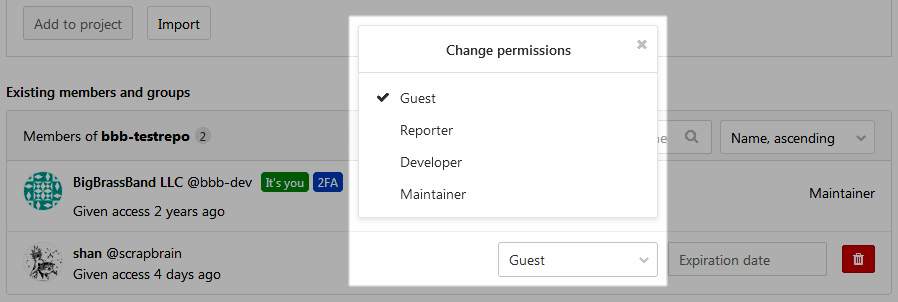
The GitLab user is set to only read a specific repository. Set to Reporter role.
This level of access allows the user to view commits for the specific repository.
For users who will be tasked with creating branches and merge requests:
-
Set the user account profile’s PAT scope to api.
-
The GitLab user should be set to read/write access for the specific repository. Set to Developer role.
This level of access allows the user to create/delete branches and create merge requests.
For more information, see GitLab Permissions ».
Creating a personal access token
While instructions from GitHub works just fine, follow this article for a quick step-by-step guide to get you started.
Starting May 14, 2024, Gitlab is removing support for non-expiring personal access tokens (PATs) where all existing unlimited tokens will suddenly expire. To maintain integration connections with your GitLab repositories, create a new token and manually enter it into the corresponding field in the integration connection properties in Git Integration for Jira app (GIJ).
Automatic token rotation
GIJ can automatically rotate tokens but we still encourage users to manually enter their tokens before or as soon as it expires.
The automatic rotation occurs only for the tokens used to connect Gitlab integrations. Any user PATs (used to create PRs) for Gitlab integrations aren’t automatically rotated, and must be manually updated by each user themselves.
Using Git service integration
This process requires an existing GitLab Server EE or GitLab Server CE. If your GitLab Server version is 10.2 or newer, a personal access token must be configured.
We recommend using the Full feature integrations panel to connect multiple repositories from your GitLab CE/EE account.
-
On your Jira side bar, go to Apps ➜ Git Integration for Jira, then Settings ➜ Manage Integrations
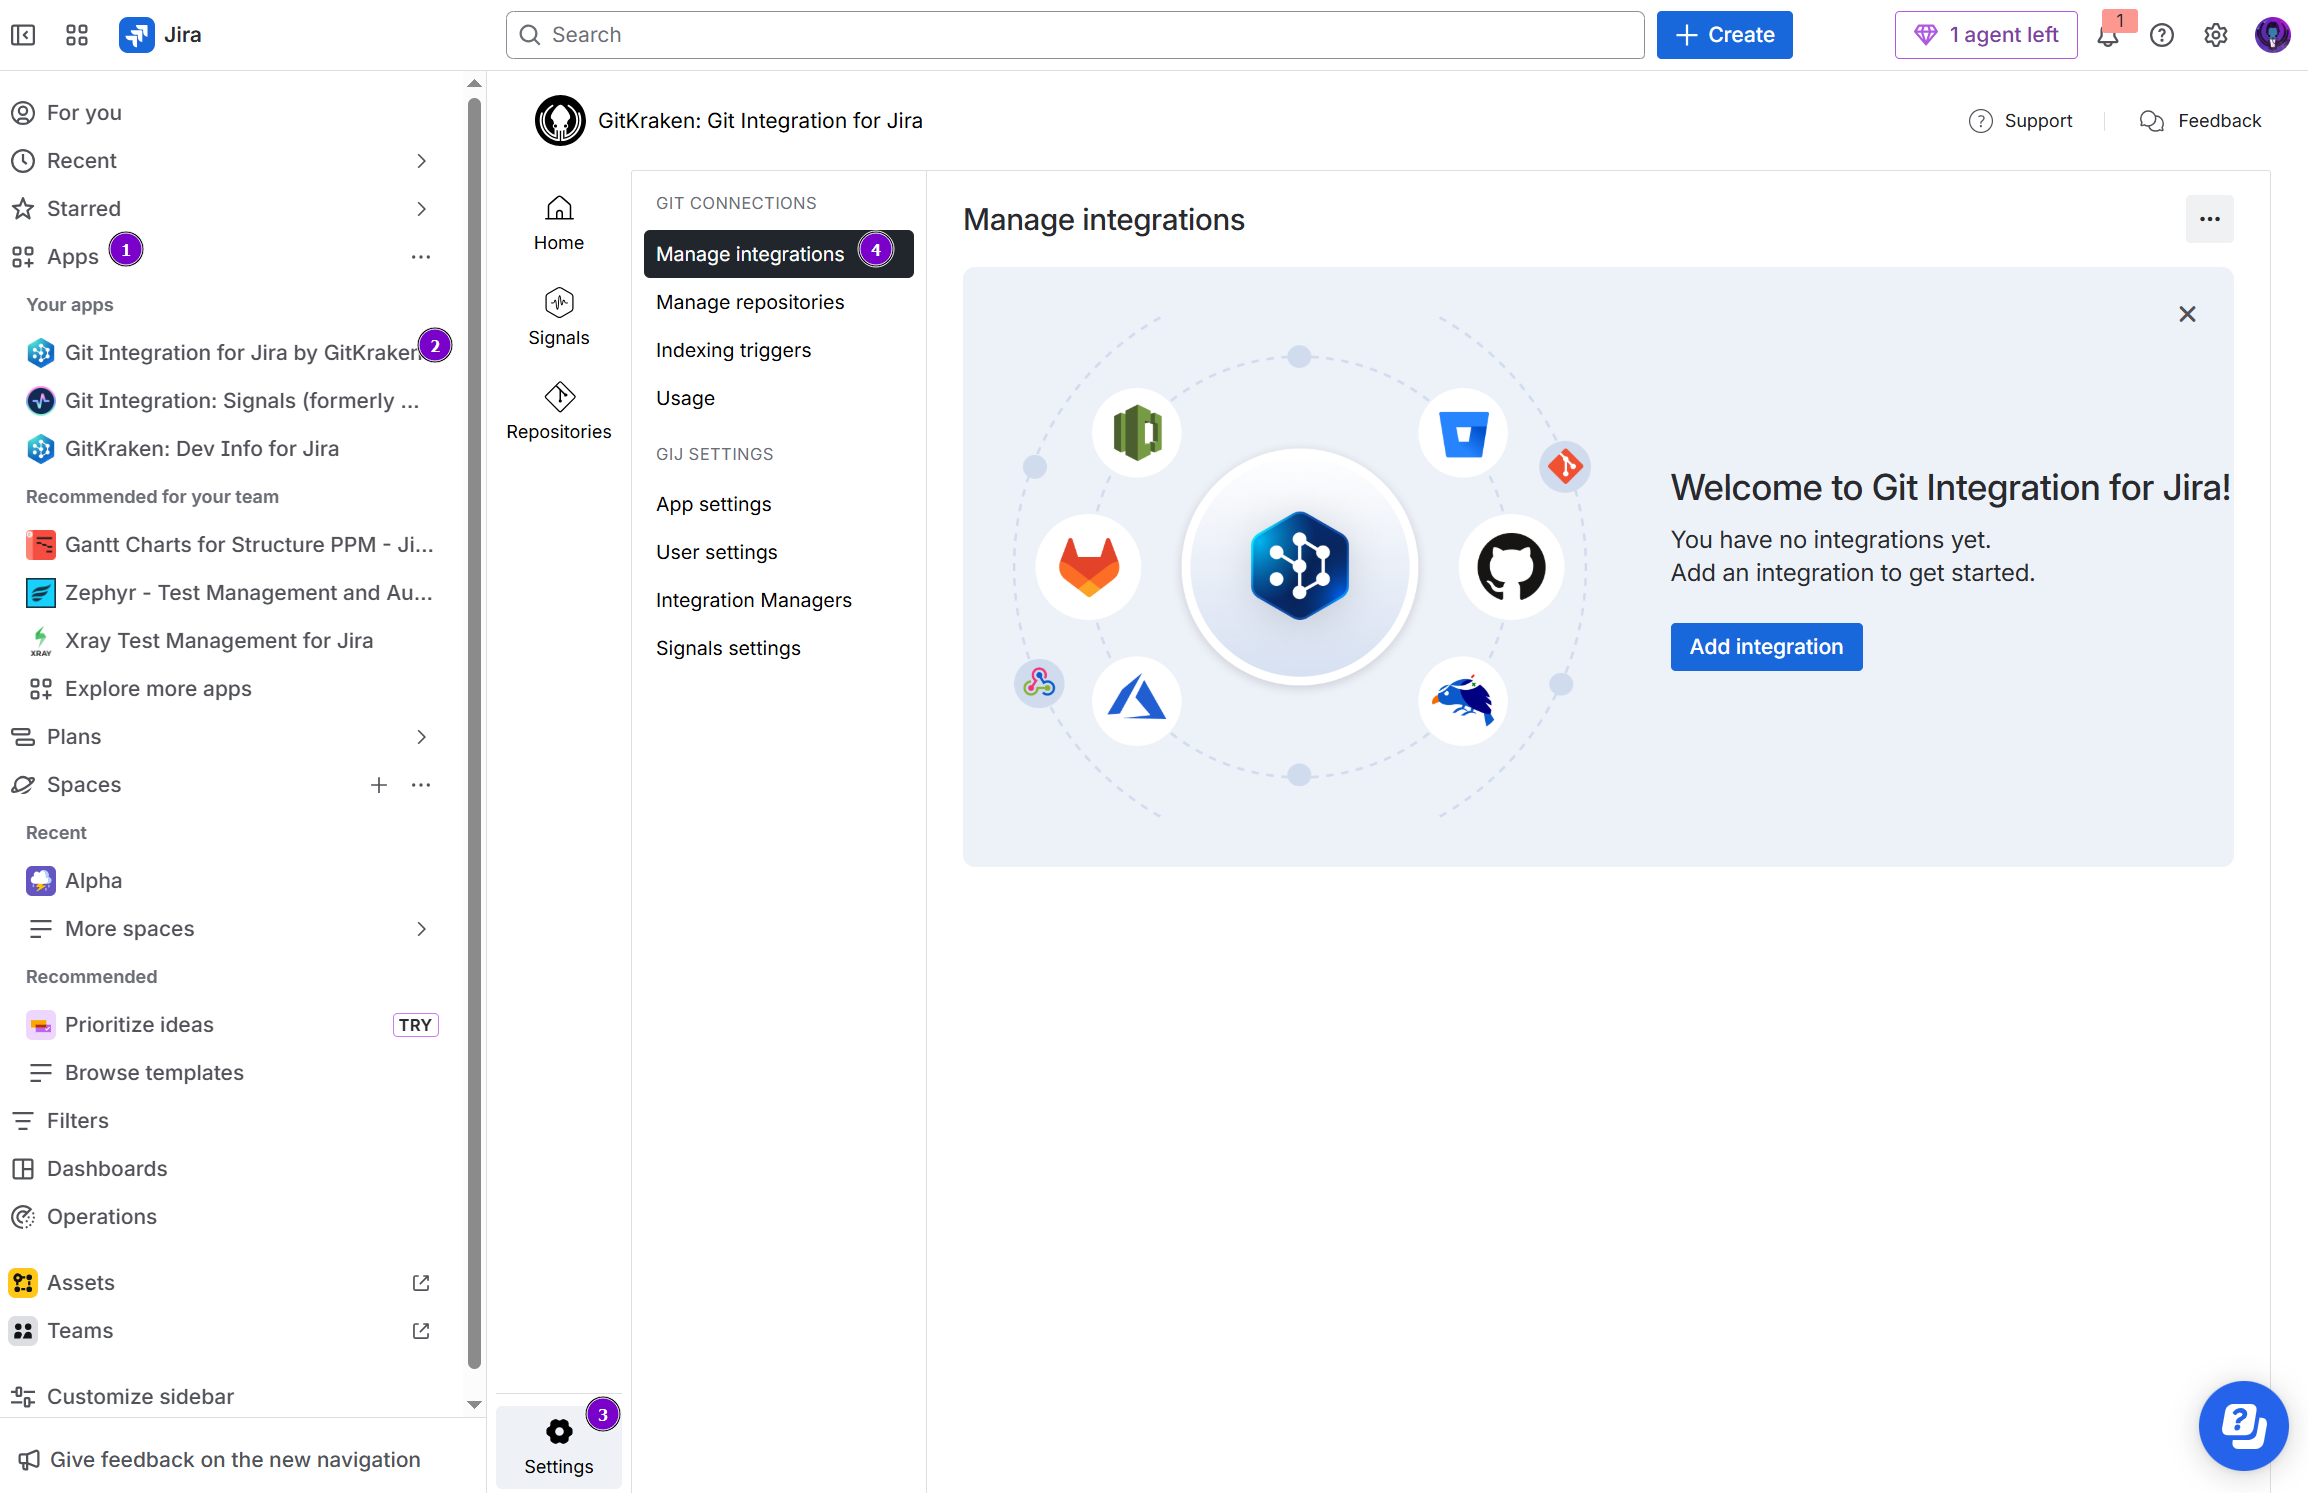
-
On the Manage integrations page, click Add integration.

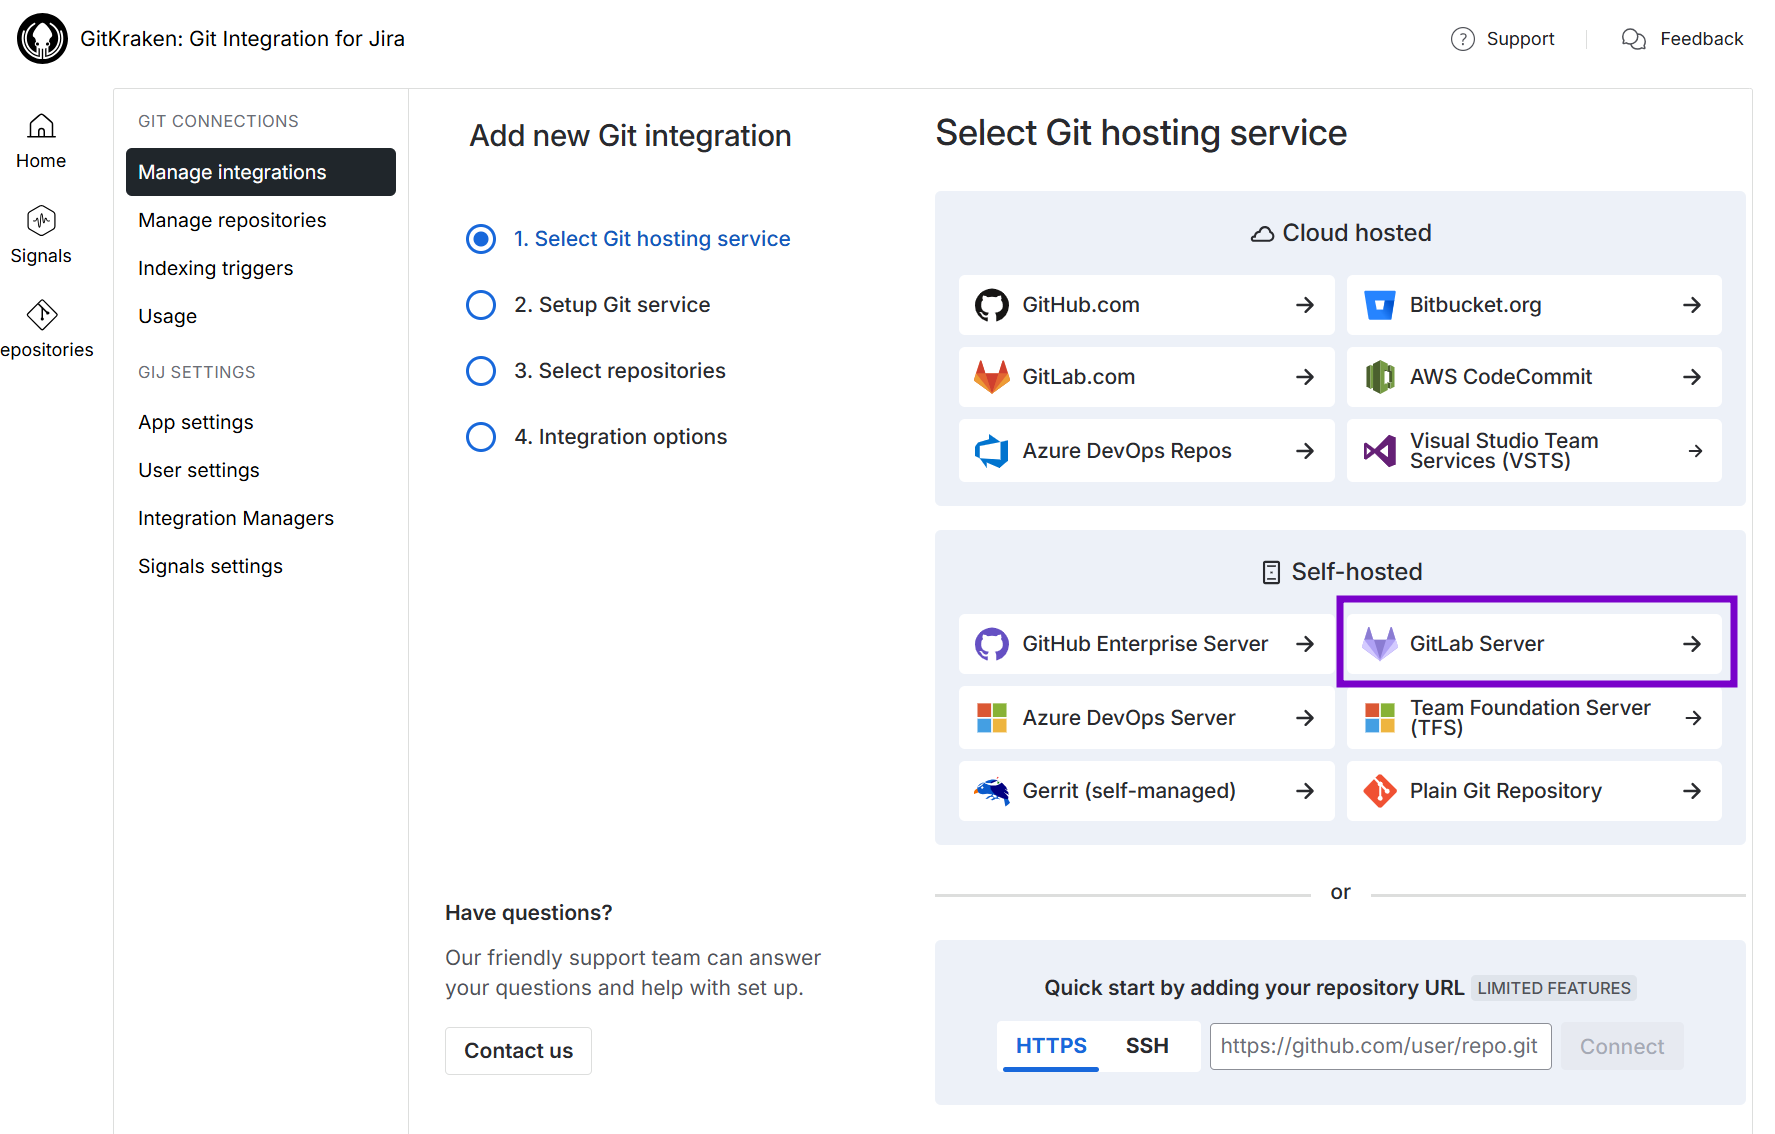
-
For the following screen, click GitLab Server to start integration with this git service.
-
On the following screen, click on the Git service integration panel for your integration type.
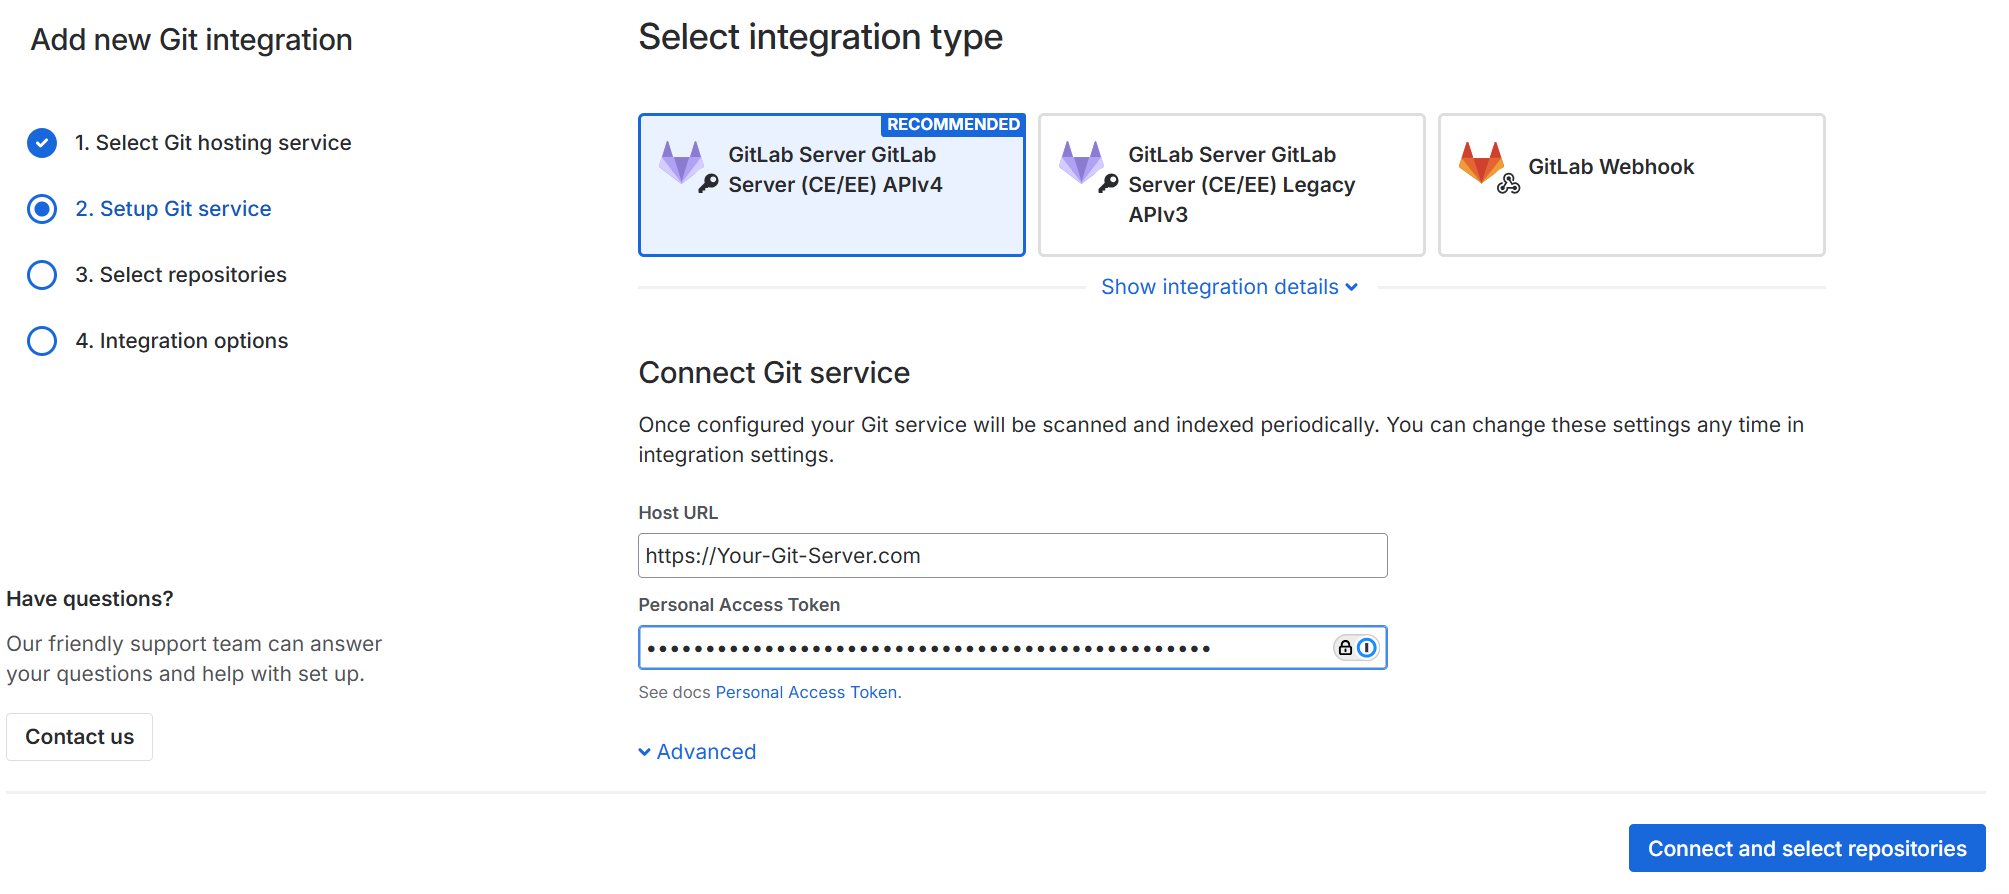
-
For this guide, click on the PAT GitLab Server (CE/EE) APIv4 panel to select it.
-
While Git Integration for Jira Cloud app supports legacy APIv3 and APIv4, we recommend the PAT APIv4 integration type for this git service connection. The PAT integration type uses personal access tokens to setup GitLab CE/EE integrations. Users will have to configure their own PAT from GitLab CE/EE to use for this setup.
-
For the Host URL, enter the address of the GitLab Server.
-
Enter the Personal Access Token for server authentication. 2FA must be enabled in your GitLab Server and PAT has been configured.
-
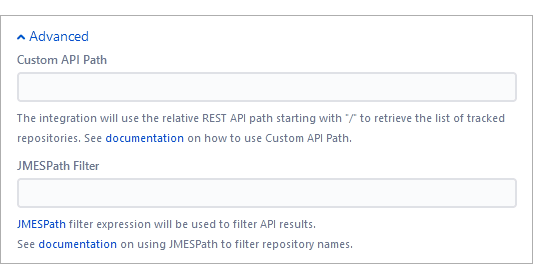
Configuring the Advanced settings is optional. However, admins/power users may set how the project listing is displayed. These settings are used with integration to retrieve the list of tracked repositories. Set a filter that will only load some cloned repositories which can be viewed in the Manage repositories page.
-
Custom API Path – this is a relative path that starts with “/”. The maximum allowed length is 2000 characters or less. The integration will use the relative REST API path to retrieve the list of tracked repositories. For more information on GitLab custom API paths, see GitLab API. For more examples, see article Jira Cloud: Working with Custom API Path.
GitLab version API support: ------------------------------------------- Gitlab v9.5 and above -- only API v4. Gitlab v9.0 to v9.4.x -- API v3 and API v4. -
JMESPath filter – JMESPath is a query language for JSON used to filter API results and to limit which repositories are integrated. The maximum allowed length is 2000 characters or less.
Read about JMESPath expressions on their website. For help with writing expressions, please contact GIJ Cloud Support.
To know more examples, see article Jira Cloud: Working with JMESPath Filters.
-
-
While Custom API Path and JMESPath filter are mutually exclusive, you can use one, the other, both or neither.
-
-
Click Connect and select repositories. The Git Integration for Jira app will import detected GitLab CE/EE repositories.
- Currently, the Git Integration for Jira app scans only the repositories visible to the user which is used for scanning. The repositories which are publicly visible (shared for all members or visible to the member with the admin rights) will not be scanned. This will be supported in a future release.
-
On the following screen, the Git Integration for Jira app will read all available repositories from your GitLab account.
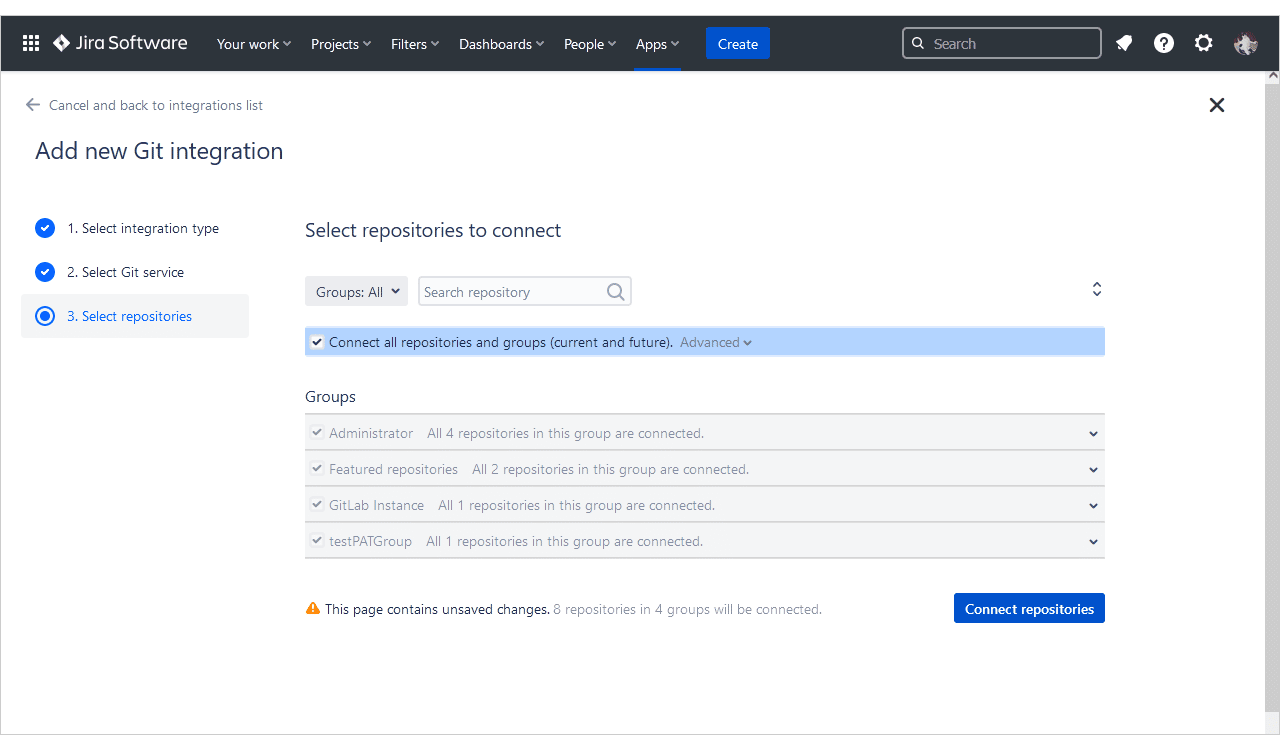
-
Click Connect repositories to complete this setup.
GitLab CE/EE repositories are now connected to Jira Cloud. The GitLab server is added to the repositories list as a connected server and is automatically reindexed.
Repositories added or removed from GitLab server will be likewise added or removed from Jira Cloud. There will be a slight delay in adding 2FA-enabled repositories compared to others. These will show in the git configuration list eventually.
|
Administrators
If you need to require users PAT for creating branches or merge requests, turn on this setting via the selected integration in Manage integrations page ➜ Actions ➜ Edit integration.
|

Single git repository integration
This process requires an existing GitLab CE/EE git repository. Look for the the GitLab CE/EE repository clone URL on the repository project page. Choose between SSH or HTTPS.
Use this information to connect the GitLab CE/EE git repository to your Jira Cloud via Git Integration for Jira app:
Single git repository integration (HTTPS)
Single git repository integration (SSH)
There will be a slight delay in adding 2FA-enabled repositories compared to others. These will show in the git configuration list eventually.
Setting up GitLab web links
The Git Integration for Jira app automatically configures web linking for GitLab git repositories.
For single repository connections, web link setup is optional. However, git links will become available in Git Commits tab when configured.
For more information on this feature, see Documentation: Web linking.
Viewing git commits in Jira Cloud
-
Perform a git commit by adding the Jira issue key in the commit message. This action will associate the commit to the mentioned Jira issue.
-
Open the Jira issue on your Jira instance.
-
Scroll down to the Activity panel then click the Git Commits tab.
-
Click View Full Commit to view the code diff.
For more information about this feature, see Documentation: Linking git commits to Jira issues.
Working with branches and merge requests with GitLab CE/EE
For GitLab CE/EE (Legacy or newer), the user must have the Write permissions and the api PAT scope.
Default branch
Most git integrations allow changing of the default branch of the repository/project other than “master”. This change is reflected in the Repository Settings of the Git Integration for Jira app on the next reindex. Auto-connected integrations support this feature where Git Integration for Jira app gets the default branch from almost all integrations and apply this setting at repository level.
Creating Branches
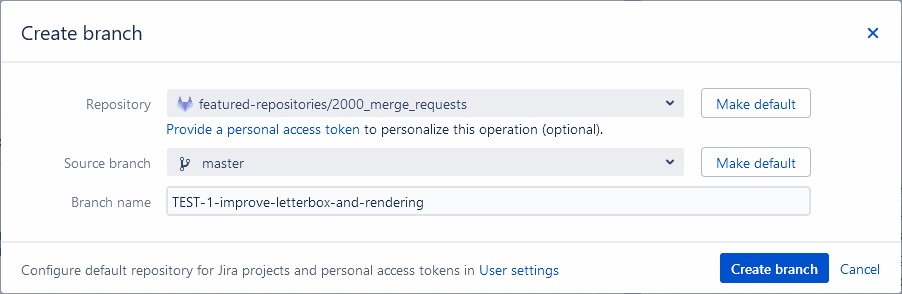
On your Jira Cloud, open a Jira issue. On the Jira Git integration development panel, click Open Git Integration then click Create branch. The following dialog is displayed.
Pointers:
-
Select a Repository from the list.
-
The git host service logo is displayed for all the repositories in the dropdown list to easily identify which git service they belong.
-
If there are several repositories with the same name, the listed GitLab repositories will have their names attached with a GitLab owner name. For example,
johnsmith/second-webhook-test-repo. -
Use the search box in the dropdown list to filter displayed repositories.
-
OPTIONAL Designate the repository to be the default selected repository for current Jira project. To configure default repositories for more than one Jira project – use the User settings page.
-
-
Choose a Source branch.
OPTIONAL Designate the branch to be the default selected branch for the currently selected repository. To configure default branches for more than one connected repository – use the User settings page.
-
Enter a Branch name or leave it as is (recommended).
-
Click Create branch to complete this process.
The newly-created branch is now listed in the developer panel under Branches. Perform a commit to the newly-created branch to be ready for merge.
Creating merge requests
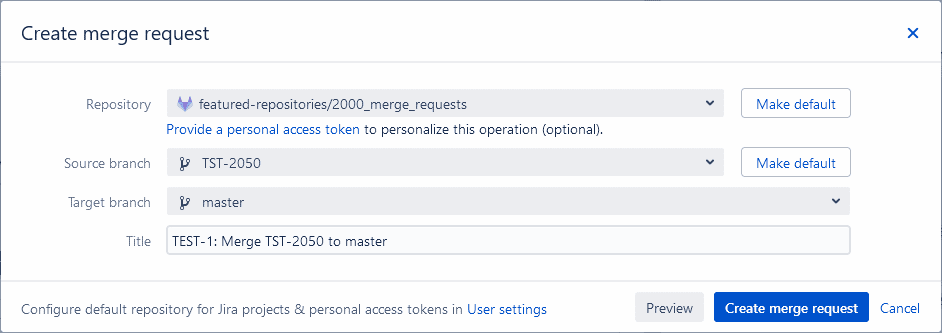
The merge request feature works the same as merge request. On your Jira Cloud, open the Jira issue where your previously created a branch. On the Jira Git integration development panel, click Open Git integration then click Create merge request. The following dialog is displayed.
Pointers:
-
Select a Repository from the list.
-
The git host service logo is displayed for all the repositories in the dropdown list to easily identify which git service they belong.
-
If there are several repositories with the same name, the listed GitLab repositories will have their names attached with a GitLab group name. For example,
BigBrassBand/second-webhook-test-repo. -
Use the search box in the dropdown list to filter displayed repositories.
-
OPTIONAL Designate the repository to be the default selected repository for current Jira project. To configure default repositories for more than one Jira project – use the User settings page.
-
-
Choose the newly-created branch as the Source branch.
OPTIONAL Designate the branch to be the default selected branch for the currently selected repository. To configure default branches for more than one connected repository – use the User settings page.
-
Set master as the Target branch.
-
Enter a descriptive Title or leave it as is (recommended).
-
Click Create merge request to complete this process. Follow the link to the PR to setup for review and approval.
The merge request is listed on the developer panel of the Jira issue page.
The merge request is also ready for approval by the reviewers in your GitLab web portal.
More Integration Guides
GitHub.com (Git Integration for Jira Cloud)
GitLab CE/EE (this page)
GitHub Enterprise Server (Git Integration for Jira Cloud)
GitLab.com (Git Integration for Jira Cloud)
Azure DevOps | Visual Studio Team Services (VSTS) (Git Integration for Jira Cloud)
Azure DevOps Server | Team Foundation Services (TFS) (Git Integration for Jira Cloud)
AWS CodeCommit (Git Integration for Jira Cloud)
Gerrit (Git Integration for Jira Cloud)
Bitbucket Cloud (Git Integration for Jira Cloud)
Introduction to Git integration (Git Integration for Jira Cloud)
All product names, logos, and brands are property of their respective owners.
