
Last updated: March 2026
The General Settings page lets Jira administrators control which Git Integration for Jira Cloud features appear in Jira and how some app-wide behaviors work. Use this page when you need to enable or disable issue tabs, repository browser features, beta functionality, branch naming rules, or connected-app visibility.
| Settings area | Use it to control | Typical reason to review it |
|---|---|---|
| Feature visibility | Git Roll Up, Git Commits, issue panel, and repository browser pages | Reduce clutter or match the features your team uses |
| Integration behavior | Branch naming, branch name length, web linking, and app options | Standardize Git workflows across projects |
| Connected apps | GitKraken and GitLens deep linking | Choose which external app actions users can access |
| Jira development information | Development panel and related Jira surfaces | Adjust how Git data appears inside Jira |
On this page:
- How to open General settings
- Enable beta features
- Git Roll Up Issue Tab setting
- Git Commits Issue Tab and Project Page
- Issue Git Source Code Panel setting
- Repository Browser settings
- Git Integration Options
- GitKraken Integration settings
- GitLens Integration settings
- Jira Development Information settings
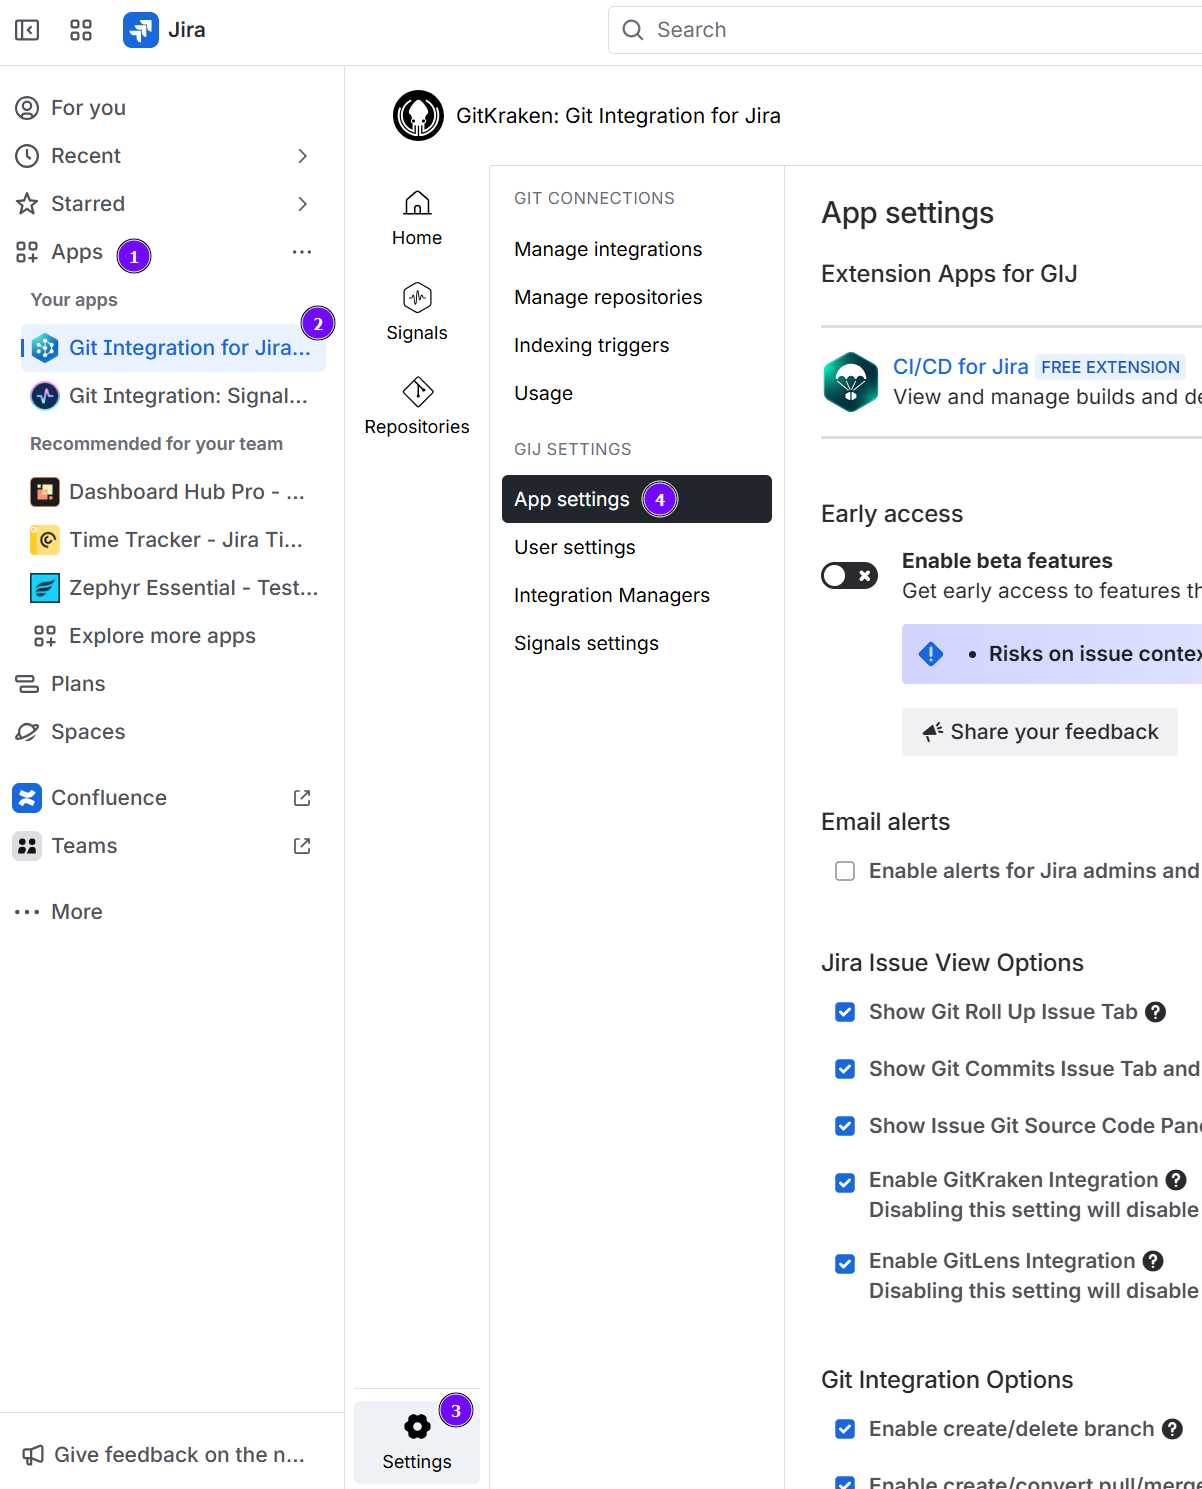
How to open General settings
Open the General settings page in Jira Apps Management to enable or disable Git Integration for Jira Cloud app features.
Access General settings through:
-
Jira Side Bar ➜ Apps ➜ Git Integration for Jira ➜ App settings.
Click Update to apply your changes.
Enable beta features
This setting is disabled in Git Integration for Jira Cloud app by default.
This setting is turned off by default in Dev Info for Jira Cloud app.
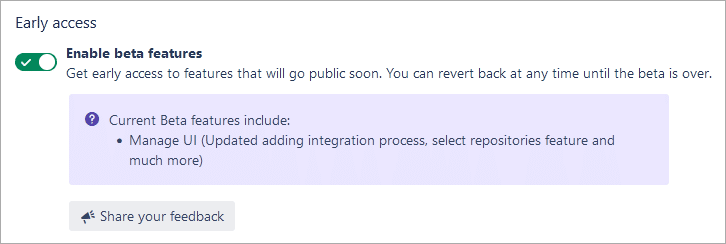
This toggle provides early access to upcoming features. Enable it to use new beta features and display them in General settings. Disable it to hide beta features.
Git Roll Up Issue Tab setting
This setting is enabled in Git Integration for Jira Cloud app by default.
This setting is turned off by default in Dev Info for Jira Cloud app.
Show Git Roll Up Issue Tab
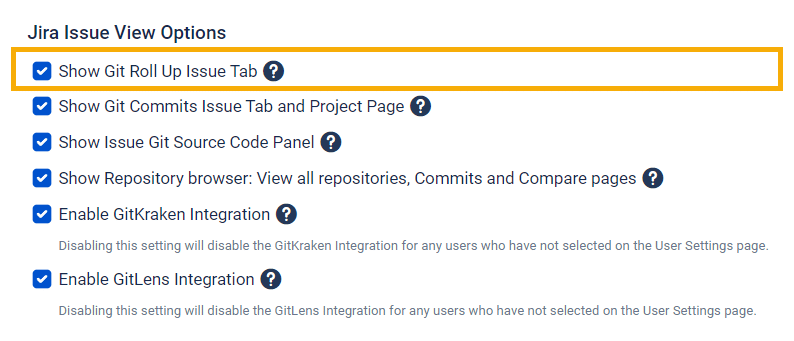
The Git Roll Up Issue tab displays a summary of files, lines, and developers who changed commits associated with a Jira issue. Toggle this setting to show or hide the Git Roll Up tab on Issue pages for all Jira projects.
For more details, see Features: Git Roll Up tab (Jira Cloud).
The View developer tools permission is required to view the Git Roll Up Issue Tab. Jira users must also have Browse Project permissions for a project associated with a repository to view.
Git Commits Issue Tab and Project Page
This setting is enabled in Git Integration for Jira Cloud app by default.
This setting is turned off by default in Dev Info for Jira Cloud app.
Show Git Commits Issue Tab and Project Page
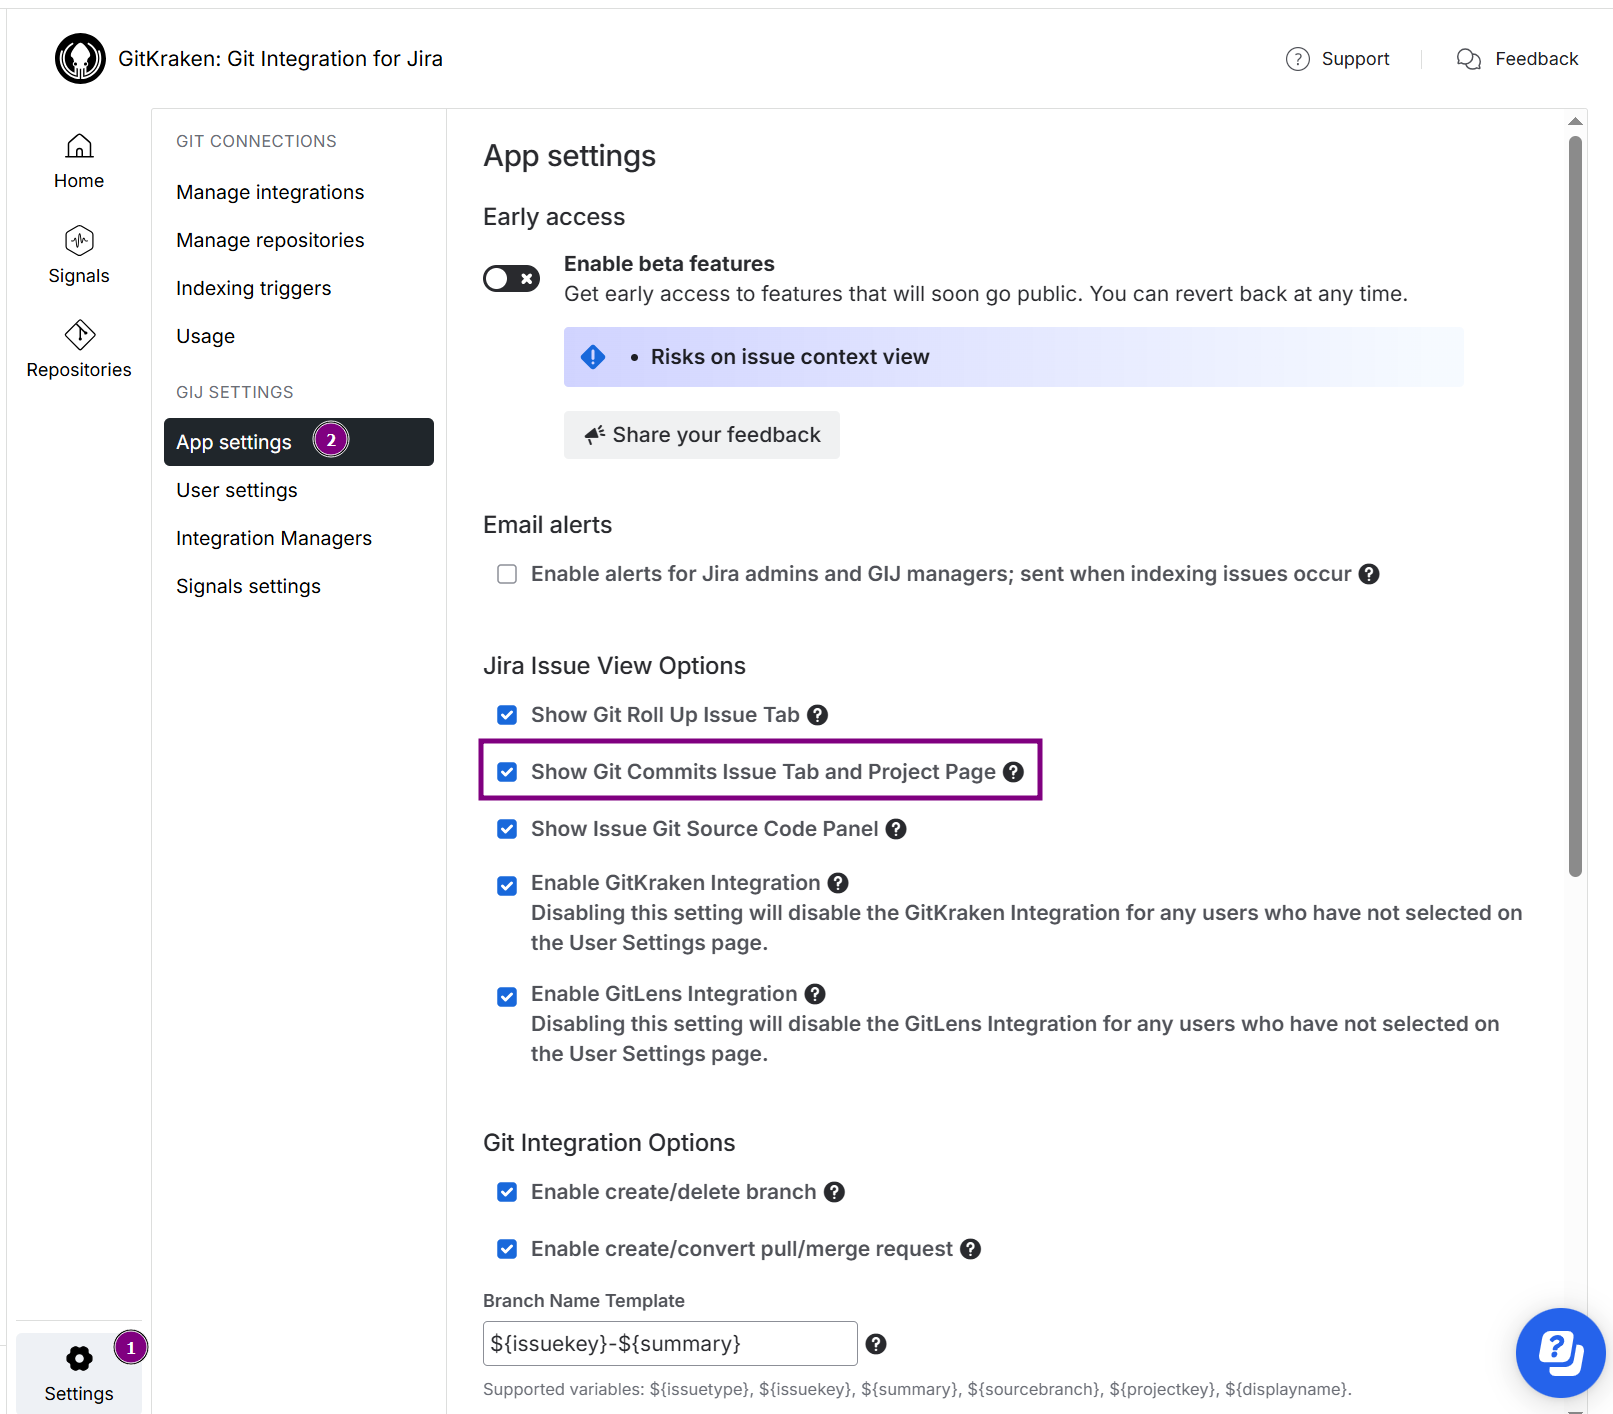
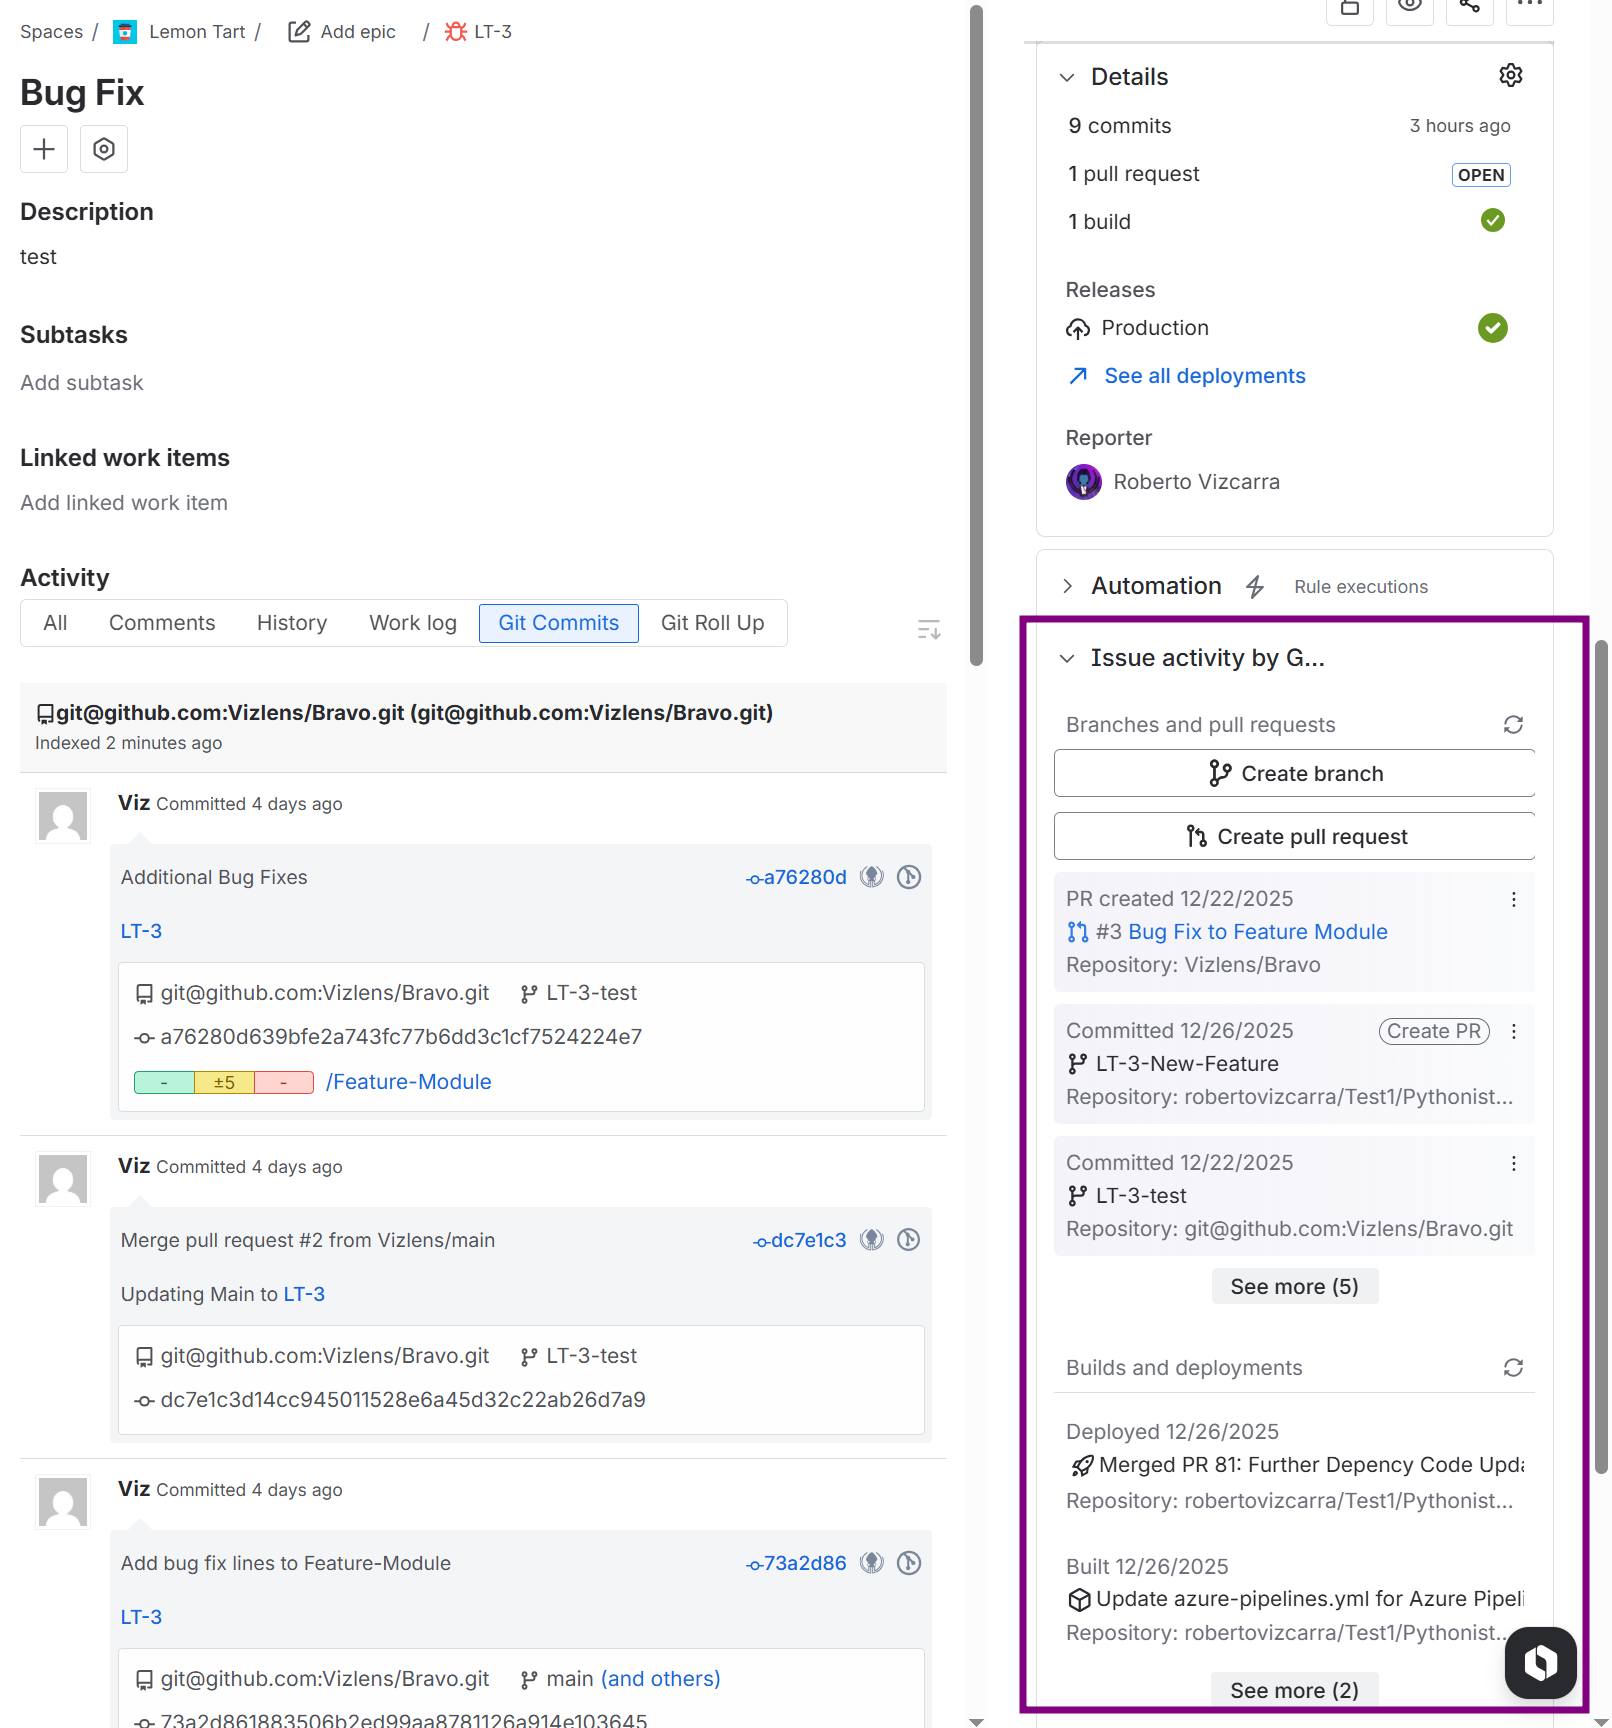
This setting enables or disables the Git Commits Issue tab and the Git Commits Project page. These locations display git commits associated with the Jira issue and project respectively. The list groups commits by repository and sorts them by commit time.
For more details, see Features: Git Commits Issue tab and Project Page (Jira Cloud).
The View developer tools permission is required to view the Git Commits Issue Tab and Projects Page. Jira users must also have Browse Project permissions for a project associated with a repository to view.
Issue Git Source Code Panel setting
This setting is enabled in Git Integration for Jira Cloud app by default.
This setting is turned off by default in Dev Info for Jira Cloud app.
Show Issue Git Source Code Panel
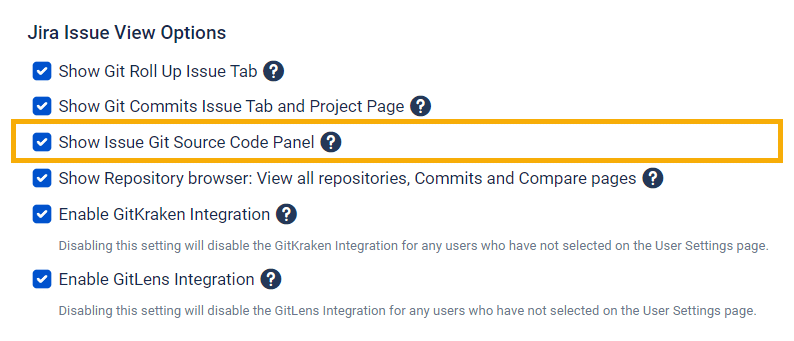
Toggle this setting to show or hide the Git Integration section on the Jira issue developer panel.
The View developer tools permission is required to view the Git Integration panel. Jira users must also have Browse Project permissions for a project associated with a repository to view.
Disabling this setting improves Jira performance.
For introductory information on this feature, see Jira git issue development panel.
Repository Browser settings
- This setting is enabled in Git Integration for Jira Cloud app by default.
- This setting is turned off by default in Dev Info for Jira Cloud app.
Git Integration Options
These settings take effect at the integration level for projects with connected GitLab/GitHub git hosts. Each setting is enabled by default.
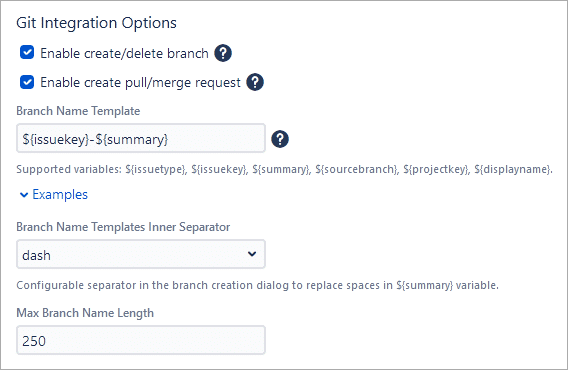
Enable create and delete branch
This setting controls branch creation and deletion functions. The Jira developer panel’s ability to create or delete branches depends on this setting.
For detailed information on this feature, see Creating branches.
Enable create pull or merge request
This setting controls pull/merge request creation from the Jira developer panel.
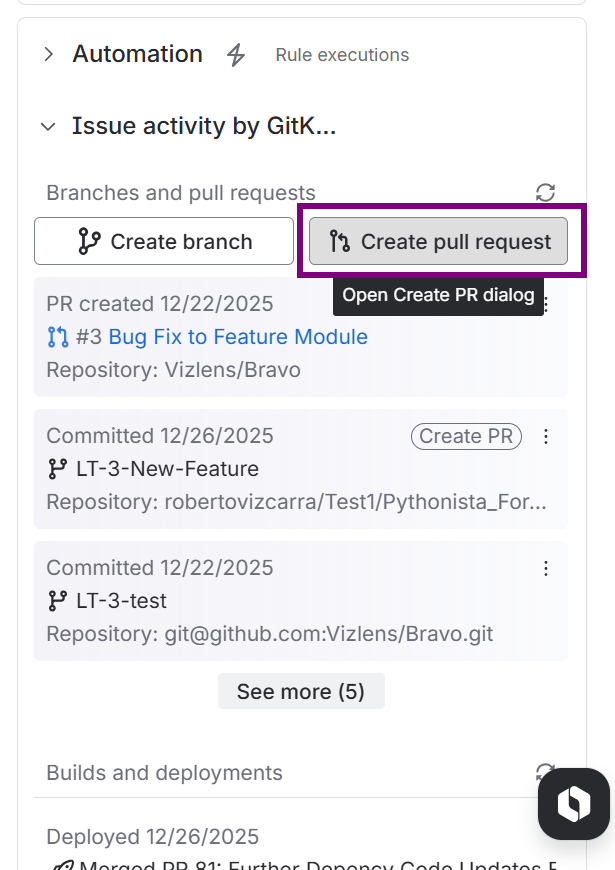
For detailed information on this feature, see Creating pull/merge requests.
Branch name template
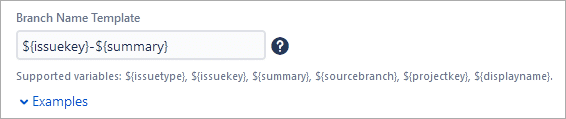
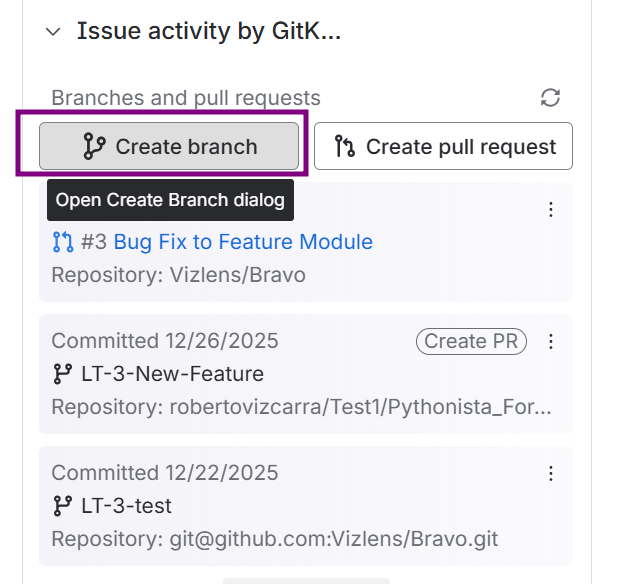
Set the Branch Name Template using the supported variables. Use the template to generate a default name for newly-created branches with the Create Branch dialog through the development panel of the Jira issue. Click Examples to view template structure examples.
Use the following template variables:
${issuetype} – Issue Type. The Issue type maps a custom issue type as part of the template. The mapping pattern follows this structure:
${issuetype:type0,subsitute0[,type1,substitute1,...,typeN,substituteN][,defaultsubstitute]}
typeN– is the nth issue type string to match.substituteN– is the substitution string to use for typeN.defaultsubstitute– is the substitution string to use if typeN‘s match is not found. If defaultsubstitute is blank, the lowercase version of the defined issue type is used.
${issuekey} – Issue Key. The Issue key appears in upper case.
${summary} – Issue Summary. The Summary comes from the current Jira issue and appears in lowercase; spaces are replaced with “-” (dash).
${issuekey}-${summary}
PRJ-123 is the issue key followed by a hyphen then the summary text of the active issue page (in hyphenated lowercase form).${sourcebranch} – Source branch. The source branch from the Create Branch dialog appears in lowercase; spaces are replaced with “-” (dash).
${projectkey} – Project Key. The Project key appears in uppercase.
${displayname} — This is the displayed name of the current user.
Branch name templates inner separator

This setting specifies which inner word separator to use for the branch name template. The default setting is "-" (dash).
Max branch name length

This setting lets administrators specify the maximum character length for branch names. The default value is 250 characters.
Branch name template examples
Example 1:
${issuetype}/${issuekey}-${summary}
This generates the string format like “newfeature/PRJ-123-add-more-logging” as a default value for branch names. Where newfeature is the actual issue type of the active Jira issue (in lowercase with whitespaces trimmed), PRJ-123 is the issue key followed by a hyphen, then the summary text of the active issue page (in hyphenated lowercase form).
Example 2:
${issuetype:New Feature,feature,Bug Fix,bug}/${issuekey}-${summary}
This generates the string format like “feature/PRJ-123-add-more-logging” as a default value for branch names. This example uses a Jira issue with the New Feature issue type—where feature substitutes for issuetype since type0 matches the active Jira issue type; PRJ-123 is the issue key followed by a hyphen, then the summary text of the active issue page (in hyphenated lowercase form).
Example 3:
${issuetype:Old Issue,old,Bug Fix,bug,branch}/${issuekey}-${summary}
This generates the string format like “branch/PRJ-123-add-more-logging” as a default value for branch names. This example uses a Jira issue with the New Feature issue type—where branch substitutes for issuetype since type0..typeN does not match the active Jira issue type; PRJ-123 is the issue key followed by a hyphen, then the summary text of the active issue page (in hyphenated lowercase form).
GitKraken Integration settings
- This setting is enabled in Git Integration for Jira Cloud app by default.
- This setting is turned off by default in Dev Info for Jira Cloud app.
Enable GitKraken integration
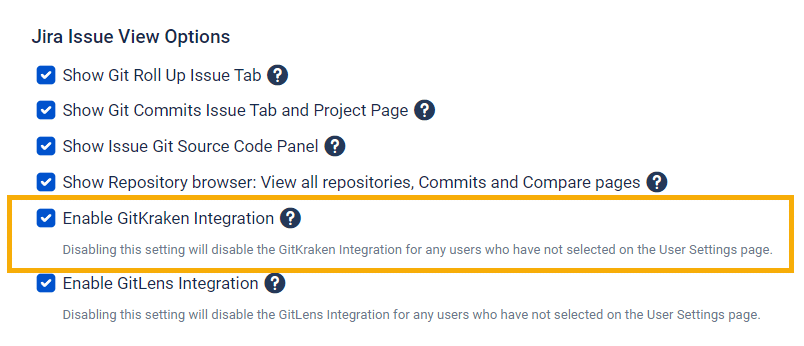
Enable deep linking to quickly move between Jira and your Git source code using the GitKraken git client. GitKraken also supports deep linking into Git Integration for Jira. For more information, see GitKraken Integrations: Git Integration for Jira.
The View developer tools permission is required to view git commits. Jira users must also have Browse Project permissions for a project associated with a repository to view.
For more details, see Features: Deep Linking to the GitKraken Git client (Jira Cloud).
GitLens Integration settings
- This setting is enabled in Git Integration for Jira Cloud app by default.
- This setting is turned off by default in Dev Info for Jira Cloud app.
Enable GitLens integration
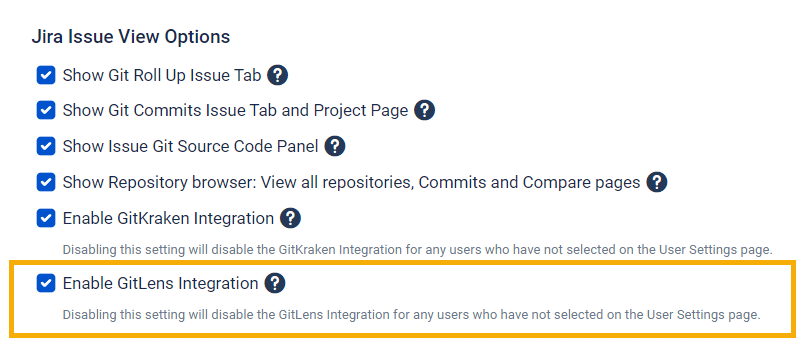
Enable deep linking to quickly move between Jira and your Git source code using the GitLens VSCode extension. GitLens also supports deep linking into Git Integration for Jira. For more information, see GitLens Integrations: Git Integration for Jira.
The View developer tools permission is required to view git commits. Jira users must also have Browse Project permissions for a project associated with a repository to view.
For more details, see Features: Deep Linking to the GitLens (Jira Cloud).
Jira Development Information settings
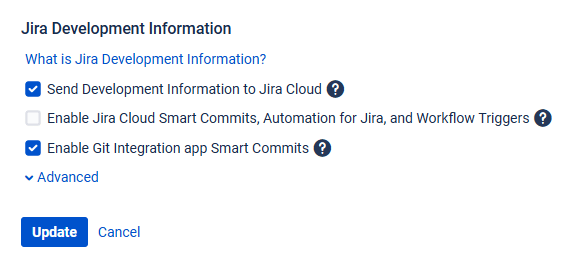
What is Jira Development Information?
Jira Development Information is a suite of Jira Software Cloud features that put commits, branches, and pull requests in context of Jira issues. Configure these settings to push development information directly into your Jira Cloud instance.
General settings effect on Smart Commits commands
The following settings affect the availability of specific smart commit commands as outlined below:
| When this General setting is enabled | #time | #label |
|---|---|---|
| Jira Cloud Smart Commits |  |
 |
| Git Integration app Smart Commits | |
|
| Both Jira Cloud Smart and GIJ app Smart commits | (doubled time and comments) |
|
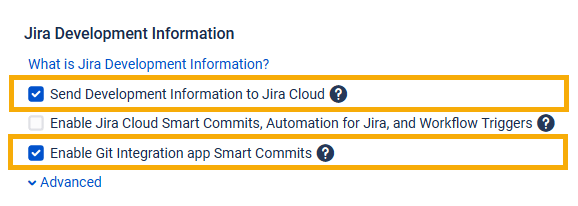
Send development information to Jira Cloud
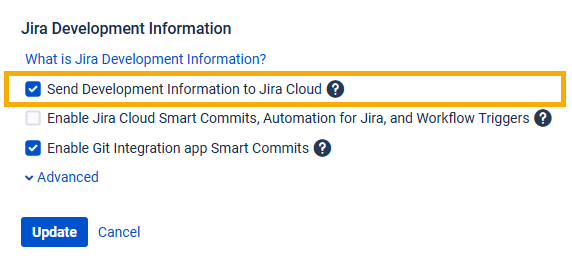
Toggle this setting to send new commit, branch, and pull request data to Jira Cloud for processing and display in various views and features.
This setting is enabled in Git Integration for Jira Cloud app by default.
This setting is turned off by default in Dev Info for Jira Cloud app.
Only newly added commits, branches, and pull requests upload to Jira Cloud when enabled. To upload the entire history of an integration or repository, remove it and add it back.
The View Development Tools permission only applies to Jira Company-managed projects. Team-managed projects do not allow permission modifications.
ON automatically disables the Enable Git Integration app Smart Commits setting.
Enable Jira Cloud Smart Commits, Automation for Jira and Workflow Triggers
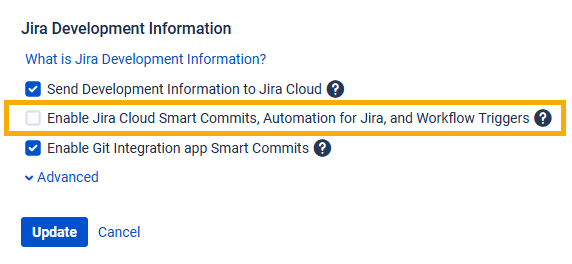
This setting activates the native Atlassian Jira Cloud Smart Commit processor, supporting #time, #comment, and #transitions commands for triggers. It also enables Automatic Workflow Triggers.
Automatic workflow triggers let you use development activity to make automatic changes in your Jira project workflows. For example, you can use workflow triggers to transition Jira issues.
For more information on Automation for Jira, see Git Integration + Jira Automation.
#label command.
Enable Git Integration app smart commits
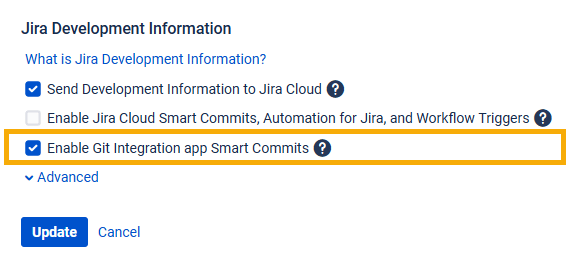
This setting activates GitKraken’s GIJ Smart Commit processor for #time, #comment, #transition, and #label commands. For more information, see Smart Commits documentation.
ON automatically disables the Send Development Information to Jira Cloud and Enable Jira Cloud Smart Commits & Workflow Triggers settings.
#time and #comment commands are processed twice, resulting in duplicated results.
#label command.
Advanced: Clear Development Information
![]()
The Advanced section contains a button that lets Jira administrators clear all Development Information associated with Git Integration for Jira.
Click Update to apply your configuration changes.
Related articles
General settings for administrators (Git Integration for Jira Cloud)
