
Last updated: March 2026
If the Git Integration for Jira app is configured and licensed successfully, new tabs and panels are added to each Jira issue.
On this page:
- Overview
- Git Roll Up tab
- Git Commits tab
- Jira Git integration development panel
- Development panel locations
- Branches
- Pull or merge requests
- Git tags
- Jira Development Information
- Development Information Views
Overview
- Jira sidebar ➜ Apps ➜ Git Integration for Jira ➜ App Setting
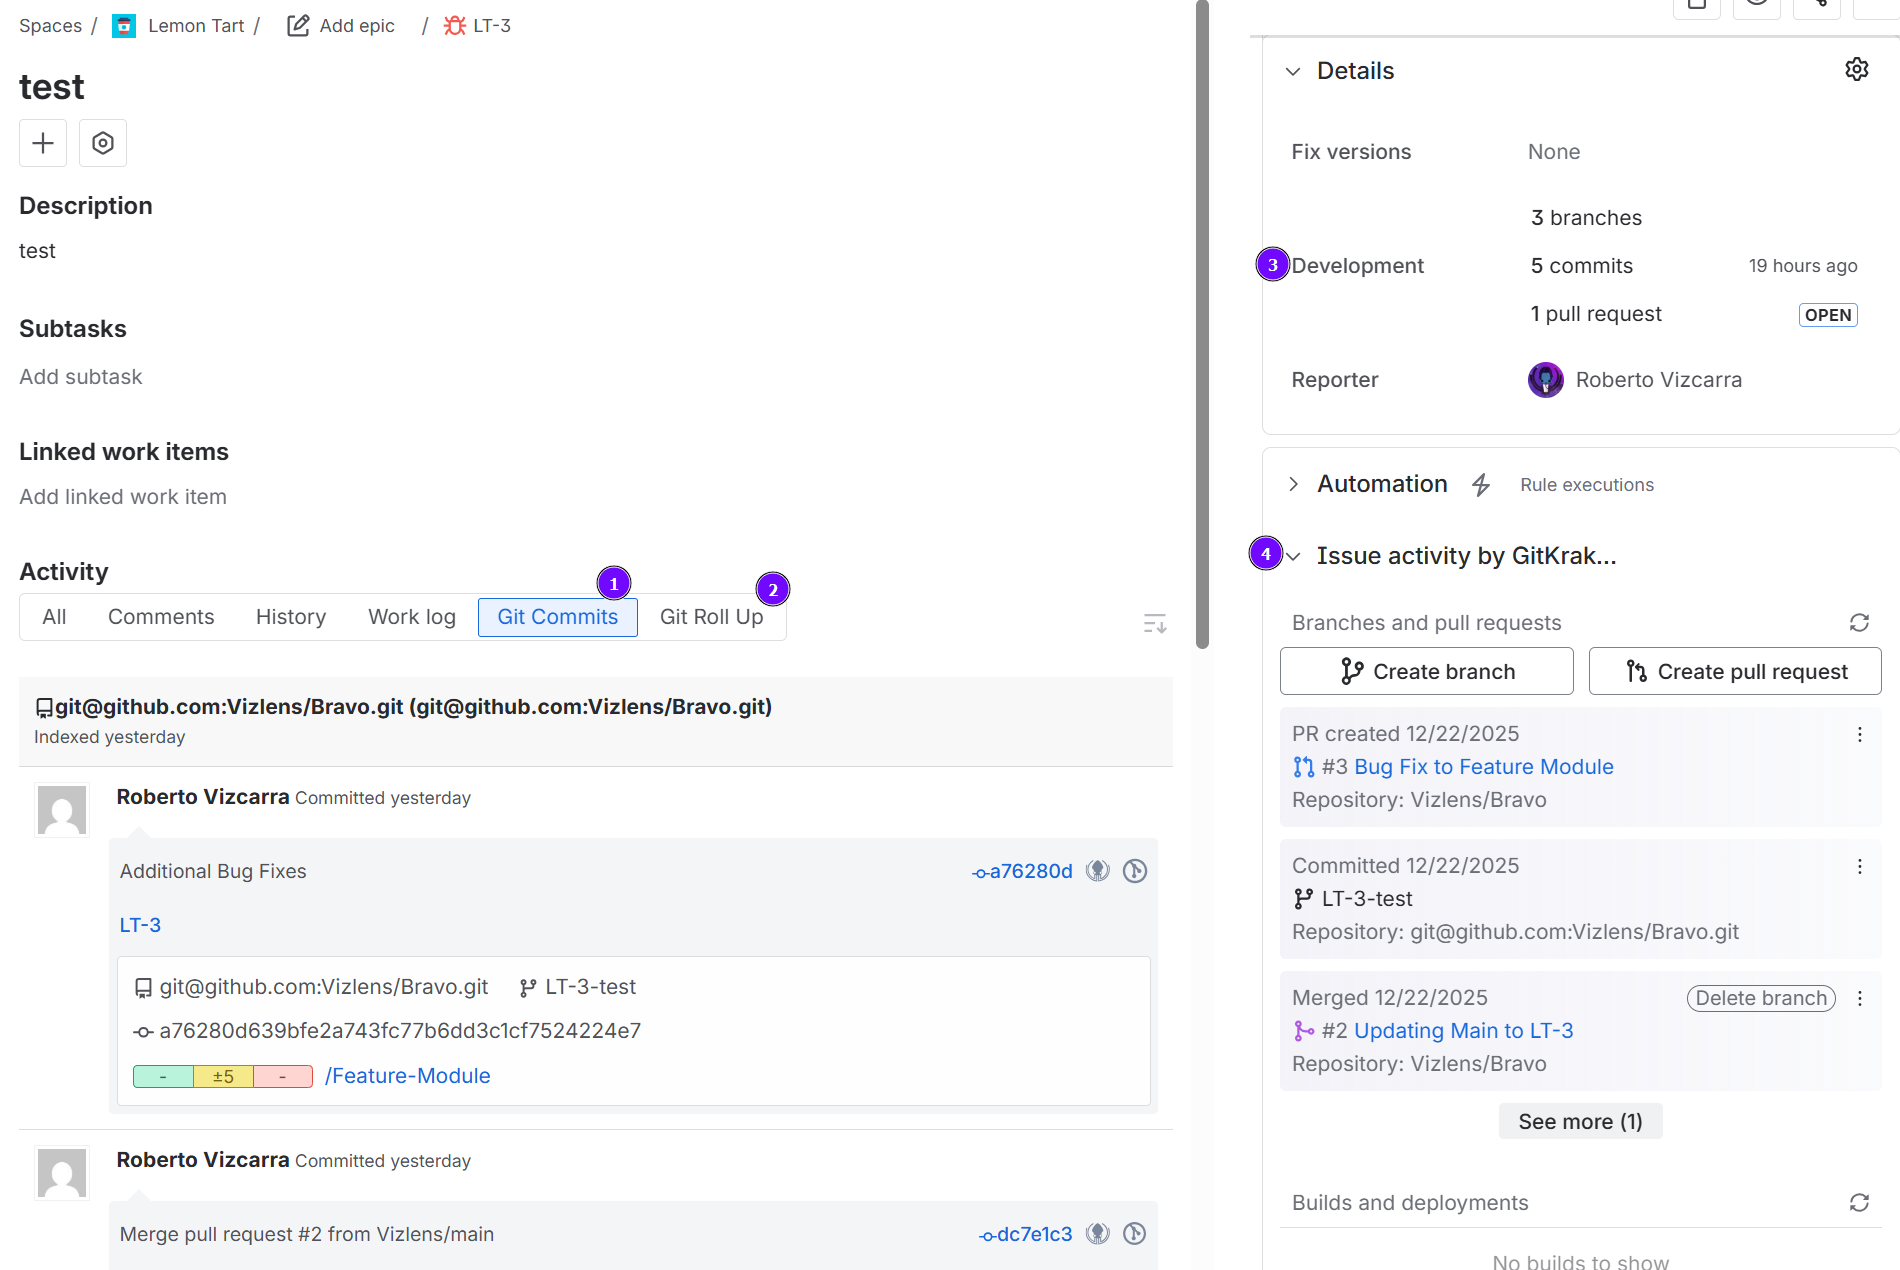
Users can see available features in the Jira issue page:
- Git Commits tab
- Git Roll Up tab
- Git Development panel
- Git Integration panel
| # | Feature | Description |
|---|---|---|
| 1 | Git Commits | In this tab, service users can see commit information such as commit author, changes to source files, as well as viewing the full commit that are associated to the current issue. |
| 2 | Git Roll Up | In this tab, service users can see commit statistics, diff and referenced Jira issues. |
| 3 | Jira Development panel | The Jira Development Panel is located on the right panel of the Jira issue page. This is a shortcut to viewing list of branches, commits and pull/merge requests. Please Note This panel is owned/maintained directly by Jira. While our application passes information to it, at times, it is possible for the information to be out of date. We suggest relying on the information from our panels. |
| 4 & 5 | Issue Activity by GitKraken panel | Click to open the Git integration panel and allows service users to create branches and pull/merge requests for selected repositories inside Jira. |
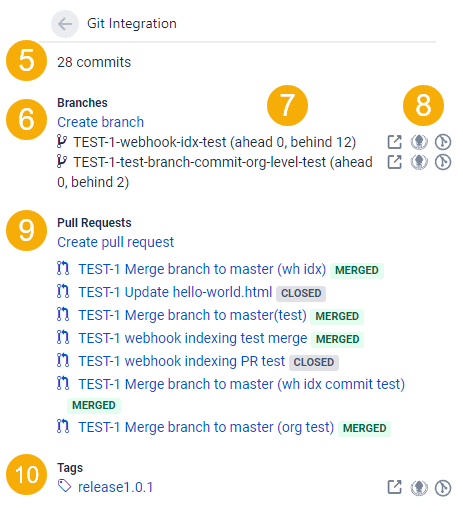
| 6 | Branches and Pull requests | Allows service users to create git branchesand Pull Requests against the specified repository from inside Jira. Created branches and Pull Requests are displayed as a list, with Pull Requests displaying Icons to indicate the status of the PR. |
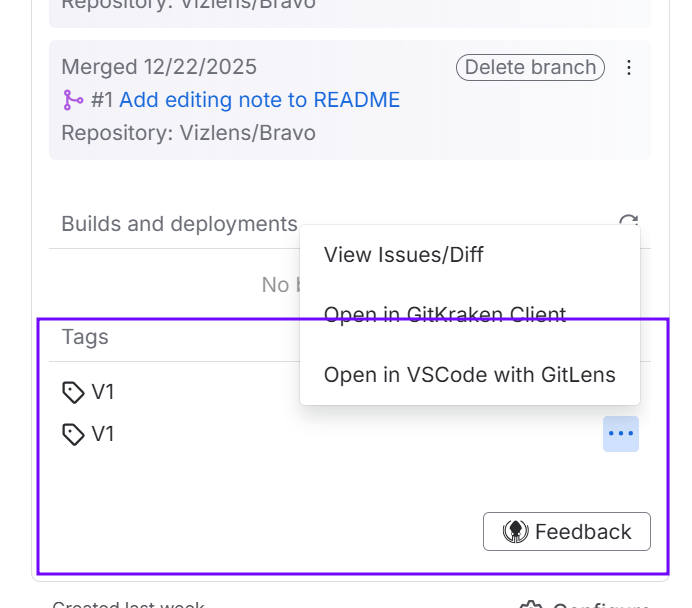
| 7 | Deep links | Deep link shortcuts to view the selected branch or PR in your git host service or in the GitKraken Desktop App and Gitlen for VSCode. |
| 8 | Git tags | Lists available git tags from the connected git repositories. Use the git shortcut icons to open git tags in your git host service, GitKraken git client app or GitLens VSCode extension. |
Git Roll Up tab
The Git Roll Up tab shows statistical information of the first and last revision of the commits and the time since the last commit was made. A summary of the files, lines and the developers who made the changes in this range of commits are also displayed.
Open a Jira issue then go to the Git Roll Up tab to view commit statistics, diffs and related git information.
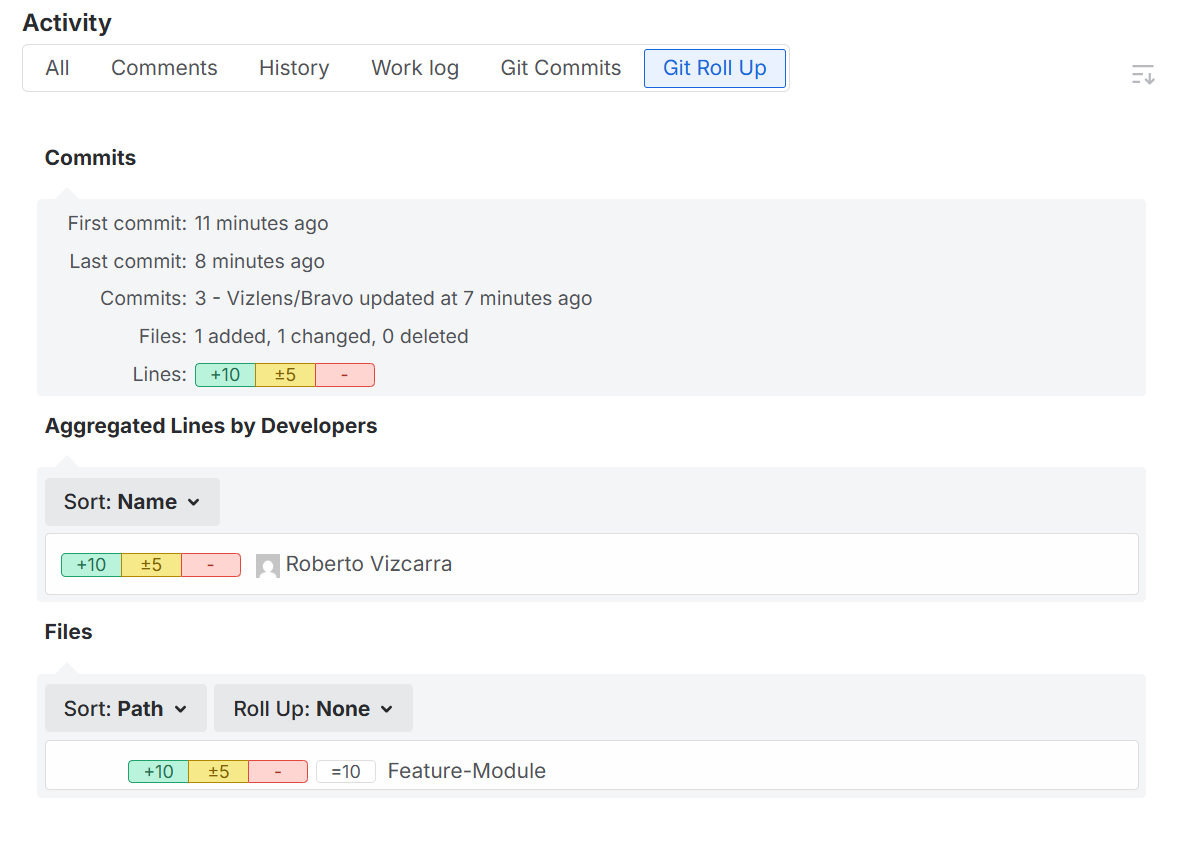
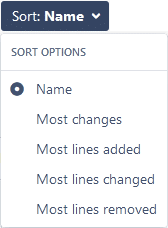
Category sorting
Sort the code statistics by clicking the respective Sort button then selecting the required sorting option.
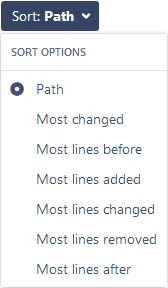
Select roll up options by clicking the respective Rollup button.

Git Commits tab
The Git Commits tab shows commit information such as commit authors, date of commit, commit messages, access to view code diffs, commit id and view full commit.
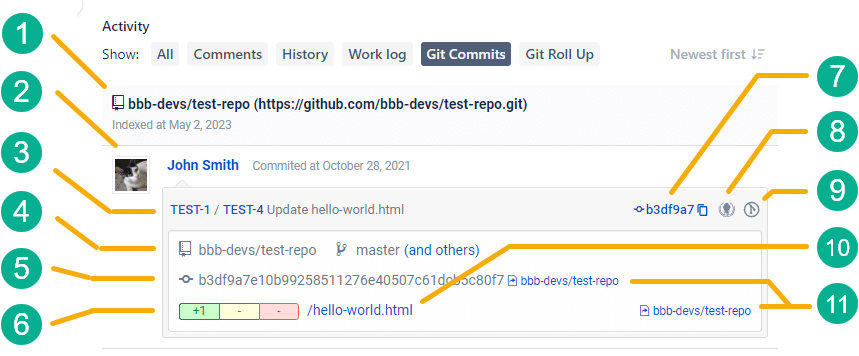
Open an issue then go to the Git Commits tab to view commit information:
| Pointer | Information | Description |
|---|---|---|
| 1 | Repository/Indexed | Name of the repository (as in app config) and date of last synchronization with remote repository. |
| 2 | Author/Committer | User who performed the commit. Hover the mouse pointer on the name to view user card. |
| 3 | Issue key/Commit message | This is the Jira issue with the corresponding commit message. |
| 4 | Repository name/Branch | This is the name of the repository and the branch where the commit has been made. |
| 5 | Commit UID | UID of the commit and git host link. Click the UID to view the code diffs for this commit. Click the git host link to view this commit via the git host server. |
| 6 | Commit counter indicators |  The traffic light indicator shows the added/modified/deleted lines from the file code diffs. The traffic light indicator shows the added/modified/deleted lines from the file code diffs. |
| 7 | Commit ID | Click the commit ID to view the commit code diff. Click the copy icon to copy the commit code diff to the system clipboard. |
| 8 | Open in GitKraken | Opens this commit in the GitKraken git client app. |
| 9 | Open in GitLens | Opens this commit in the GitLens extension via VSCode app. |
| 10 | Files changed | List of files affected by the commit. Click the file or git host link to view code diff of this commit. |
| 11 | Web links | Clickable web links that will open the selected file code diff directly to git host service portal in a new browser window/tab. |
View the whole commit code diff information by clicking the View full commit button to the right of the commit message.
View code diff information of the particular file by clicking the filename for each file adjacent to the rollup counter markers.
Jira Git integration development panel
Permissions
Jira Cloud – Development panel
The View Development Tools permission only applies to Jira Classic Projects. Next-Gen Projects don’t allow to modify the permission.
Create Branches and Branch Names
For connected GitHub git host, this feature requires enabled public_repo scope permissions.
Issue Activity by Gitkraken panel
Locate the Issue Activity by Gitkraken panel panel on the right pane of the Jira issue page. Click on Issue Activity by Gitkraken panel to expand its contents.
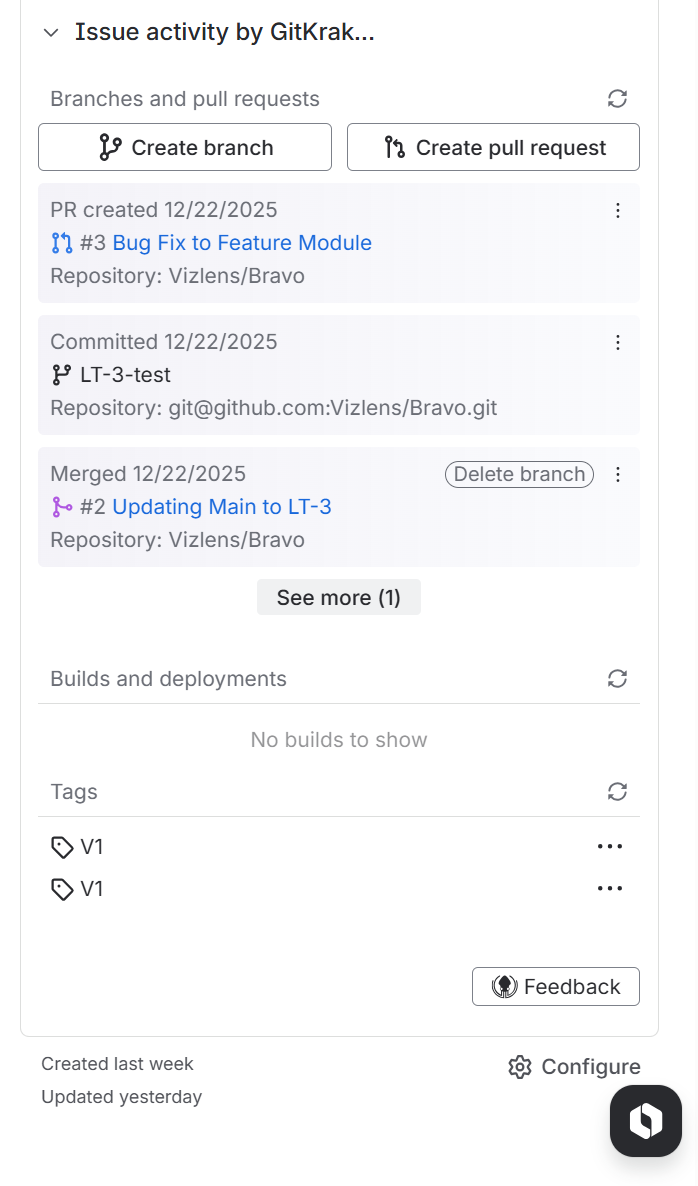
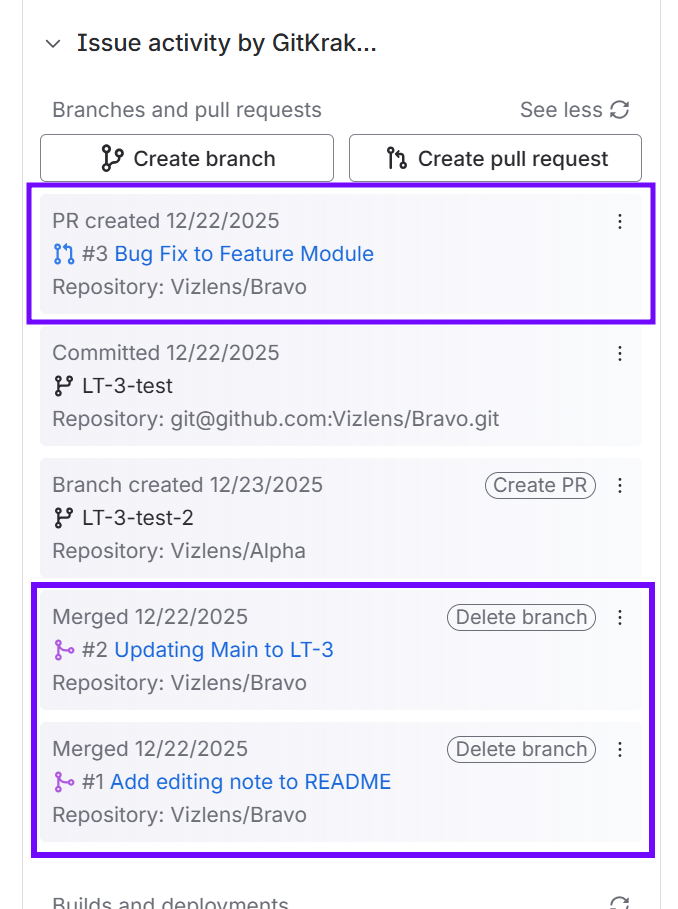
Branches
The Branches section lists the branches names, linking the selected branch to view via the Repository browser.
The branch is displayed on the developer panel and is also associated to the mentioned Jira issue by fulfilling one of the following conditions:
- The branch name contains the issue key. For example,
TEST-1-fix-binaries. - The branch has associated unmerged commits with the issue key in the comments. For example,
TEST-1 fixed-binaries.
The branch panel will show a summary of all the unmerged branches (regardless of the number of commits and the number of repositories) — that either contain the name of the issue or have unmerged commits that reference the issue. This also gives users a view into the behind/ahead status and provide links to the Repository browser for those branch names.
TST-1-new-branch branch will be visible on the developer panel of the TST-1 issue page even if the TST-1-new-branch branch has just been forked from master and does not have any new commit.
Create branch

Click Create branch on the Issue Activity by Gitkraken panel to create a branch for the selected repository.

-
Select a Repository. (Optional – click Make default to set this repository as default for branch and PR/MR creation dialogs).
-
Set Source branch. (Optional – click Make default to set this branch as default for Source branch when working with branch and PR/MR creation dialogs).
-
The Git Integration for Jira app will populate the Branch name field according to the Branch Name Template declared in the Git Integration Options via General Settings. Enter a descriptive name or leave it as is (recommended).
Clicking the the branch name will open this branch in your remote git service.
Pull or merge requests
The Pull Requests (GitHub or other connected git hosts) or Merge Requests (if GitLab is connected) section lists the merge/pull requests and their status. All merge/pull requests from all types of sources are shown here (for now, GitLab/GitHub/Azure/TFS/VSTS).
The displayed information depends on which supported git hosts are connected to Jira. For example:
- GitLab integrations only – merge requests
- Other integrations – pull requests
- Both GitLab and GitHub integrations – separate sections for merge requests and pull requests
The source branch for the pull/merge request must have a commit. Fulfill this condition to create pull/merge request via Jira Git Integration panel without issues.
Create pull/merge request
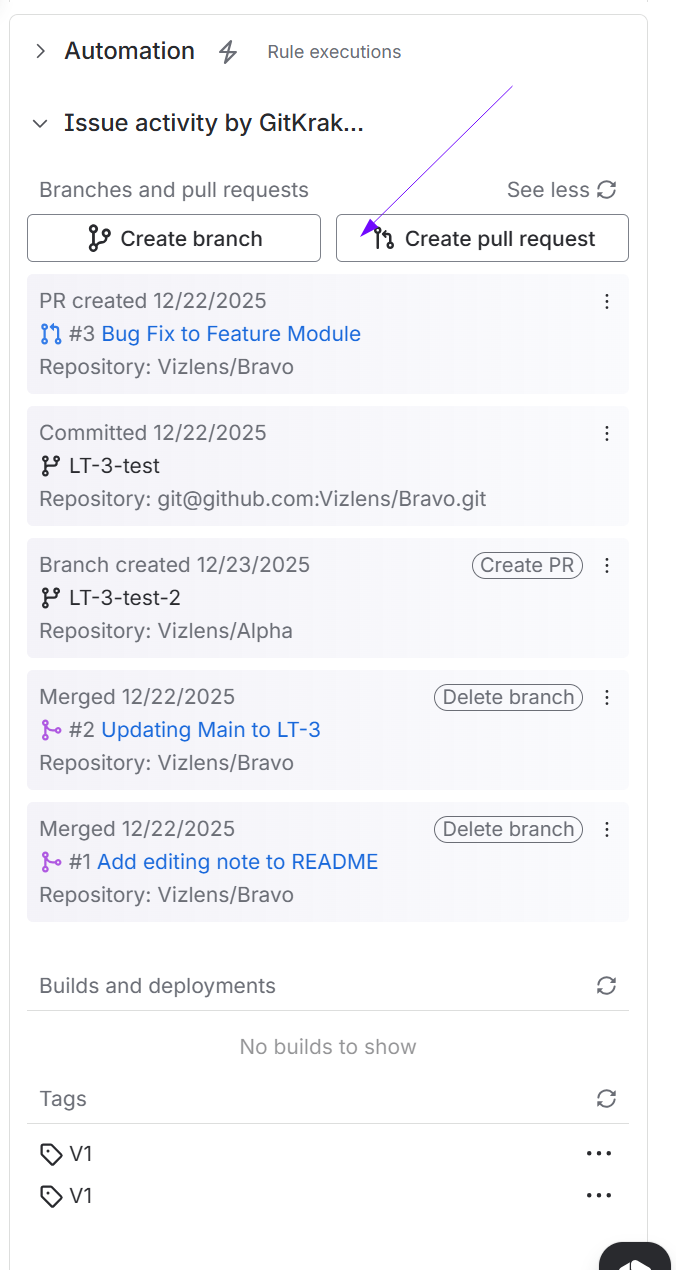
If a git host is connected to Jira, create a pull/merge request by clicking Create pull request or Create merge request label link on the Jira Git integration development panel.

- Select Repository from the list.
- Choose a branch as the Source branch. This branch will be merged to the target branch.
- Set master as the Target branch.
- Enter a descriptive Title or leave it as is (recommended).
Click Create pull request on the Create pull request dialog. The newly-created pull request is now listed in the developer panel under Pull requests.
Associating pull/merge request to Jira issue
A git service user can create a PR/MR via the Git host service portal and adding/inserting a Jira issue key in the PR/MR title. This is automatically added to the Pull/Merge request list in the Jira issue Git developer panel.
The merge request is displayed on the developer panel and will also be associated to the mentioned Jira issue by fulfilling the following condition:
- Merge request Title contains the issue key. For example,
TEST-1-Fix-binaries.
This will also allow a service user to associate a Merge/Pull Request with multiple Jira issues regardless of commit associations.
Git tags
The Git Integration for Jira app supports both lightweight and annotated tags. The tags are loaded separately from the rest of the Git Source Code.
Git tags identify specific release versions of your code in a particular branch and do not change when the branch moves on. A tag is an alias for a commit hash, much like symbolic names for a given revision. It is typically used to mark a particular point in the commit. It is like a branch with a read-only attribute. The git tags are accessible in the developer panel.
Tags cannot be moved since it is linked to a specific commit and are not pushed by default.
The Git for Jira app supports two types of git tags:
- lightweight – shows only the commit object
- annotated – shows the message, author and the tag object followed by the commit
The Git Integration for Jira app will show the last 3 and first tags if no filter is set. If the filter is set, the Git Integration for Jira app will use it and will display the tags sorted in ascending order by date.
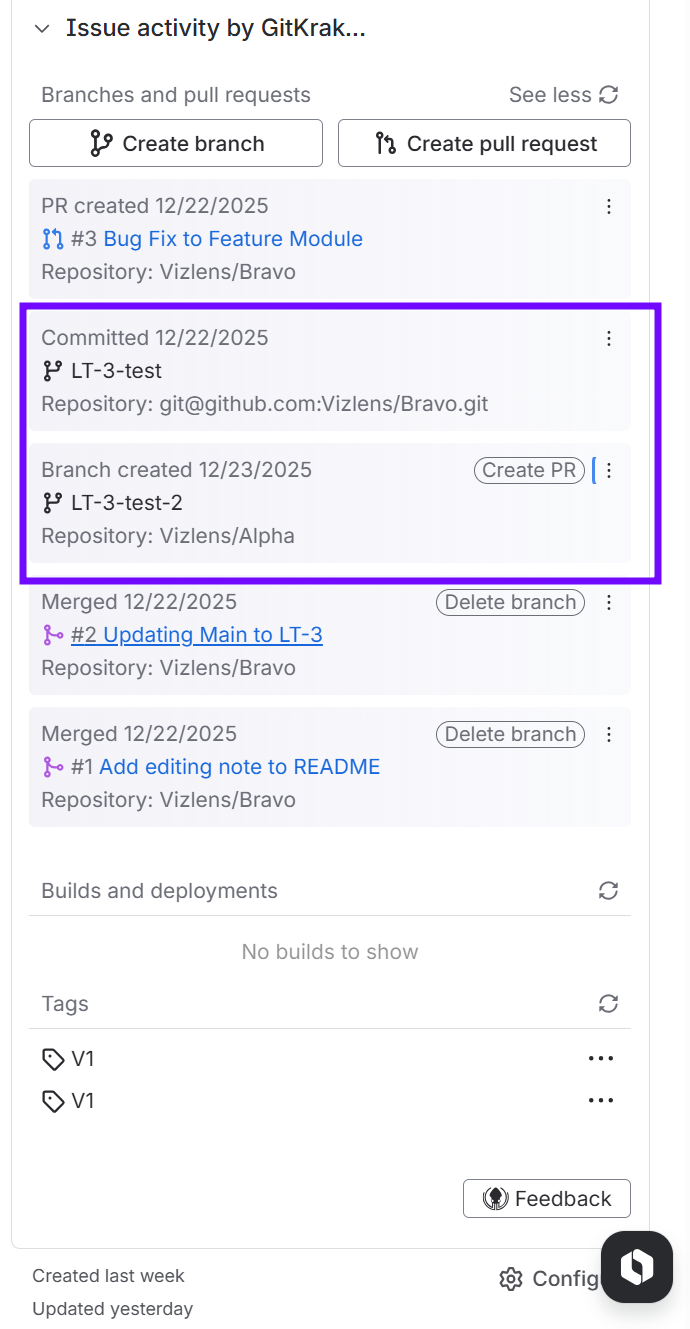
If there are several git tags listed, click the more… label link to expand the list in increments of five tags.
Tag information
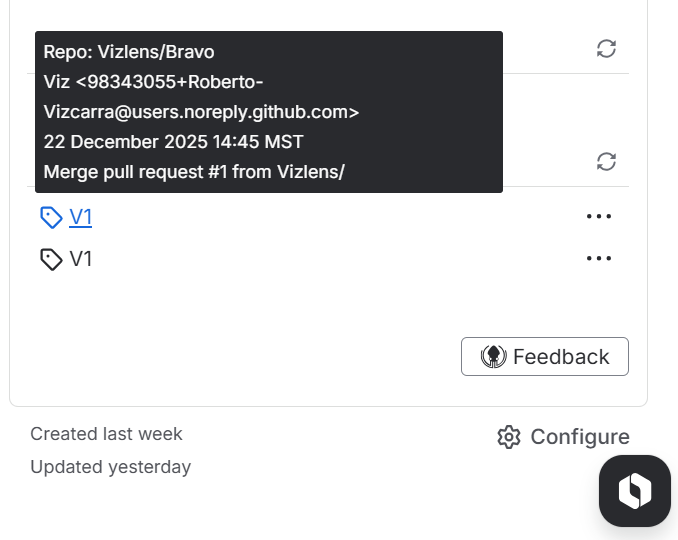
Move the mouse pointer over the tag to display the following tooltip information:
- Repository Name
- Commit author name and email address (if available)
- Date / Time
- Message (if any)
Tag associations
Tags are only associated with the Jira issue by Jira keys that are specified in commits that belong to the tag. Specifying a Jira key in the name of a tag does not associate this tag with the mentioned ticket.
Jira Development Information
What is Jira Development Information?
Jira Development Information is a suite of features available in Jira Software on the Cloud platform that puts commits, branches, and pull requests in context of Jira issue.
- By default, Git Integration for Jira has Jira Development Information disabled.
- By default, Dev Info for Jira has Jira Development Information enabled.
How does Jira Development Information work?
The Git Integration for Jira and Dev Info for Jira apps can be configured to “push” development information (commits, branches, and pull requests) directly into your Jira Cloud instance. Once the data is stored by Jira Cloud – the commits, branches, and pull requests can be displayed by Atlassian in a variety of locations within Jira Cloud.
Who can see Jira Development Information?
- Jira users with the View development tools Jira permission for a given Jira project can.
- Jira administrators can verify a user’s permissions using the Permission Helper.
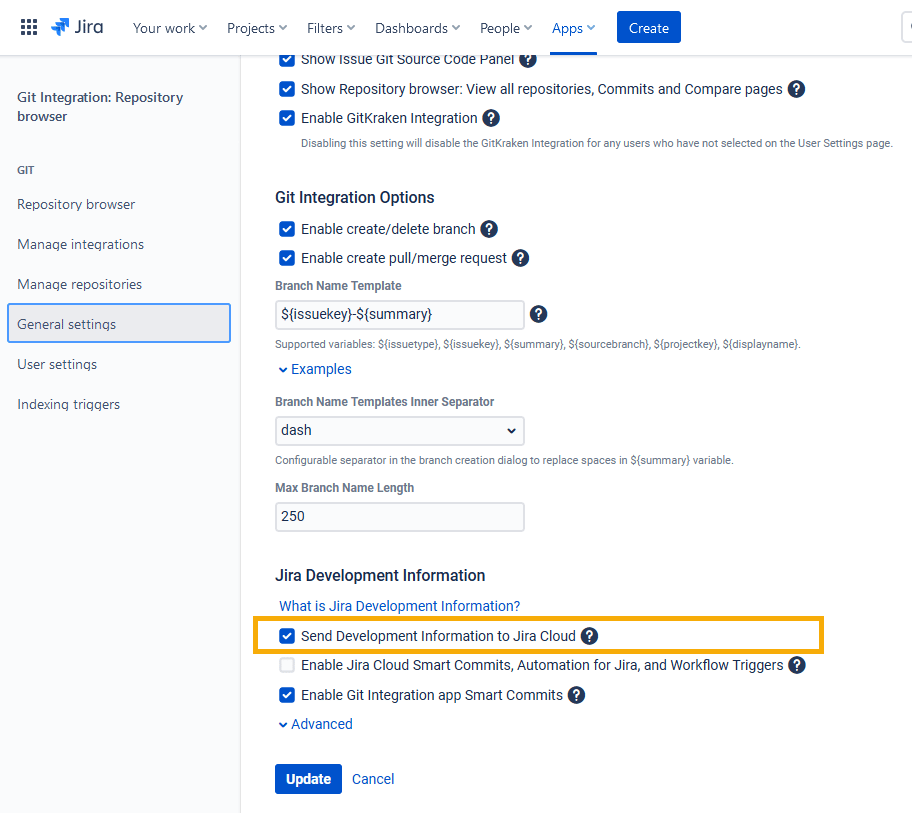
How to enable or disable Jira Development Information
-
Install the Git Integration for Jira or the Dev Info for Jira app.
-
Navigate to the General settings page of the application (
 Jira Settings ➜ Apps ➜ (sidebar) General settings).
 -
Enable or disable the setting:
Send Development Information to Jira Cloud. -
Click Update button.
Development Information Views
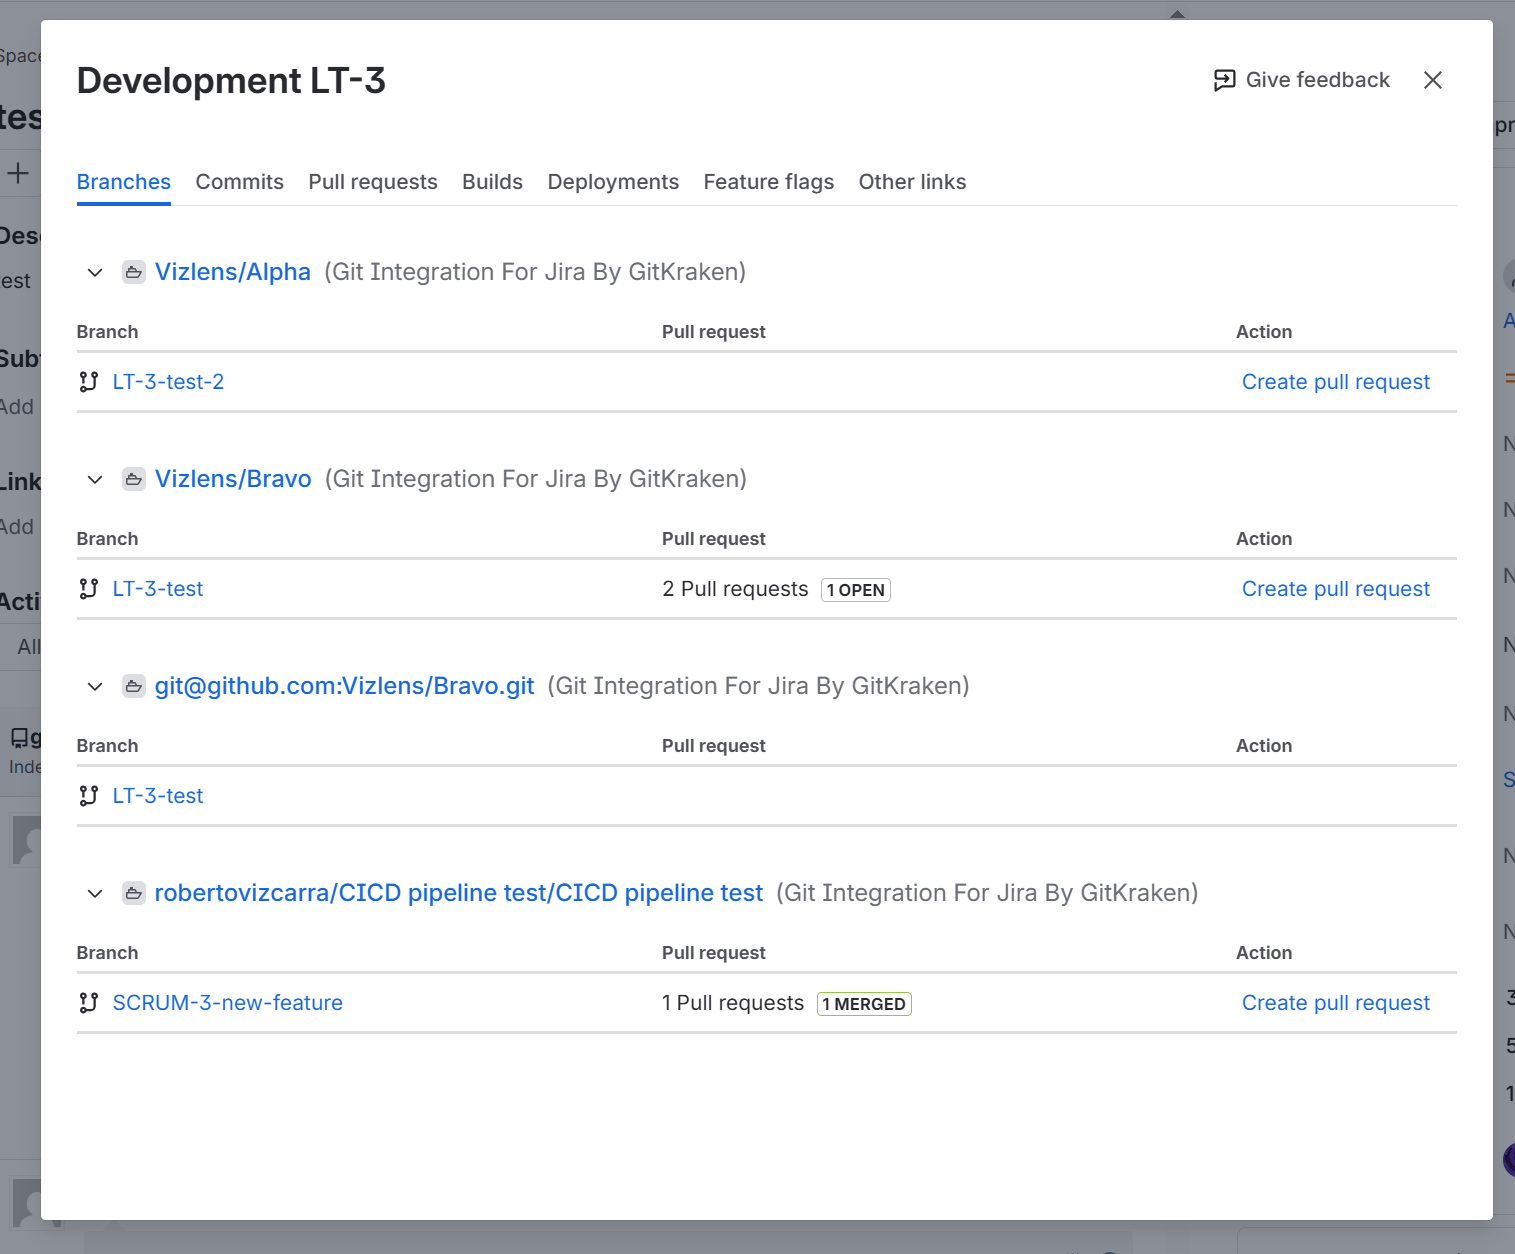
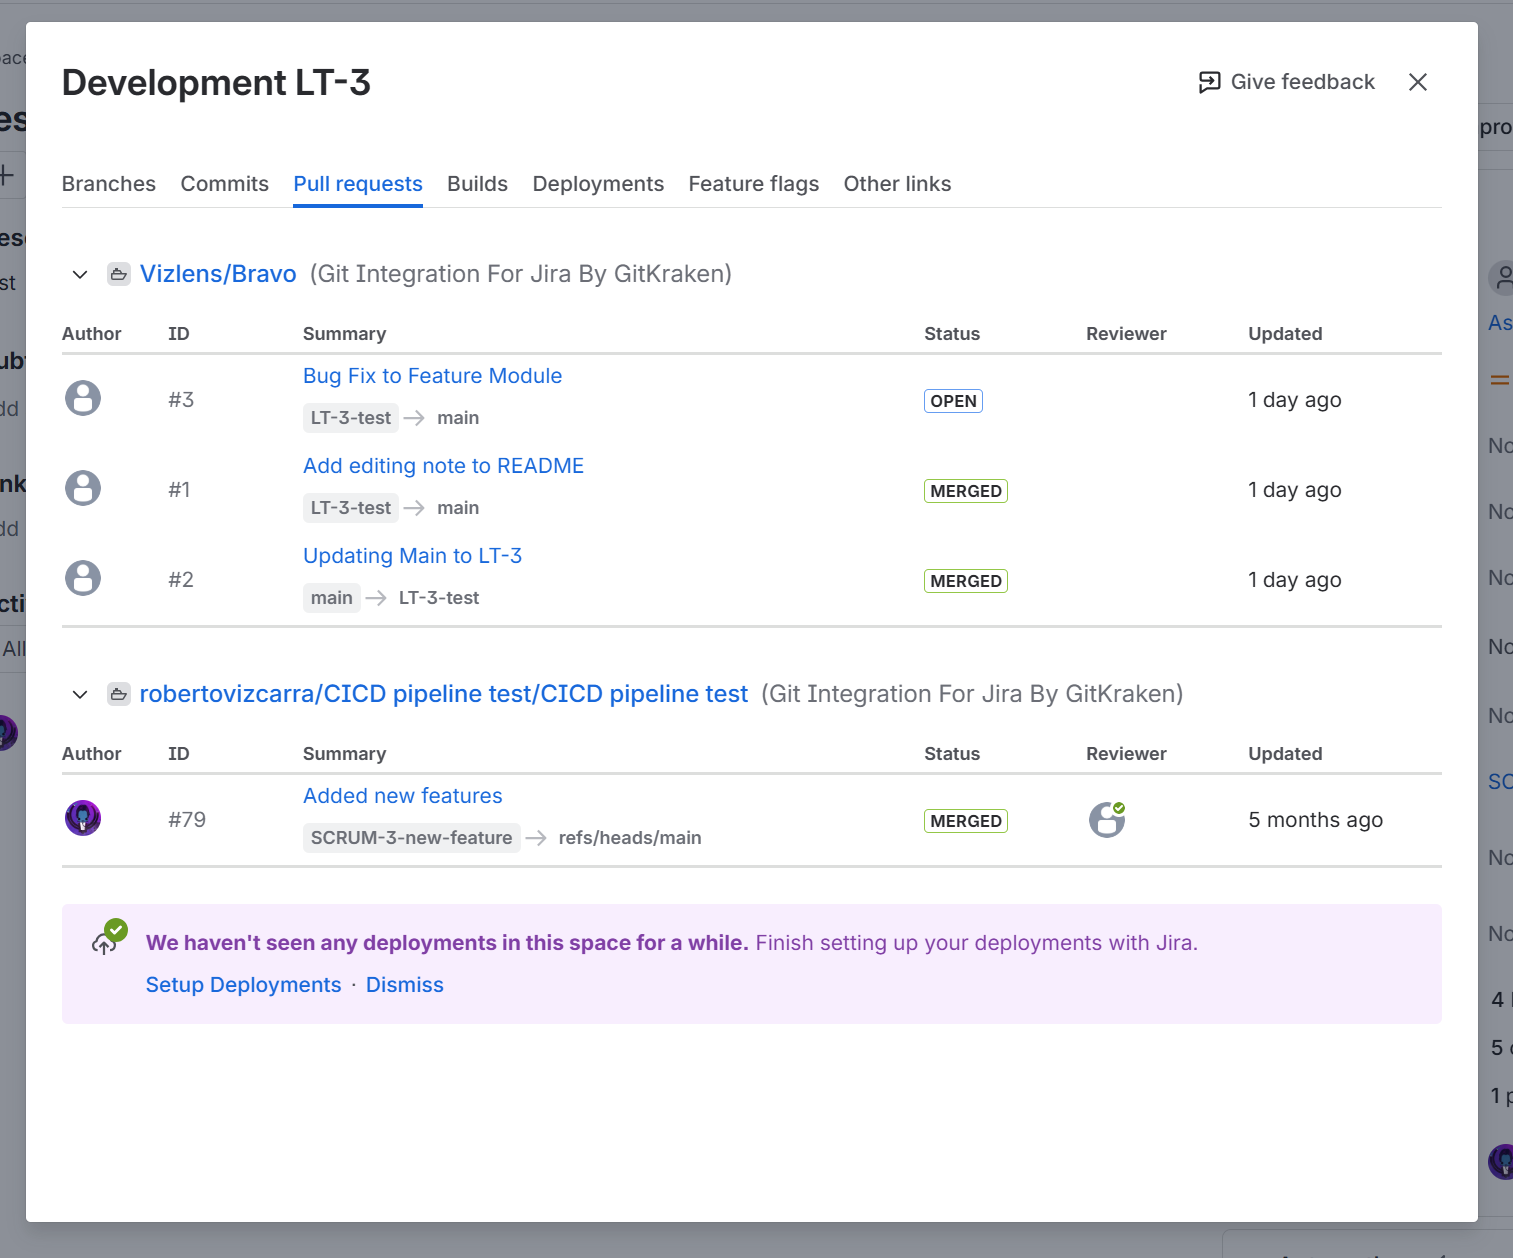
Atlassian Jira Cloud currently displays Jira Development Information in the Development Panel in Jira issues.

Detailed view of commits

Detailed view of branches
Detailed view of pull requests
Next-gen projects: View commits, branches, and pull requests in Jira Boards

When using the Development Information feature within a ‘Next-gen’ (Team-managed) Jira Cloud project – your commits, branches and pull requests will be shown in your boards.
A ‘next-gen’ project can be created in the Projects screen:
- On your Jira Cloud dashboard menu, choose Projects ➜ View all projects.
- In the top-right corner of the page, click Create project.
- On the next screen, select either Scrum or Kanban.
- Click Use template to proceed to the following screen.
- Choose the type of project required for your team or company.
- Give the new project a meaningful Name; set project Key as required.
- Finally, click Create project to complete this process.
Prev: Jira user information card
