
Integrate Gerrit with Jira Data Center
Quickly learn how to connect Gerrit git repositories via Git Integration for Jira Data Center.
For the Jira Cloud version of this document click Here
What’s on this page:
Using Full feature Integration
-
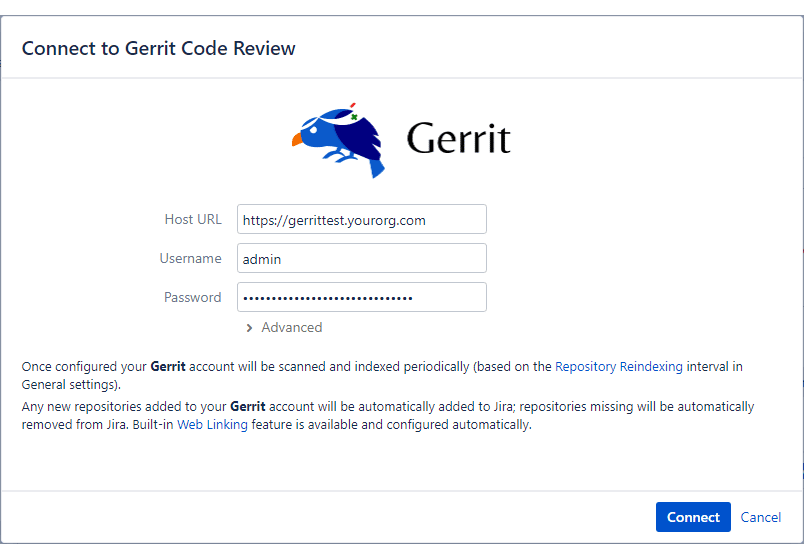
On your Jira dashboard, go to menu Git ➜ Manage repositories.
-
Click Gerrit on the Auto-connect integration panel. The Auto-connect wizard appears.
-
Enter your git server’s Host URL.
-
Enter login credentials for username and password.
-
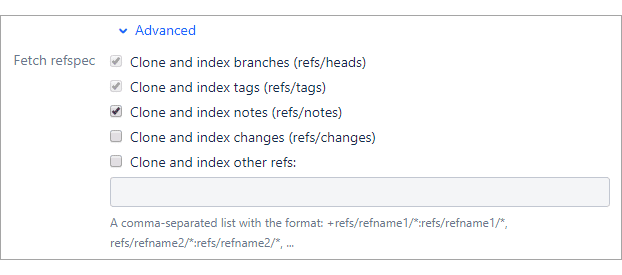
OPTIONAL Click Advanced to setup how git fetches refs.
-
Setup fetch refspec by selecting options needed for this integration. A refspec maps a branch in the local repository to a branch in a remote repository. For more information, see Git Refspec.
-
For Clone and index other refs, enable it to define a custom refspec tailored for this integration. A refspec is specified as
[+]<source>:<destination>— where,<source>is the source branch in the local repository and<destination>is the destination branch in the remote repository. The optional+sign instructs git to force the remote repository to perform a non-fast-forward update. -
For more detailed information on formatting, see Git Fetch.
Note:
The new values will be applied to the subsequent fetches only instead of applying it to the objects that have been already fetched.
-
-
-
Click Connect. The Auto-connect wizard automatically reads git repositories for import into the git configuration.
-
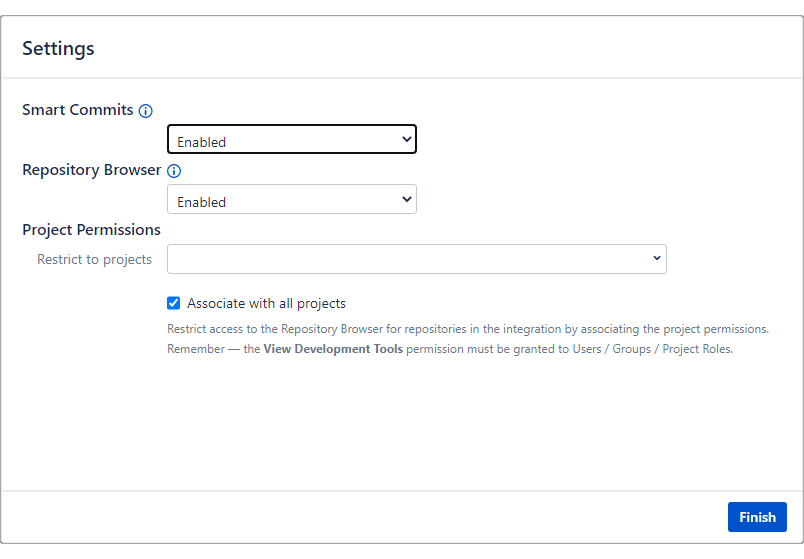
Click Import repositories. The Settings screen is displayed.
-
Set Smart Commits, Repository Browser options or leave it as is.
-
Set Project Permissions by restricting it to specific projects or leave it as is (associate with all projects).
-
-
Click Finish to complete this setup.
Single Repository (Manually Connect via SSH, HTTP, HTTPS)
Login to your Gerrit account. Obtain the repository URL from the Gerrit repository project page. Use SSH or HTTP/HTTPS.
-
On your Jira dashboard menu, go to Git ➜ Manage repositories.
-
Click Connect to Git Repository to open the Connect Wizard.
-
Paste the URL from Gerrit web portal in the provided box. (Example:
http(s)://<your.org.com>/<repo_name>) -
Click Next. The Settings page is displayed.
-
Set Smart Commits, Repository Browser options or leave it as is.
-
Set Project Permissions by restricting it to specific projects or leave it as is (associate with all projects).
-
-
Click Finish to complete this process.
The repository is now connected to Jira Data Center.
Setting Up Gerrit Web Links
Web links are automatically configured for Gerrit repositories with Auto-connect integration.
For manual integration. setting up web links for Gerrit integration is optional.
Configure web links from either of the following locations:
-
Advanced setup in Connect Wizard
-
Git ➜ Manage repositories ➜ Edit repository/integration settings.

Select the Gerrit git host from the Web Link dropdown list.
Set the variables to the actual URL settings of the git host.
Save the changes.
Viewing Git Commits in Jira Data Center
-
Perform a git commit by adding the Jira issue key in the commit message. This will associate the commit to the mentioned Jira issue.
-
Open the Jira issue.
-
Scroll down to the Activity panel then click the Git Commits tab.
-
Click View Full Commit to view the code diff.
Default Branch
Most git integrations allow changing of the default branch of the repository/project other than “master”. This change is reflected in the Repository Settings of the Git Integration for Jira app on the next reindex. Auto-connected integrations support this feature where Git Integration for Jira app gets the default branch from almost all integrations and apply this setting at repository level.
For the case with Gerrit, the default main branch is always “master”.
How to enable GetRepositories log response from Gerrit to the Jira log?
-
Open
 Jira System Administration then click Logging and profiling on the left sidebar.
 -
Under the Default loggers section, click Configure….
-
Set the Package name to
com.bigbrassband.jira.git.services.integration. -
Set Logging Level to DEBUG.
-
Click Add to proceed.
IMPORTANT! Remember to turn this setting off after you have obtained the log file for analysis.
More Integration Guides
GitHub.com (Git Integration for Jira Data Center/Server)
GitHub Enterprise Server (Git Integration for Jira Data Center/Server)
GitHub App integration (Git Integration for Jira Data Center/Server)
GitLab.com (Git Integration for Jira Data Center/Server)
GitLab CE/EE (Git Integration for Jira Data Center/Server)
Azure DevOps | Visual Studio Team Services (VSTS) (Git Integration for Data Center/Jira Server)
Azure DevOps Server | Team Foundation Services (TFS) (Git Integration for Jira Data Center/Server)
AWS CodeCommit (Git Integration for Jira Data Center/Server)
Gerrit (this page)
Bitbucket Server (Git Integration for Jira Data Center/Server)
Bonobo (Git Integration for Jira Data Center/Server)
Windows Network | Server Share
Tracked Folders (Git Integration for Jira Data Center/Server)
Back to: Integration basics (Git Integration for Jira Data Center/Server)
