
![]()
Integrate AWS CodeCommit with Jira Data Center/Server
AWS CodeCommit is a git host service by Amazon Web Services to store and manage source code, related files and private Git repositories in the cloud.
Quickly learn how to connect AWS CodeCommit git repositories via Git Integration for Jira Data Center/Server.
What’s on this page:
- Integrate AWS CodeCommit with Jira Data Center/Server
- Required permissions
- Basic features
- All features
- Webhooks and triggers
- Using Full feature integration
- Single repository (Manually connect via HTTP or HTTPS)
- Single repository integration (Manually connect via SSH)
- Setting up AWS CodeCommit web links
- Viewing git commits in Jira Data Center/Server
- Working with branches and pull requests
- Default branch
- Creating branches
- Creating branches with Require user PAT enabled
- Creating pull requests
- Creating pull request with Require user PAT setting enabled
- Updating Require User PAT data
Required permissions
Before performing an AWS CodeCommit integration, make sure to configure the recommended permissions.
The permissions detailed in the connect/Auto-connect wizard are necessary for specific features to work.
We recommend that the following AWS IAM policies are configured beforehand based on what features that will be used.
Basic features
Configure AWSCodeCommitReadOnly » IAM policy for basic features:
| Feature | Required permission |
|---|---|
| show commits, process smart commits, show branches | codecommit:ListRepositories codecommit:GitPull codecommit:BatchGetRepositories |
| show pull requests | codecommit:ListPullRequests codecommit:GetPullRequest |
All features
Configure AWSCodeCommitPowerUser » IAM policy for all features:
| Feature | Required permission |
|---|---|
| create pull request | codecommit:CreatePullRequest |
| create branch | codecommit:CreateBranch |
| delete branch | codecommit:DeleteBranch |
| configure webhooks automatically | codecommit:GetRepositoryTriggerscodecommit:PutRepositoryTriggerssns:CreateTopicsns:DeleteTopicsns:Subscribe |
See this article for related information.
Webhooks and triggers
RECOMMENDED
CodeCommit doesn’t have webhooks but it has SNS triggers requiring a subscription confirmation ».
With an existing AWS CC repository, enable triggers then create an SNS topic and subscribe to that topic.
For more information on Amazon SNS, see Amazon SNS: Getting Started ».
Using Full feature integration
This process requires an AWS account with existing CodeCommit repositories.
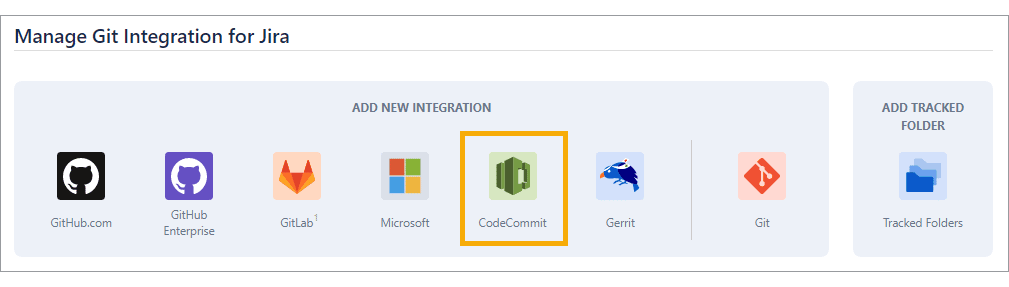
We recommend using the Add new integration panel (formerly Auto-connect integration panel) to connect multiple repositories from your AWS CodeCommit git host.
-
On the Jira Data Center/Server dashboard menu, go to Git ➜ Manage repositories. The git configuration page for connecting repositories is displayed.
-
On the Add new integration panel, click CodeCommit. The Auto-Connect wizard for AWS CodeCommit is displayed.
-
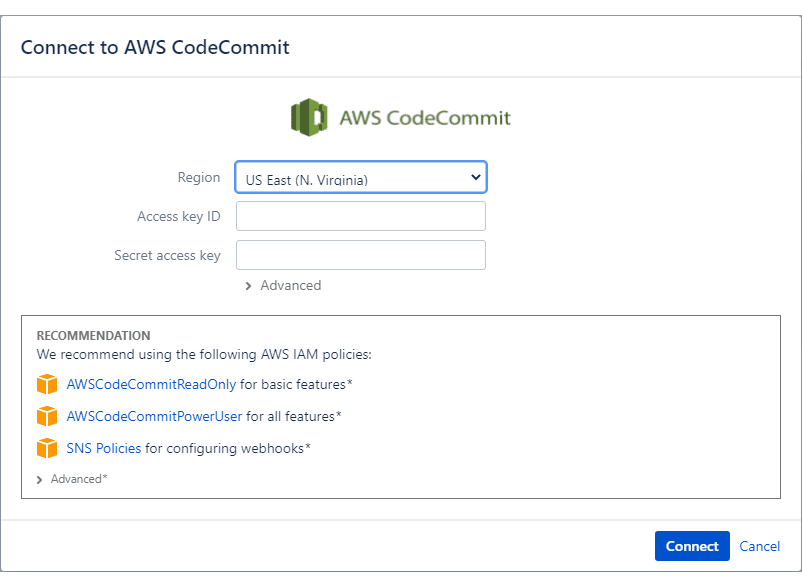
Select the Region where the CodeCommit repositories reside then enter credentials for the Access key ID and Secret access key.
See below on the supported regions:
*   US East (N. Virginia)
*   US East (Ohio)
*   US West (N. California)
*   US West (Oregon)
*   Canada (Central)
*   EU (Ireland)
*   EU (Frankfurt)
*   EU (London)
*   EU (Paris)
*   EU (Stockholm)
*   EU (Milan)
*   EU (Spain)
*   EU (Zurich)
*   Asia Pacific (Hyderabad)
*   Asia Pacific (Mumbai)
*   Asia Pacific (Singapore)
*   Asia Pacific (Sydney)
*   Asia Pacific (Seoul)
*   Asia Pacific (Tokyo)
*   Asia Pacific (Hong Kong)
*   Asia Pacific (Osaka)
*   Asia Pacific (Jakarta)
*   Middle East (Bahrain)
*   Middle East (UAE)
*   Africa (Cape Town)
*   South America (Sao Paulo)
OPTIONAL! Configuring the Advanced settings (under the credential fields) is not required. However, admins/power users may set how the project listing is displayed.
-
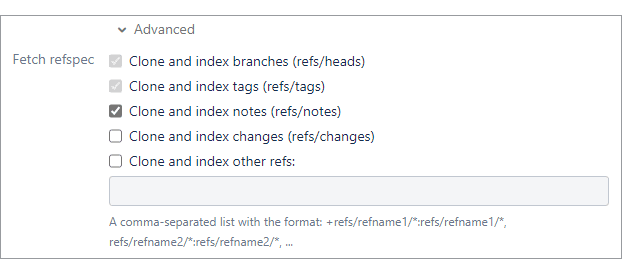
Fetch refspec – Git refspec contains patterns mapped as references from the remote to the local repository.
For more information, see Git Internals — The Refspec.-
The first two refspec options are required.
-
The rest of the options are OPTIONAL:
-
Clone and index ref notes (refs/notes) – This is a reference to
refs/notes/*used for fetching. This option is enabled by default. This affects git notes which are not shown:-
…when
refs/notesare disabled on connecting a repository. -
…when a new note comes when
refs/notesis disabled.
-
-
Clone and index changes (refs/changes) – This is a reference to `refs/changes/` used for fetching. This option is turned off by default.
-
Clone and index other refs – This is a user-defined list of references used for fetching. It is a comma-separated list with the format:
+refs/refname1/*:refs/refname1/*,refs/refname2/*:refs/refname2/*, …
-
-
-
-
Click Connect.
-
On the following screen, Git Integration for Jira app will read all available repositories from your AWS CodeCommit account. Click Import repositories.
Repositories of the logged-in AWS CodeCommit user can be automatically connected to Jira Data Center/Server. Repositories that are added or removed from AWS CodeCommit will be likewise connected or disconnected from Jira Data Center/Server.
-
After the import process, the Settings dialog is displayed:

-
On the Integration Settings, setting the Require User PAT option to
ON, will require users to provide AWS Access Key ID and Secret Access Key specific for branch and pull requests creation/deletion (via the Jira Git integration development panel on the Jira issue page). For more information on this feature, see Integration feature settings: Require user PAT. -
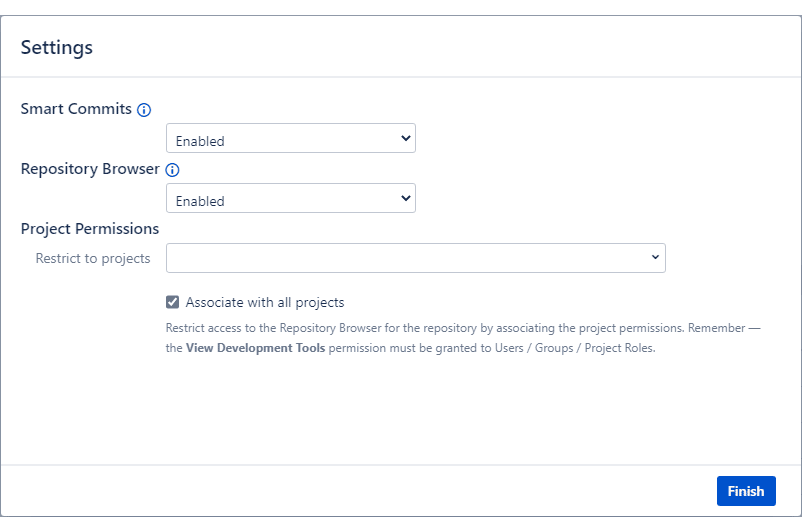
Set Smart commits and Repository Browser to enable/disable these features.
-
Set Project Permissions according to your organization’s project association rules. For detailed information, see Setting project permissions.
-
-
Click Finish to complete setting up this integration.
The AWS CodeCommit repositories are now connected to Jira Data Center/Server.
The Git Integration for Jira Data Center/Server app supports tracked folders for AWS CodeCommit git repositories. The connected git host is scanned for existing repository folders. The found repositories can then be added to the Git Repositories configuration.
There are two ways to configure the git repository connection using tracked folders with Git for Jira Data Center/Server:
-
connect via Auto-connect integration panel ➜ CodeCommit, or
-
connect via Connect to Git Repository dropdown ➜ Connect to AWS CodeCommit.
If the connected git host has newly added repositories, the Git Integration for Jira app will automatically add them to the git repositories configuration on the next reindex. For the deleted git repositories, these will be removed from the Git repositories configuration on the next reindex.
Single repository (Manually connect via HTTP or HTTPS)
Connect a single AWS CodeCommit repository manually to Jira via HTTP/HTTPS connection.
-
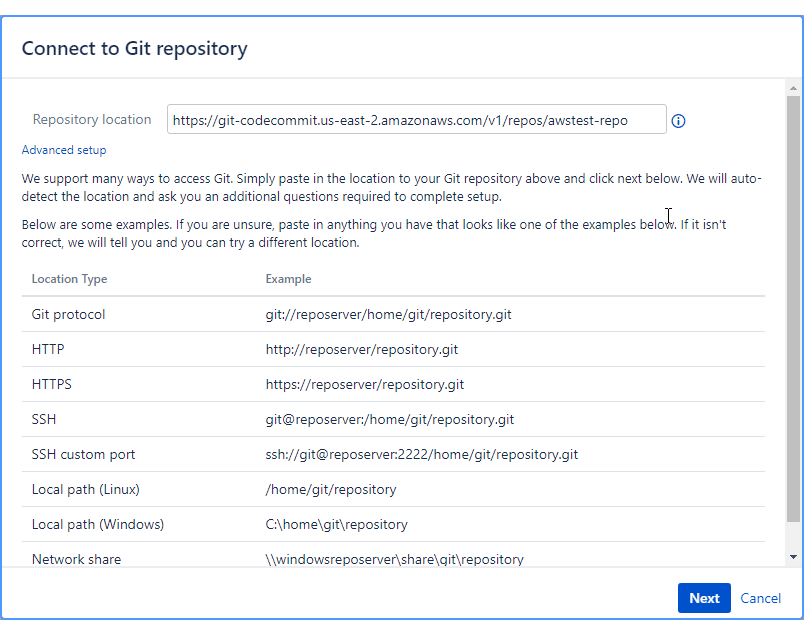
Use the Git clone HTTP/HTTPS URL of your AWS CodeCommit repository and paste it on the Repository location field on the Connect to Git repository wizard start screen.
-
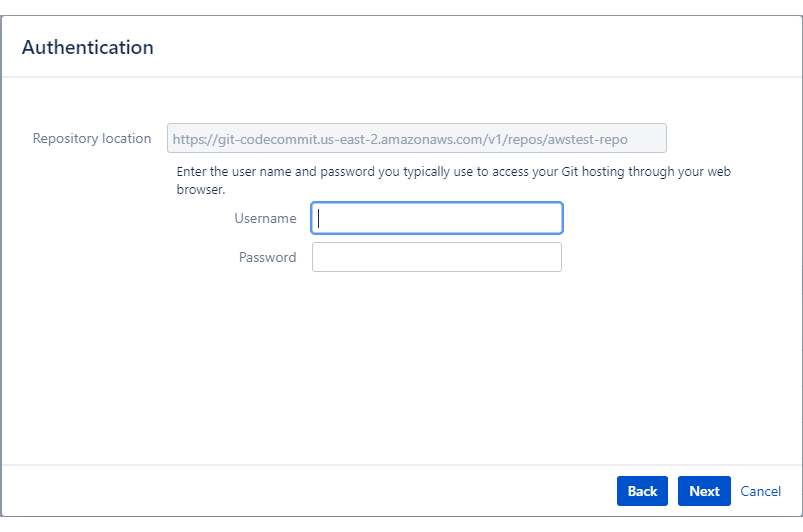
On the Authentication screen, enter the Access Key ID as the username then the Secret Access Key as the password.
-
Click Next. The wizard will verify the authentication details and proceeds to the next screen if there are no errors.
-
On the Permissions dialog, set Repository Browser and Project Association permissions or leave them as is.
-
Click Finish to complete setting up this connection.
The repository is now connected to Jira Data Center/Server.
Single repository integration (Manually connect via SSH)
Connect a single AWS CodeCommit repository manually to Jira via SSH connection.
SSH connections are handled automatically if the PUBLIC KEY was added in the AWS IAM console and the associated PRIVATE KEY was added/uploaded on the Jira side (Git Integration for Jira ➜ SSH Keys ➜ Add SSH Key).
If authentication issues are encountered during connecting an AWS repository to Jira, modify the original URL by inserting the SSH Key ID as the username. The SSH Key ID is an alphanumeric sequence provided by AWS IAM when importing a PUBLIC KEY for a particular user account in IAM.
For example, the original URL is:
ssh://git-codecommit.us-east-1.amazonaws.com/v1/repos/test-repoIf the SSH Key ID 1a2b3c4d5e is applied to the original SSH URL, the resulting URL would be:
ssh://[email protected]/v1/repos/test-repoThe modified URL can now be used as a valid repository URL via Git Integration for Jira ➜ Connect to Git repository.
Setting up AWS CodeCommit web links
The Git Integration for Jira app automatically configures web linking for AWS CodeCommit repositories in Jira Data Center/Server.
Viewing git commits in Jira Data Center/Server
-
Perform a git commit by adding the Jira issue key in the commit message. This will associate the commit to the mentioned Jira issue.
-
Open the Jira issue.
-
Scroll down to the Activity panel then click the Git Commits tab.
-
Click View Full Commit to view the code diff.
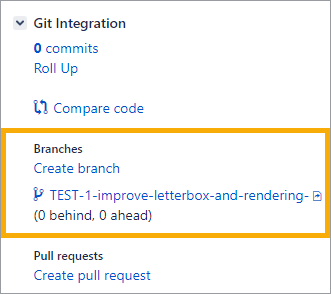
Working with branches and pull requests
The Git Integration for Jira app supports creation of branches and pull requests from Jira via the developer panel.
Default branch
Most git integrations allow changing of the default branch of the repository/project other than “master”. This change is reflected in the Repository Settings of the Git Integration for Jira app on the next reindex. Auto-connected integrations support this feature where Git Integration for Jira app gets the default branch from almost all integrations and apply this setting at repository level.
Creating branches
-
On your Jira Data Center/Server instance, open a Jira issue.
-
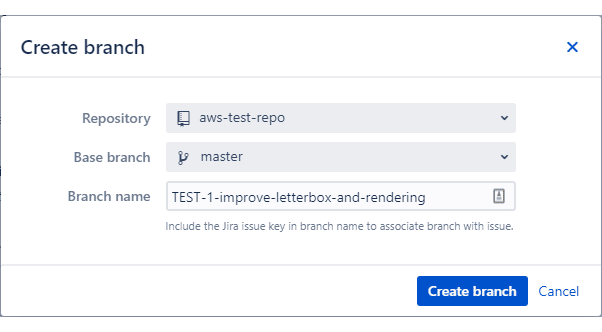
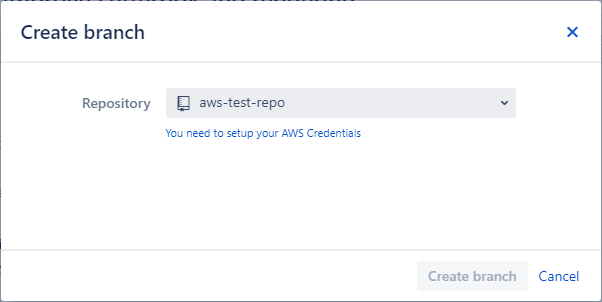
On the Jira development panel under Git integration, click Create branch. The following dialog is displayed,
-
Select a Repository from the list.
If there are several repositories with the same name, the listed GitLab repositories will have their names attached with a GitLab owner name. For example,
johnsmith/second-webhook-test-repo. -
Choose a Base branch (usually master).
-
Enter a Branch name or leave it as is (recommended).
-
-
Click Create branch to complete this process.
The newly-created branch appears on the development panel under Branches section.
Creating branches with Require user PAT enabled
If the Require user PAT setting is enabled in the Integration feature settings Actions ➜ Edit integration feature settings) and a user PAT isn’t configured yet for the selected repository via Repository Browser, the following create branch dialog is displayed instead.
Click the link label to setup the PAT.
The Setup your AWS Credentials dialog appears.
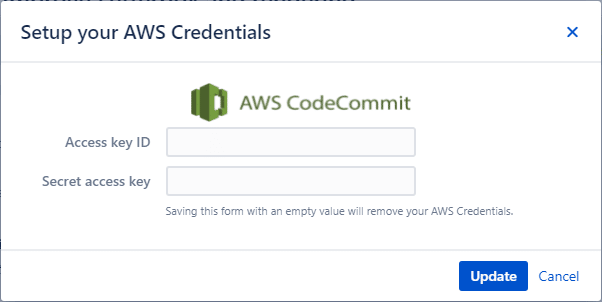
Enter the required credentials then click Update to complete this setup. You can now proceed to create branches and pull requests for the selected repository.
If an invalid secret access key was configured for the selected repository, the branch and pull request creation process will fail.
Creating pull requests
The pull request feature works the same as merge request.
-
On your Jira Data Center/Server instance, open the Jira issue where you previously created a branch.
-
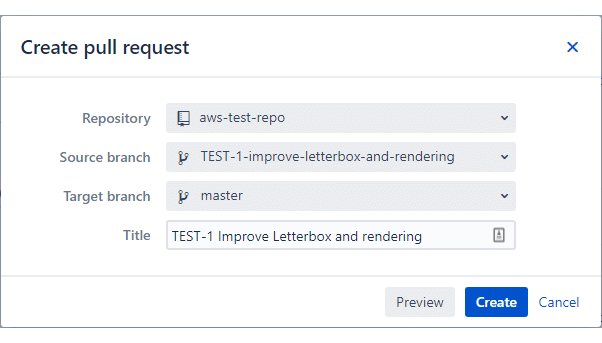
On the development panel under Git integration, click Create pull request. The following dialog is displayed.
-
Select Repository from the list.
If there are several repositories with the same name, the listed AWS CodeCommit repositories will have their names attached with an AWS CodeCommit owner name. For example,
johnsmith/second-webhook-test-repo. -
Choose the newly-created branch as the Source branch.
-
Set master as the Target branch.
-
Enter a descriptive title or leave it as is (recommended).
-
OPTIONAL — Click Preview to open this pull request in the Repository Browser ➜ Compare tab. See this page for more information.
-
-
Click Create to complete creating this pull request.
The pull request is listed on the developer panel of the Jira issue page.
The pull request is also ready for approval by the reviewers in your AWS CodeCommit web portal.
Creating pull request with Require user PAT setting enabled
If the Require user PAT setting is enabled in the Integration feature settings ( Actions ➜ Edit integration feature settings) and a user PAT isn’t configured yet for the selected repository via Repository Browser, the following pull request dialog is displayed instead.
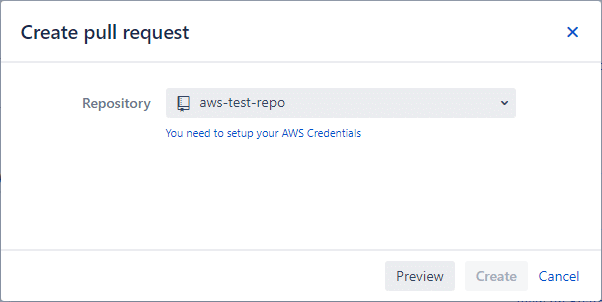
Click the link label to setup the PAT.
The Setup your AWS Credentials dialog appears.
Enter the required credentials then click Update to complete this setup. You can now proceed to create branches and pull requests for the selected repository.
Updating Require User PAT data
If the secret access key has changed for your AWS account, update the credentials via Repository Browser (dashboard menu Git ➜ View all repositories).
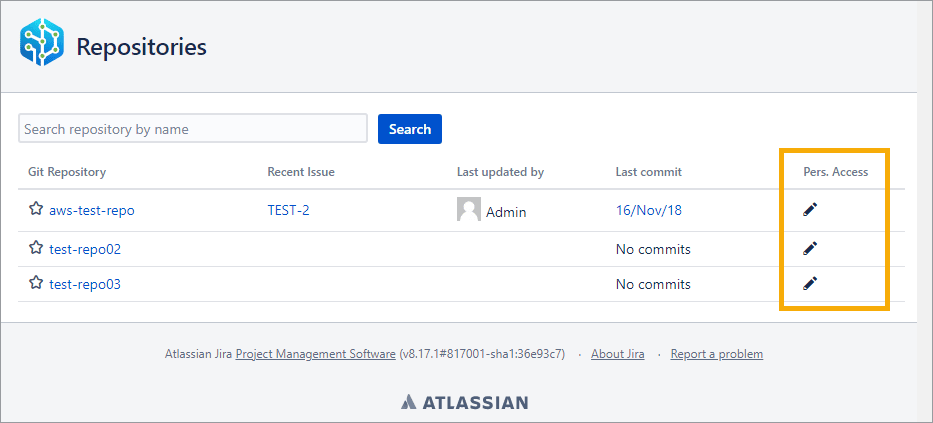
Click the edit ![]() icon under the Personal access column for the selected repository. The same dialog for Setup your AWS Credentials appears. Enter the updated Secret access key then click Update to save the settings.
icon under the Personal access column for the selected repository. The same dialog for Setup your AWS Credentials appears. Enter the updated Secret access key then click Update to save the settings.
More Integration Guides
GitHub.com (Git Integration for Jira Data Center/Server)
GitHub Enterprise Server (Git Integration for Jira Data Center/Server)
GitHub App integration (Git Integration for Jira Data Center/Server)
GitLab.com (Git Integration for Jira Data Center/Server)
GitLab CE/EE (Git Integration for Jira Data Center/Server)
Azure DevOps | Visual Studio Team Services (VSTS) (Git Integration for Data Center/Jira Server)
Azure DevOps Server | Team Foundation Services (TFS)
AWS CodeCommit (this page)
Gerrit (Git Integration for Jira Data Center/Server)
Bitbucket Server (Git Integration for Jira Data Center/Server)
Bonobo (Git Integration for Jira Data Center/Server)
Windows Network | Server Share (Git Integration for Jira Data Center/Server)
Tracked Folders (Git Integration for Jira Data Center/Server)
Back to: Integration basics (Git Integration for Jira Data Center/Server)
