Welcome, Jira administrators! In this page, you will be seeing some useful tips on how to get more productive using the Git Integration for Jira app.
Indexing Strategies
Smart commits
To improve performance, turn off smart commits on initial indexing then turn it back on after initial reindexing.

Indexing strategies to reduce strain on system
In some cases with large amount of repositories, there could be some frequent pushes that can have large changes. This can affect Jira performance and slow it down over time. Below are some tried approaches to help improve performance:
-
Disabling Revision Indexing for particular repositories. Select the “Do not index and link to the revision history” option on Update Repository settings page for repositories that you want to exclude from processing.

-
Turning off reindex scheduler + manual reindexing. The administrator performs reindex manually for all or particular repositories. No regular updates occur. This approach can be less convenient. To “temporarily” switch off scheduled reindexing, go to the General settings page and specify a very high value to Reindex interval. For example:
9,999,999.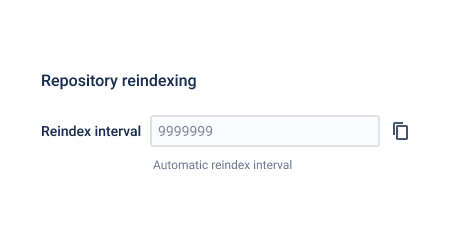
-
Turning off reindex scheduler + web hooks. This approach works for git hosts that supports the Webhooks feature, for example, GitHub and GitLab. The indexing will be called only when there are push events for some repositories. The process of one index call can be completed faster because the number of repositories that are to be indexed will become less compared to scheduled re-indexing. For this approach, set Reindex Interval to zero then enable Webhooks.
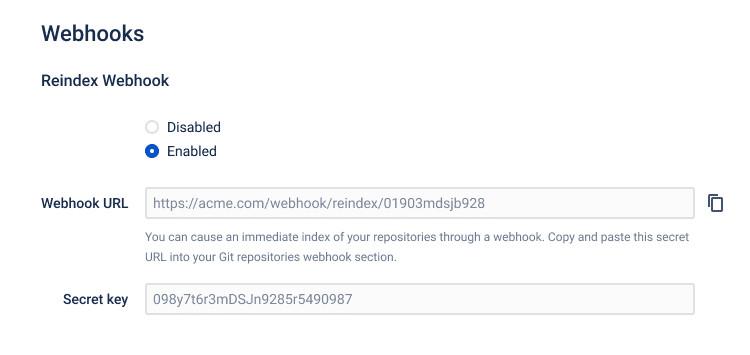
-
Disabling smart commits for particular repositories. The indexing process includes a phase for smart commits processing while detecting some commands against Jira issues. The length of the indexing process can reduced if smart commits is turned off for the particular repository. Smart commits are enabled by default for any newly connected repository.

Adding new repositories
When adding a new repository, users might be able to encounter an indexing issue where the progress takes a long time to finish. This can only happen for large remote repositories having long history and heavy file set. During this situation, we highly recommend to inspect it for some large branches or binary files.
We also suggest the following article which covers problems of large repositories and possible solutions for them. Look for the topic, Handling Repositories with Huge Binary Assets.
Timeout Strategies
This strategy will aid in the initial cloning of large repositories and repositories that have large files via Git Integration for Jira app.
- Go to dashboard manu Git ➜ Manage repositories ➜ General settings.
- Set the Git operations timeout setting by temporarily increasing the value. This will give ability completely perform the initial clone of a big repository.
- After the repository is cloned, roll back the timeout setting to the default value so that fetching updates are performed quicker.
For detailed information on this topic, see Git Admins – Increase Timeout Threshold.
Bulk Change
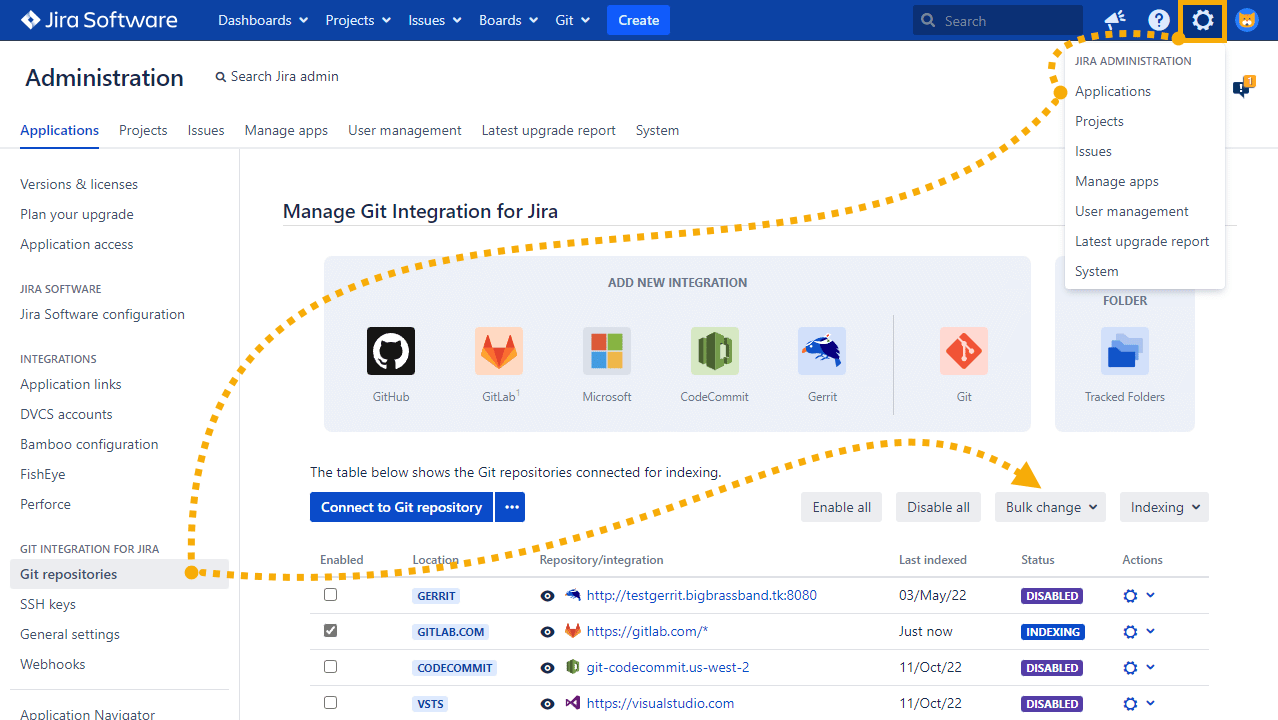
From your Jira dashboard, open the Jira Adminstration menu ➜ Applications then click Git Repositories on the sidebar. The Git Integration for Jira app repository configuration page is displayed. Use the Bulk Change dropdown to import or export git configuration.
The Bulk Change feature allows administrators to easily import or export repository configuration into a tab-delimited file. This feature is best suited for the following occasions:
-
When reinstalling the Git Integration for Jira app. Backup repository configuration by exporting it. Reinstall the Git for Jira app. Import the repository configuration again. This ensures automatic reconnection of the managed git repositories.
-
For administrators who have several git repositories. The Git for Jira app allows importing of multiple repository configuration using a tab-delimited file (.tsv). This will make managing large git repository list more efficient.
-
When moving your git repository configuration from an old Jira server to a new Jira server. Exporting and importing of git repository configuration via Bulk Change is quick and easy. The Git Integration for Jira Server app has the same export/import format with the Cloud version making a seamless transition.
The bulk change export function allows Jira administrators to create a backup copy of the git repository configuration into a tab-delimited file and can be edited using any spreadsheet application. When editing the tab-delimited file, the following rules must be considered:
- The header row is required.
- The columns must not be reordered.
- if a column field is ommitted, the Git Integration for Jira app will use the default values.
- Put the word delete in the delete column to confirm removal of the selected repository from the repository configuration upon bulk import.
When saving the file to a tab-delimited (.tsv) format:
- OSX users – select all data in Numbers and then paste into a text editor and save. Name the file with the .tsv extension (repo-example-00.tsv).
- Excel users – save the file as Text (Tab delimited) (*.txt). Rename the file’s .txt extension to .tsv.
- Google Drive – upload the file to this service. Right click the .tsv file then open it with Google Sheets. Make the necessary changes then go to File ➜ Download as ➜ Tab separated values (.tsv) to your local machine.
Webhooks
With Git Integration for Jira app, setting up webhooks on your remote git host offers almost instantaneous reindexing of git repositories. For example, if you made a change in a file from the git repository and then commit it, the Git Integration for Jira app can fetch it immediately and updates the changes into Jira. Administrators can enable/disable this feature via Jira Administration ➜ Add-ons/Applications ➜ Git Integration for Jira ➜ Webhooks.
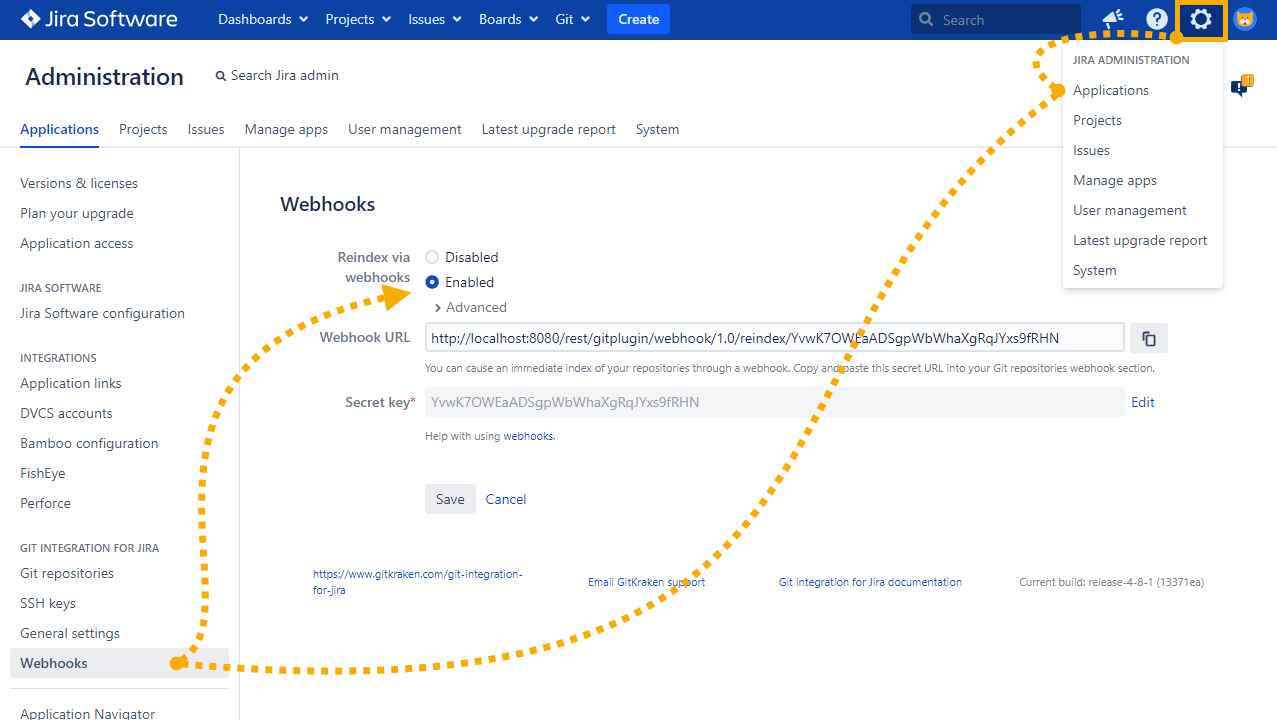
The secret key is provided at the time of the Git Integration for Jira app installation. Administrators can change this to a different value by generating another secret token from your git host. Use this key in the form of:
<JIRA_BASE_URL>/git/webhook/reindex/<SECRET_KEY>
For detailed information, usage and examples, see Hook and API Reference – Webhooks.
REST APIs
The Git Integration for Jira app supports REST APIs which can be used for automation process via scripts.
Bulk Change REST API
The bulk change API extends the possibility of importing and exporting repository configuration. There are three (3) methods:
-
Bulk Export (GET) – This API will return a tab-separated values (.tsv) file with the repository configuration.
-
Bulk Import (POST) – This API will start the process of importing repository configuration from the specified (.tsv) file.
-
Get Bulk Import Information (GET) – This API will obtain information about the importing thread.
For detailed information, usage and examples, see Hook and API Reference – Bulk Change REST API.
Repository REST API
The repository API allows the query and management of the project repository list. There are four (4) methods:
-
Retrieve Repository List (GET) – This API will retrieve the list of repositories mapped to a given project.
-
Add New Repository (POST) – This API will create a new repository from the given settings.
-
Update Existing Repository (PUT) – This API will update the existing repository using the given settings.
-
Delete Repository (DELETE) – This API will delete the existing repository from the Git for Jira app repository configuration list.
For detailed information, usage and examples, see Hook and API Reference – Repository REST API.
Reindex REST API
This REST API will give more control on the indexing. There are two (2) methods:
-
Reindex (POST) – This API will start the reindex process in a separate thread and returns the result immediately.
-
Reindex (GET) – Use this API to track messages for a particular thread.
For detailed information, usage and examples, see Hook and API Reference – Reindex REST API.
Commits REST API
The commits (GET) API can obtain commit information using a Jira issue key. There are three (3) methods:
-
showFiles (GET) – This API can be extended to review which files changed related to a specific Jira issue by adding
?showfiles=[true|false]as an optional parameter. -
Get Commit Issue Changes (GET) – This API returns the list of issues associated with the commit
-
Update Commit Issue Changes (GET) – This API updates the list of issues associated with the commit.
http://jira.yourorg.com/rest/gitplugin/1.0/issues/TST-234/commitsFor detailed information, usage and examples, see Hook and API Reference – Commits REST API.
Branches REST API
This API will obtain list of branches associated to a Jira issue. If the option parameter ?key={issuekey} is not defined, it will return all indexed git branches.
For detailed information, usage and examples, see Hook and API Reference – Branches REST API.
Tags REST API
This API returns several latest tags for the Jira issue. The tags are sorted in chronological order from newest to oldest. The result contains tag elements with basic information such as name of tag, associated commit data, associated repository settings, etc. The hasMore flag in the result indicates if an issue contains more tags
For detailed information, usage and examples, see Hook and API Reference – Tags REST API.
Tracked Folders (Jira Server/Data Center only)
On the git repositories configuration page, click the Connect to Git Repository dropdown then select Add tracked folder.
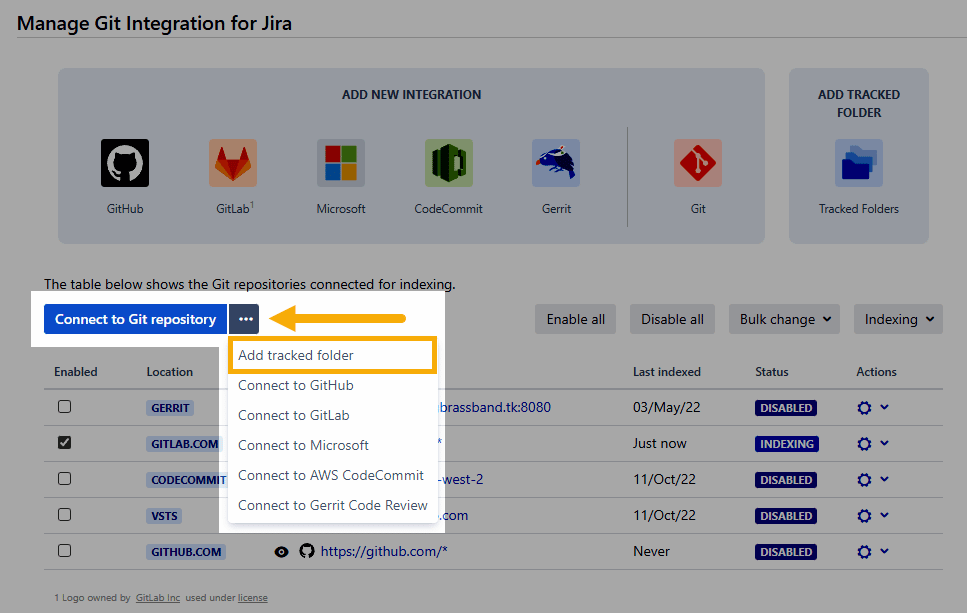
This feature scans a locally accessible path for cloned Git repositories and automatically imports those Git repository references into Jira. A repository group called FOLDER is added in the Git for Jira app repository settings.
The Add tracked folder wizard automatically adds the detected repositories to Jira. You can add multiple tracked folders in case your repositories are spread among multiple locations.
When removing a tracked folder (Not available in Jira Cloud):
-
Leave the checkbox unchecked to just remove the tracked folder setting from the repository configuration list. (The local path for this tracked folder will still remain in the local system for later use); or
-
Tick the checkbox to permanently delete the tracked folder and its files from the local system.
If a new repository is manually added into the local path, the Git Integration for Jira app will detect the new repository folder on the next reindex and add it into the existing tracked folder in Jira.
If a repository folder is manually deleted from the local path, the Git Integration for Jira app will remove the repository setting from the tracked folder in Jira on the next reindex.
