

![]()
Integrate Azure DevOps Server/TFS with Jira Data Center/Server
Quickly learn how to connect Azure DevOps Server/TFS git repositories via Git Integration for Jira Data Center/Server.
The Git Integration for Jira app supports Azure Repos.
- Integrate Azure DevOps Server/TFS with Jira Data Center/Server
- Permissions
- Creating a personal access token
- Integration supported platform
- Using Full feature integration
- Single repository integration (Manual integration)
- Webhooks and web linking
- Linking commits of Azure DevOps Server/TFS projects to Jira Data Center/Server
- Viewing git commits in Jira Data Center/Server
- Working with branches and pull requests
- Default branch
- Creating branches
- Pushing commits to the branch
- Creating pull requests
- Merging branch to master
- More Integration Guides
Permissions
Set Azure DevOps Server/TFS repository permissions according to your organization’s rules. Viewing commits from Jira requires the user to have at least Read or View permissions. For branch/pull request creation, set specific service users with Write permissions.
Creating a personal access token
For TFS 2017, TFS 2018 and Azure DevOps Server, you can generate a personal access token (PAT) for extra security. Use this token as password or as login key for auto-connect or manual integration with Git Integration for Jira app.
To create PATs, follow the simple steps outlined in in this article.
Integration supported platform
The Git Integration for Jira DC app supports the following Microsoft git services and the latest versions of Azure DevOps Server:
- Azure DevOps Server 2022
- Azure DevOps Server 2020
- Azure DevOps Server 2019
- Team Foundation Server 2018
- Team Foundation Server 2017
Using Full feature integration
Formerly called Auto-connect integration. This process requires at least an existing Contributor user access to Azure DevOps Server/TFS git projects.
We recommend using the Add new integration panel to connect multiple repositories from your Azure DevOps Server/TFS. This setup uses full feature integration offering functions and features not found on single repository connections.
-
On the Jira Data Center/Server dashboard menu, go to Git ➜ Manage repositories.
-
The git configuration page for connecting repositories is displayed.
-
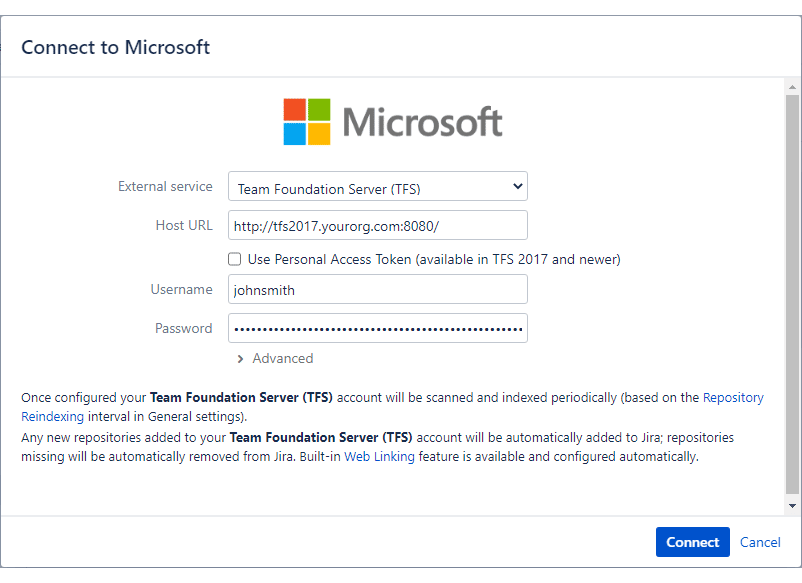
On the Add new integration panel, click Microsoft. The following screen is displayed.
-
Select Team Foundation Server (TFS). If you are using Azure DevOps Server, select that instead.
-
Enter the Host URL, Username and Password for this connection.
-
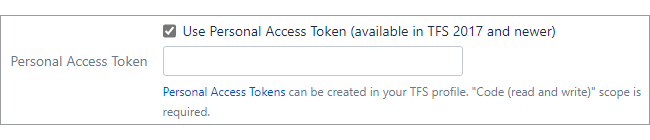
If PAT is configured in your Azure DevOps Server/TFS, tick the Use Personal Access Token checkbox and enter your PAT in the provided field. Do note that PAT is only supported on TFS 2017 and newer.
-
IMPORTANT!
Do NOT include the<DOMAIN>in the Username field when Azure DevOps Server/TFS is connected to Active Directory. The correct example is “BigBrassBandjohnsmith“ ➜ “johnsmith“ -
HELPFUL TIP!
The › Advanced twisty has the default /tfs path. Thus, there is no need to add the/tfsto the Host URL path. If you know your specific collection, type it in the provided box. The Git Integration for Jira app initially reads and imports all collection from the connected Azure DevOps Server/TFS integration.
-
-
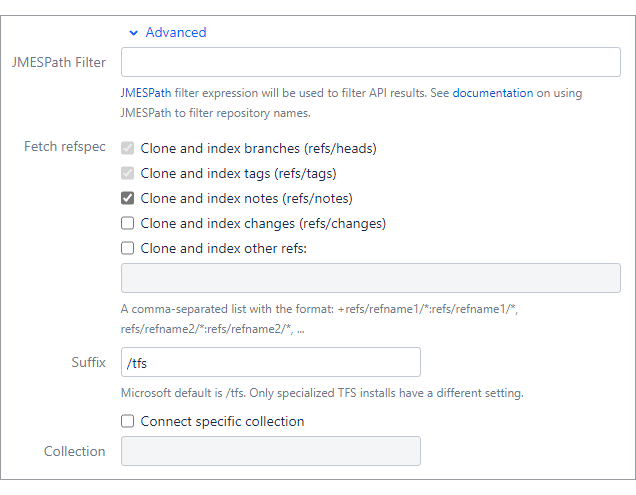
OPTIONAL! Configuring the Advanced settings is not required. However, admins/power users may set how the project listing is displayed with the following options:
-
JMESPath filter – JMESPath is a query language for JSON used to filter API results and to limit which repositories are integrated. The maximum allowed length is 2000 characters or less. Read about JMESPath expressions on their website.
For help with writing expressions, please contact support.
To learn more Azure DevOps Server/TFS examples, see article Working with JMESPath Filters.
-
If the field is empty, the Git Integration for Jira app will get all available accounts and then scans all available git repositories.
-
If the field is not blank, the app will assume it as a single account path and will try to use it. To connect to all available accounts, manually create integrations for each one of them.
-
-
Fetch refspec – Git refspecs contains patterns mapped as references from the remote to the local repository.
For more information, see Git Internals — The Refspec.-
The first two refspec options are required.
-
The rest of the options are OPTIONAL:
-
Clone and index ref notes (refs/notes) – This is a reference to
refs/notes/*used for fetching. This option is enabled by default. This affects git notes which are not shown:-
…when
refs/notesare disabled on connecting a repository. -
…when a new note comes when
refs/notesis disabled.
-
-
Clone and index changes (refs/changes) – This is a reference to
refs/changes/*used for fetching. This option is turned off by default. -
Clone and index other refs – This is a user-defined list of references used for fetching. It is a comma-separated list with the format:
+refs/refname1/*:refs/refname1/*,refs/refname2/*:refs/refname2/*, …
-
-
-
Suffix – This is a relative path that defaults to “/tfs”.
-
If this field is blank, the Git Integration for Jira app automatically appends the default “/tfs” suffix and scans for all the collections inside it.
-
If this field is not empty, the app assumes it as a single collection path and will try to use it.
-
-
Connect specific collection – Turn this on to allow setting a collection to use. Turn this off (default) to scan for all collections.
-
Collection – Enter a specific collection to use.
-
-
-
Click Connect to continue.
The Git Integration for Jira app lists available git repositories from Azure DevOps Server/TFS. Currently, all available accounts are scanned and corresponding URLs are created internally. Enable/disable repositories for use with Jira by ticking or unticking the checkbox for the selected repositories.
-
Click Import repositories.
Currently, all available accounts are scanned and corresponding URLs are created internally.
Repositories of the connected Azure DevOps Server/TFS can be automatically connected to Jira Data Center/Server. Repositories that are added or removed from Azure DevOps Server/TFS will be likewise connected or disconnected from Jira Data Center/Server.
-
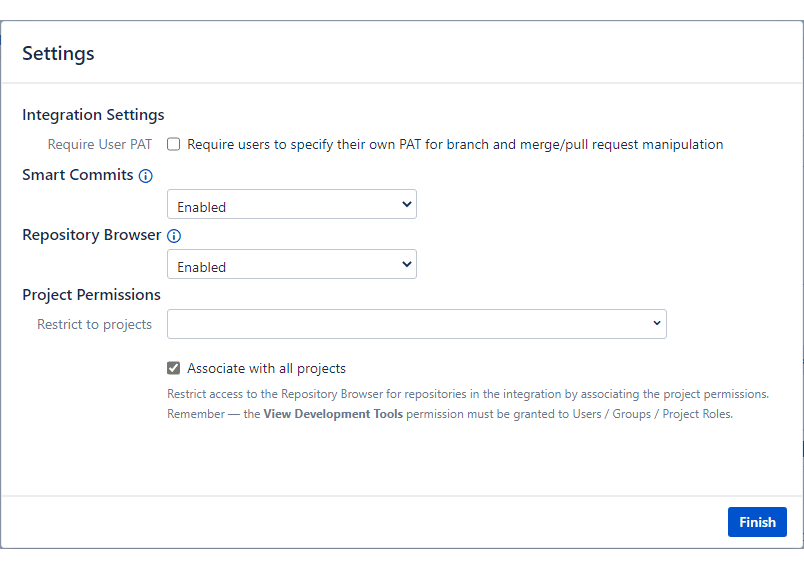
After the import process, the Settings dialog is displayed.
-
On the Integration Settings, setting the Require User PAT option to
ONwill require users to provide a PAT which will be used for branch and merge/pull requests creation/deletion (via the developer panel on the Jira issue page). The recommended Selected scopes setting for this isCode (read and write).For more information on this feature, see Integration settings: Require User PAT.
 PATs were introduced with TFS 2017 and newer. TFS 2013 and TFS 2015 do not support PATs. If this property is set to
 ON, the users will not be able to create/delete branches and pull requests. When the above setting is enabled, a branch or pull request cannot be created until a valid personal access token (PAT) is set.
 -
Set Smart commits and Repository Browser to enable/disable these features.
-
Set Project Permissions according to your organization’s project association rules. For detailed information, see Associating project permissions.
-
-
Click Finish to complete this setup. For now, only git projects are supported from Azure DevOps Server/TFS.
The Azure DevOps Server/TFS repositories are now connected to Jira Data Center/Server.
Single repository integration (Manual integration)
This process requires an existing Azure DevOps Server/TFS git repository. Look for the repository URL on the repository project page.
Choose between SSH or HTTPS. Use this information to connect the Azure DevOps Server/TFS git repository to your Jira server via Git Integration for Jira app:

-
On your Jira dashboard menu, go to Git ➜ Manage repositories.
-
Click Connect to Git Repository (or click Git icon on the Add new integration panel) to open the Connect Wizard.
-
Paste the URL from Azure DevOps Server/TFS web portal in the provided box.
-
Continue to the next step by following the screen instructions.
-
Click Finish to complete this process.
The repository is now connected to Jira Data Center/Server.
Webhooks and web linking
The Git Integration for Jira app automatically configures web linking for Azure DevOps/VSTS git repositories.
First – configure webhooks in the Git Integration app in Jira via the Git menu ➜ Manage repositories then click Webhooks (sidebar). Enable the feature and save the settings. Then follow these instructions to setup the webhook triggers. Azure DevOps Server/TFS webhooks will trigger an immediate index of all repositories within the integration.
For detailed step-by-step guide showcasing the webhooks setup, see this article.
For single repository connections, web link setup is optional. However, git links will become available in Git Commits tab when configured. For more information on this feature, see Web linking.
Linking commits of Azure DevOps Server/TFS projects to Jira Data Center/Server
For the following steps, a Azure DevOps Server/TFS and a Visual Studio environment that supports git is required.
-
Open Visual Studio IDE. Sign in to your Microsoft account, if prompted.
-
Connect to your Azure DevOps Server/Team Foundation Server:
-
Select a server in the dropdown list to connect to. If this is a new connection, add a new server by clicking the Servers… button.
-
On the next prompt dialog that appears:
-
Type your Azure DevOps Server/TFS Host URL
-
Enter Username and Password, if prompted.
-
-
Click OK to continue.
-
-
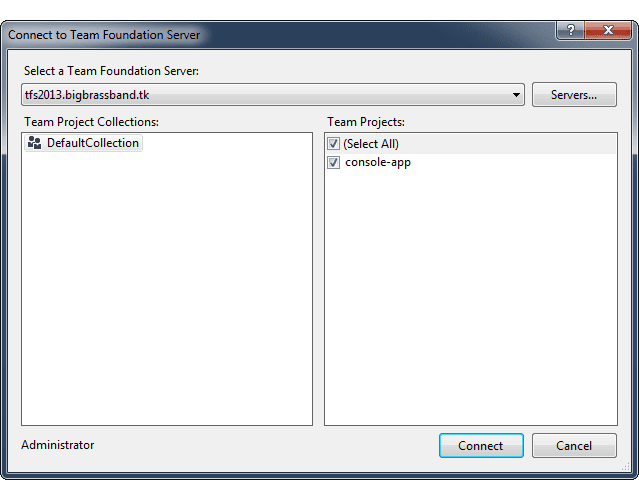
Select a Team Project to work on then click Connect.
For first time connection to the TFS/Azure DevOps Server team project, the default work branch is master. -
On the Team Explorer, click Unsynced Commits or Sync.
-
Click the Pull to clone the git repositories to your local machine.
-
Make changes to the code of a file/project.
-
On the Team Explorer, click Changes.
-
Type a message for this commit.
To associate this commit to the Jira issue page, mention the Jira issue key along with the commit message. For example: PRJ-123 Fix null code;Where
PRJ-123is the Jira issue key andFix null codeis the commit comment.
-
Click Commit and Push.
The commit is published to Azure DevOps Server/TFS. To view the commit in Jira, go to the Jira issue mentioned in the commit message. Click the Git Commits tab in the Activity row.

Viewing git commits in Jira Data Center/Server
-
Perform a git commit by adding the Jira issue key in the commit message. This will associate the commit to the mentioned Jira issue.
-
Open the Jira issue.
-
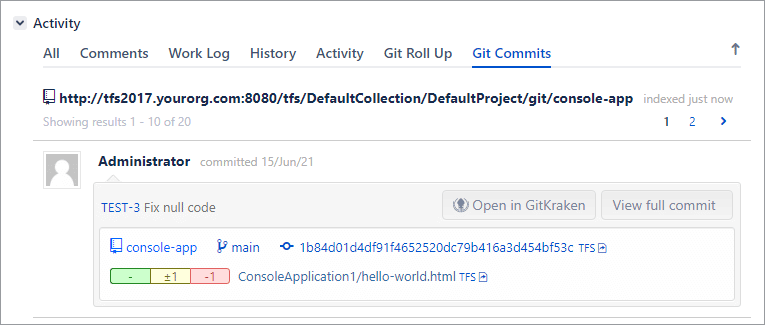
Scroll down to the Activity panel then click the Git Commits tab.
-
Click View full commit to view the code diff.
For more information on this feature, see Viewing commit code diffs.
Working with branches and pull requests
This process requires a Azure DevOps/VSTS git repository and a PAT with at least Code (read and write) scope.
Default branch
Most git integrations allow changing of the default branch of the repository/project other than “master”. This change is reflected in the Repository Settings of the Git Integration for Jira app on the next reindex. Repositories added via Add new integration support this feature where Git Integration for Jira app gets the default branch from almost all integrations and apply this setting at repository level.
Creating branches
-
On your Jira Data Center/Server instance, open a Jira issue.
-
On the Jira developer panel, go to Git integration section then click Create branch. The following dialog is displayed.

-
Select a Repository from the list.
-
Choose a Base branch (usually master).
-
Enter a Branch name or leave it as is (recommended).
-
If the Require User PAT option is enabled in the Integration Settings and a user PAT isn’t configured yet for the selected repository via Repository Browser, the following dialog is displayed instead:
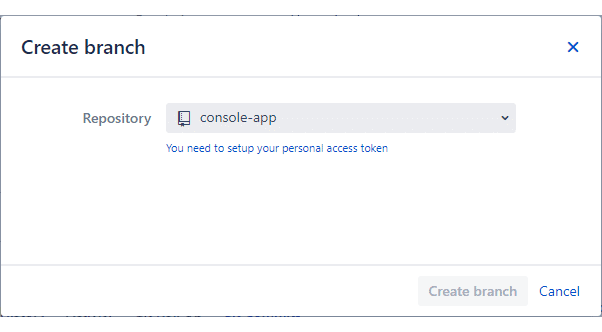
-
Click the link label below the repository selector to setup the PAT. The following dialog appears.

-
Enter your personal access token from your Azure profile settings.
-
When you click Update to save the settings:
-
If this field is blank and no PAT is provided, nothing is changed and saved.
-
If PAT has been previously configured and this field is blank, the PAT will be discarded.
-
If a PAT has changed since last configuration and is provided, the new PAT is used.
-
-
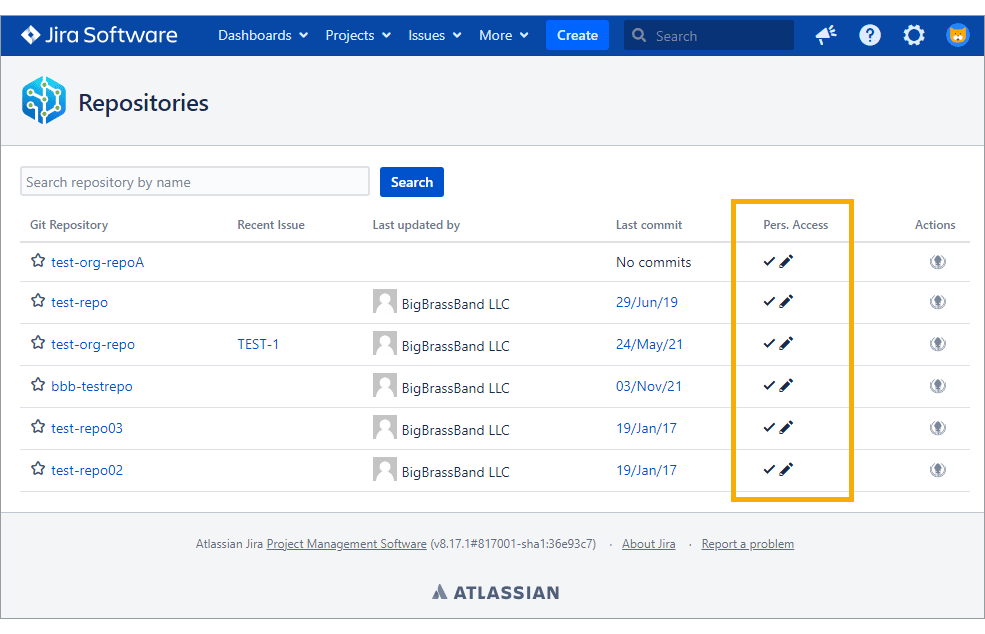
PAT settings can be accessed via Repository browser ➜ Pers. access column.
-
Click the edit
 icon to setup/reconfigure PAT. The checkmark adjacent to the edit icon indicates PAT has been configured.
-
-
-
Click Create branch. The newly-created branch is now listed in the developer panel under Branches.
Perform a commit to the newly-created branch to be ready for merge.
Pushing commits to the branch
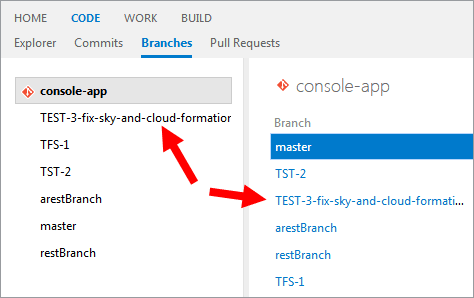
To update the branch list to your Visual Studio’s Team Explorer, perform a Pull action on the connected team project. The branches list in your VS IDE should be updated now.
-
On the Team Explorer, click Branches.
-
Click New Branch then select the newly-created branch from the dropdown list.
-
Click Create Branch. The selected branch is now listed under the Published Branches in the Team Explorer.
-
Make changes to a file or project then perform a commit to the selected branch:

-
On the Team Explorer, click Changes.
-
Make sure that Branch: displays the name of the newly-created branch. If not, select it again from the list.
-
-
Click Commit and Push.
The commit is pushed to the new branch and is now ready for merge.
Creating pull requests
The pull request feature works the same as merge request.
To create a pull request and merge it to the main source (master):
-
On your Jira Server, open the Jira issue where your previously created a branch.
-
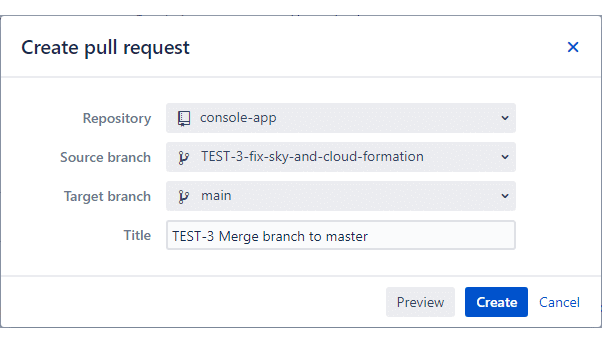
On the developer panel under Git integration, click Create pull request. The following dialog is displayed.
-
Select a Repository from the list.
-
Choose the newly-created branch as the Source branch.
-
Set master as the Target branch.
-
Enter a descriptive title or leave it as is (recommended).
-
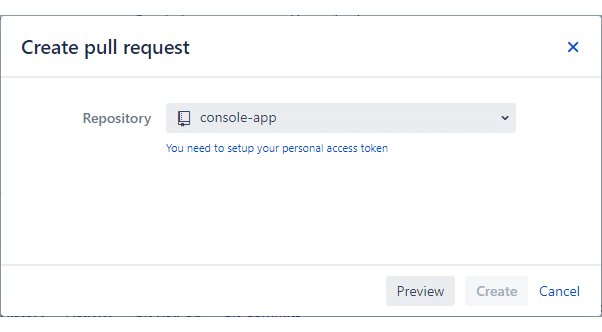
If the Require User PAT option is enabled in the Integration Settings and a user PAT isn’t configured yet for the selected repository via Repository Browser, the following dialog is displayed instead.
-
Click the link label below the repository selector to setup the PAT.
-
If an invalid PAT was configured for the selected repository, the pull request creation process will fail.
-
-
-
Click Create to create the pull request.
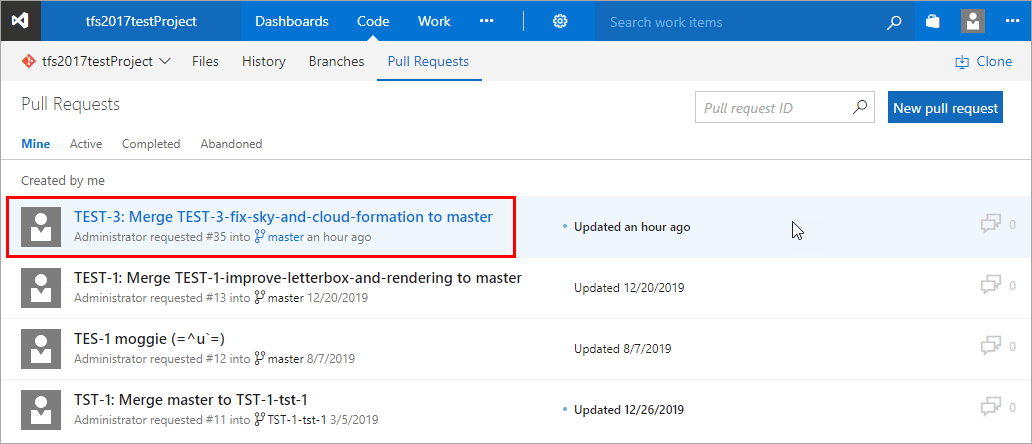
The pull request is listed on the developer panel of the Jira issue page.
The pull request is also ready for approval by the reviewers in your Azure DevOps Server/TFS web portal.
Merging branch to master
Continuing from the above steps, the current branch is ready for merge.
-
On your Team Explorer, go to Branches.
-
Click Merge.
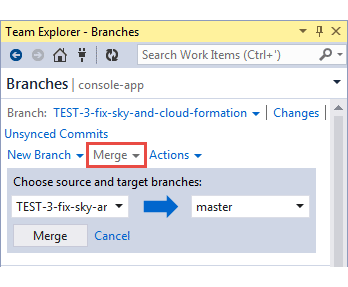
-
Set the source to the branch you pushed the commits to.
-
Set the target branch to master.
-
-
Click Merge to continue.
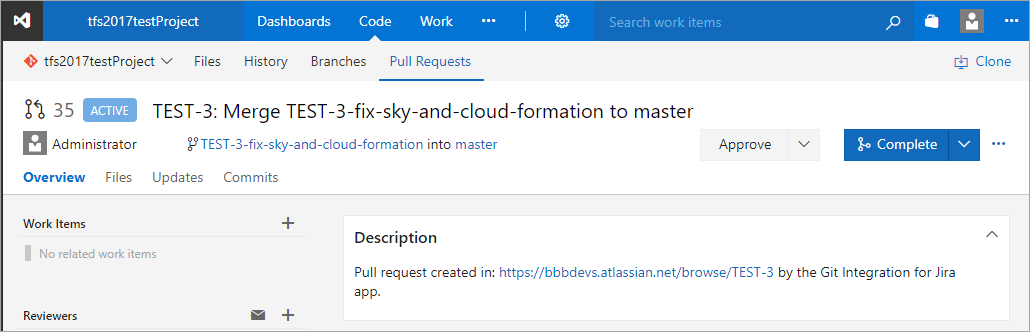
The reviewer’s approval is required to completely merge the pull request. This usually takes place in the Azure DevOps Server/TFS server web UI where your updated code is being reviewed.
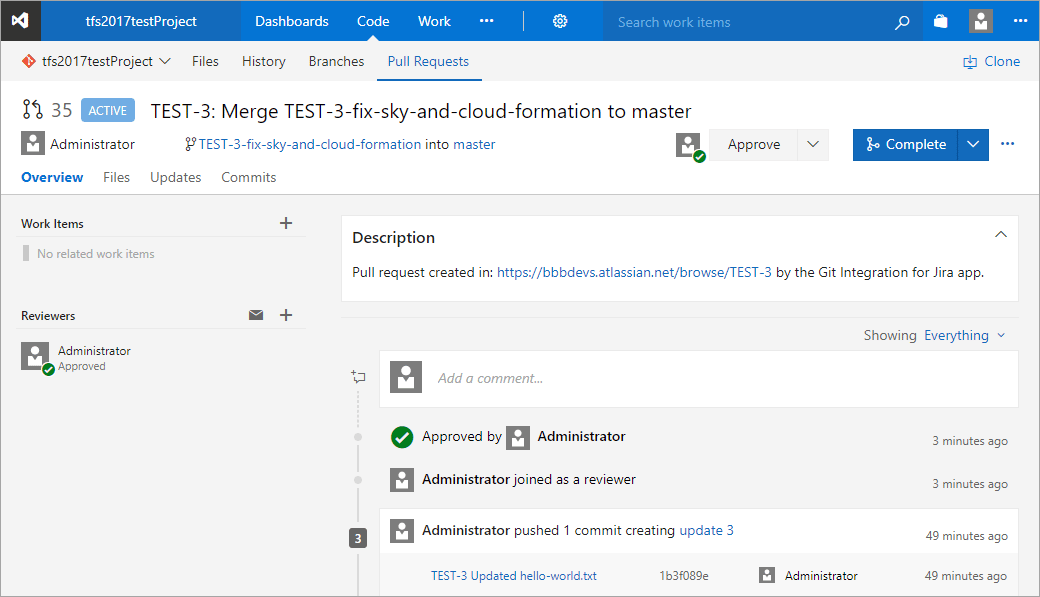
Once approved, the team leader or reviewer can then complete the merge. The commit can be viewed in the associated Jira issue page.
More Integration Guides
GitHub.com (Git Integration for Jira Data Center/Server)
GitHub Enterprise Server (Git Integration for Jira Data Center/Server)
GitHub App integration (Git Integration for Jira Data Center/Server)
GitLab.com (Git Integration for Jira Data Center/Server)
GitLab CE/EE (Git Integration for Jira Data Center/Server)
Azure DevOps | Visual Studio Team Services (VSTS) (Git Integration for Data Center/Jira Server)
Azure DevOps Server | Team Foundation Services (TFS) (this page)
AWS CodeCommit (Git Integration for Jira Data Center/Server)
Gerrit (Git Integration for Jira Data Center/Server)
Bitbucket Server (Git Integration for Jira Data Center/Server)
Bonobo (Git Integration for Jira Data Center/Server)
Windows Network | Server Share (Git Integration for Jira Data Center/Server)
Tracked Folders (Git Integration for Jira Data Center/Server)
Back to: Integration basics (Git Integration for Jira Data Center/Server)
