
- Jira users can be required to provide their own Personal Access Token when creating a branch or pull request. See Require Personal Access Tokens for user actions (create branch/pull request) for instructions on how to configure this feature.
- The View developer tools permission is required to view the Source Code panel (see more in Jira issue Git integration development panel. Jira users must also have the Browse Project permissions to a project associated with a repository to view.
- The Create branch feature can be disabled for all Jira users (regardless of permissions) in General settings.
This feature is not available for single or plain git repository connections.
Introduction
The Create branch feature offers Jira users the ability to create a git branch directly from the Jira issue.
For information about creating pull/merge requests from a Jira issue – see article Creating pull/merge request.
Advantages
When creating a branch from within Jira:
-
Automatically populates branch name with issue key (necessary for branch ⇿ Jira issue association) and issue summary.
-
Further – default branch naming conventions can be customized to match your development workflow.
For example:
${issuetype:New Issue,new,Bug Fix,bug}/${issuekey}-${summary}generatesbug/PRJ-123-add-more-loggingSee General settings for more information.
-
Require each Jira user to provide their Personal Access Token for creating branches. This option adds some friction to creating branches/pull requests but enabling this setting will enforce the git server user permissions as well as give better attribution for the actions.
For more information, see Require Personal Access Tokens for user actions (create branch/pull request) for more information.
Supported platforms
-
Full feature (Auto-Connect) integrations:
-
GitHub
-
GitLab
-
AWS CodeCommit
-
Azure DevOps
-
Microsoft Visual Studio Team Services (VSTS)
-
Microsoft Team Foundation Server (TFS)
-
Steps to creating a git branch in Jira
-
Prerequisite: Jira administrator configures a a full feature integration (auto-connect) via Add new integration panel in the Git Integration for Jira Data Center app. See Integration Guides for more information.
-
To access the Create branch action, do one of the following:
-
Open/expand the Git Development panel.
-
If not visible or displayed, enable in General settings.
-
-
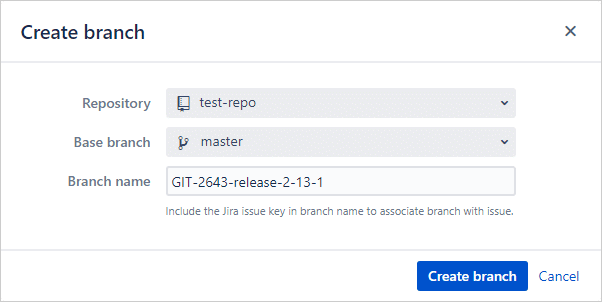
Click Create branch in one of the panels from step 2.
-
Select git repository. Use the search box to look for the specific name of the repository that will be used.
-
If a personal access token is required (and not yet provided) – follow on screen instructions to provide a personal access token with correct permissions for selected repository.
-
Select base branch.
-
Verify branch name is correct. Edit as desired.
Note: The Jira issue key must remain in the branch name to create the branch ⇿ Jira issue association. -
Click Create branch.
Video: Creating branch via Git Development panel
(UPDATED VIDEO COMING SOON)
The video shows Git Integration for Jira Cloud process but is also
applicable to the Jira Server version.
If you still have a question – reach out to our Support Desk or email us at [email protected].
See more Git Integration for Jira app features
Manager permissions (Git Integration for Jira Data Center)
Cancel indexing (Git Integration for Jira Data Center)
Pull request filters (Git Integration for Jira Data Center)
Tag filters (Git Integration for Jira Data Center)
Indexing queue viewer (Git Integration for Jira Data Center)
Deep linking feature (Git Integration for Jira Data Center)
GitHub App integration (Git Integration for Jira Data Center)
Git Integration + ScriptRunner (Git Integration for Jira Data Center)
Git Integration + Jira Automation (Git Integration for Jira Data Center)
Enforced git permissions for Jira users – Features (Git Integration for Jira Data Center)
Shared reindex queue between DC nodes (Git Integration for Jira Data Center)
Smart commits overview (Git Integration for Jira Data Center)
Associate Pull/Merge Requests to Issues Based on Commits (Git Integration for Jira Data Center)
Creating branches (this page)
Creating pull/merge requests (Git Integration for Jira Data Center)
Issue Git integration panel – Features (Git Integration for Jira Data Center)
