This page contains related questions about troubleshooting using Jira logs.
Use the FAQ below to find answers to common questions. Feel free to contact our support team via our Support portal if you don’t see what you’re looking for.
- How to create the support zip file?
- How do I enable debug logging level for Git Integration for Jira app?
- How do I enable debug logging level for GitHub?
- Where can I find the Jira logs?
How to create the support zip file?
Jira Cloud does not have the Support Zip feature.
Jira can produce a Support Zip file for diagnosing issues. This will give our support team a better view of the issue.

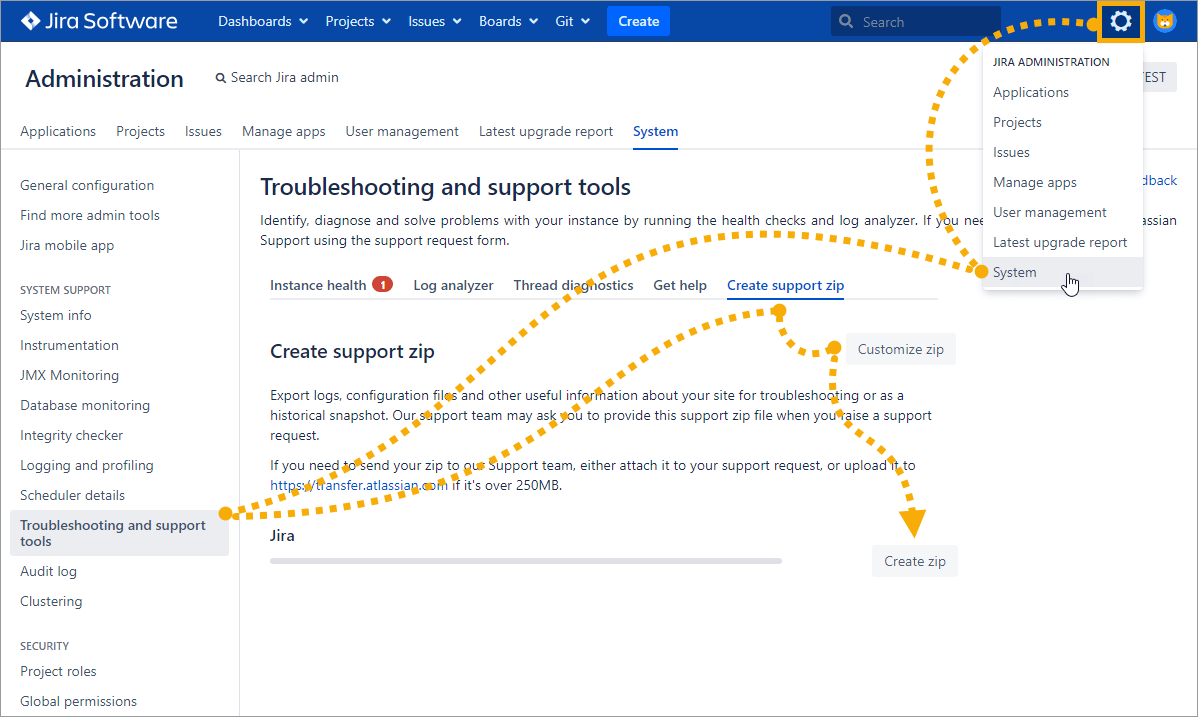
You can create this file by accessing the Atlassian Support Tools in your Jira:
-
On your Jira Server dashboard, go to Jira Administration.
-
Click System.
-
On the left sidebar, click Troubleshooting and support tools.
-
Click the Create support zip tab.
-
For Customize zip, leave all check marked options (recommended) or check/uncheck required information to generate.
RECOMMENDED! For Jira Data Center instances, you may include Thread dumps for performance analysis.
-
Click Create zip to start generating support data.
Locate the generated Support Zip file and send it via our Support portal.
How do I enable debug logging level for Git Integration for Jira app?
The debug logging level can be set by performing the following steps:
-
On your Jira dashboard, go to Jira Administration ➜ System.
-
On the sidebar, under System support, select Logging and profiling.
-
Scroll down to the Default Loggers section, then click Configure.

-
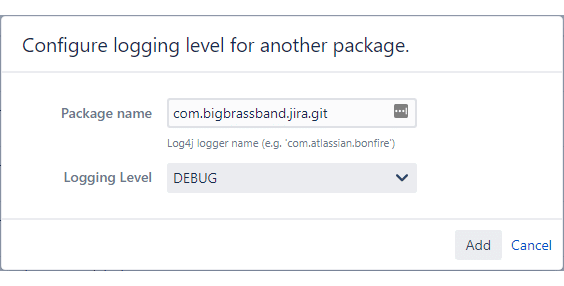
On the following screen, enter
com.bigbrassband.jira.gitfor Package name then set Logging Level to DEBUG.
-
Click Add to add this configuration to the Debug Loggers list.
Starting GIJ v4.22, webhook logging is added to the Jira logs. The log will contain whether a webhook event has been triggered and which payload the request had.
To report errors:
-
Collect errors and send log file via our Support portal.
-
Also, please add your Jira version, Git plugin version and OS used to run Jira.
How do I enable debug logging level for GitHub?
Turn on INFO logging for com.bigbrassband.jira.git.services.integration.github package. This will allow the GIJ app to track GetRepositories responses from GitHub.
-
On your Jira dashboard, go to Jira Administration ➜ System.
-
On the sidebar, under System support, select Logging and profiling.
-
Scroll down to the Default Loggers section, then click Configure.

-
On the following screen, enter
com.bigbrassband.jira.gitfor Package name then set Logging Level to DEBUG.
-
Click Add to add this configuration to the Debug Loggers list.
The GitHub responses are now logged in the atlassian-jira.log file (see below on how to find this file). Submit this log file to our support for analysis.
Make sure to turn off or remove this setting after the logs are acquired. Leaving this setting ON will greatly affect Jira performance.
Where can I find the Jira logs?
The Git logging is also found in the standard Jira logs. This can change based on how Jira was installed, which version you have, and which version you started with. Generally, start by looking at catalina.out in the Jira Tomcat directory.
If you need to troubleshoot the installation of the Git Integration for Jira app (or any Jira issue), the best place to turn to or check is the logs that Jira offers.
Please follow the directions from Atlassian: Atlassian Logging and Profiling and send us the following file:
-
atlassian-jira.log(if Windows) -
catalina.out(if Linux)
